ARRI Studio T12 / ARRI Studio T24
4 / 11
•
Entnehmen Sie die Lampe für den Transport aus dem
Scheinwerfer.
•
Schutzvorrichtungen dürfen nur zu Servicezwecken von
Fachpersonal entfernt werden und sind anschließend sofort wieder
anzubringen.
•
Der Betrieb des Scheinwerfers ohne Stufenlinse (10), Schutzgitter
(11) und/oder Reflektor (18) ist verboten.
•
Ersetzen Sie die Stufenlinse (10) und das Schutzgitter (11), wenn
diese durch sichtbare Beschädigung, z.B. durch Sprünge und tiefe
Kratzer, beeinträchtigt ist.
•
Eventuelle Glasbruchstücke sind rückstandslos zu entfernen.
•
Ersetzen Sie den Reflektor (18), wenn dieser durch sichtbare
Beschädigung beeinträchtigt oder matt ist oder eine Deformation
aufweist.
•
Halten Sie die Anschlusskabel vom Scheinwerfer fern.
•
Verwenden Sie das Netzkabel nicht zum Halten, Bewegen oder
Aufhängen des Scheinwerfers.
•
Vermeiden Sie die Bestrahlung durch andere Scheinwerfer und
andere Wärmequellen. Brandgefahr und Gefahr der Überhitzung.
•
Bei erkennbaren Schäden an Kabeln, Steckern, Lampenhalterung,
Lampe, Stufenlinse und Schutzgitter darf der Scheinwerfer nicht in
Betrieb genommen werden. Schäden müssen durch einen
zertifizierten ARRI Servicepartner behoben werden (siehe
www.arri.com).
•
Do not use the fixture without fresnel lens (10), wire guard (11)
and/or reflector (18).
•
Change the fresnel lens (10) and wire guard (11), if it has become
visibly damaged, for example by cracks or deep scratches.
•
Carefully remove glass splinters of broken lamps and fresnel lens
from the lamphead.
•
Change the reflector (18), if it has become visibly damaged,
deformed or blind.
•
Always keep the cables at reasonable distance away from the
housing.
•
Do not misuse the mains cable to hold, move or suspend the
fixture.
•
Avoid direct illumination by conventional luminaires or other heat
sources. Risk of overheating or fire!
•
Do not operate the lamphead if any damage to cables, plugs,
lampholder, lamp, fresnel lens and wire guard is detected.
Damaged components of the housing must be replaced by a
certified ARRI service partner (refer to www.arri.com).
Bauteil
Mögliche Schäden
Lampe
defekt, matt, deformiert
Kabel und Litzen
deformiert, Schnitte, angeschmort
Stecker
deformiert, Bruch, angeschmort
Lampenfassung
Bruch, Risse, angeschmort
Reflektor
matt, deformiert, fehlt
Stufenlinse und
Schutzgitter
Bruch, Kratzer, fehlt
Part
possible damage
lamp
dull, deformed, defective
cable
deformed, cuts, burnt
connector
deformed, broken, burnt
lamp holder
burnt, cracked, broken
reflector
dull, deformed, missing
Fresnel lens and wire
guard
broken, scratched, missing
Sicherung des Scheinwerfers und des Zubehörs
•
Bei hängendem Betrieb und beim Betrieb über Personen müssen
Sie den Scheinwerfer und das verwendete Zubehör mittels eines
zugelassenen Sicherungsseils gegen Herabfallen sichern.
•
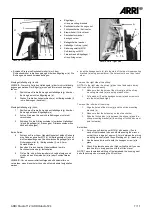
Führen Sie das Sicherungsseil durch die Sicherungsöse (13) des
Scheinwerfers und um die tragende Struktur.
•
Der Haltebügel (6) darf nicht zur Sicherung des Scheinwerfers
verwendet werden.
•
Das Sicherungsseil und seine Verbindungselemente müssen
mindestens für das 10-fache Gewicht des zu tragenden
Scheinwerfers und seines Zubehörs ausgelegt sein.
•
Halten Sie das Sicherungsseil so kurz wie möglich.
•
Das Zubehör muss korrekt in den Zubehörhalter (4) eingesetzt
werden. Die Torsicherung (12) muss geschlossen und eingerastet
sein.
•
Das Flügeltor muss mit einem eigenen Sicherungsseil gegen
Herabfallen gesichert werden.
•
Stative müssen standsicher aufgestellt und für die Traglast
ausgelegt sein. Beachten Sie hierbei das Gewicht des Zubehörs
und der Kabel. Lesen Sie hierzu auch die Hinweise im
"Sicherheitsmerkblatt für ARRI Scheinwerfer" L5.40731.E.
•
Der Haltebügel (6) darf nur senkrecht hängend oder stehend
montiert werden. Querbelastungen können zu Deformation oder
Bruch des Stativzapfens (7) oder des Bügels (6) führen.
To Secure the Luminaire and its Accessories
•
When mounted in a hanging position or above persons, use a
suitable safety cable to prevent the fixture and the attached
accessories against falling, when the primary mounting method
fails.
•
Always secure the lamphead with a safety cable mounted through
the safety eyelet (13) of the lamphead.
•
Lead the safety cable through the safety eyelet (13) of the
lamphead and the structure the luminaire is mounted to.
•
Do not use the stirrup (6) to secure the lamphead.
•
The safety cable and its connecting elements must be rated at a
minimum load of 10 times the weight of the fixture with its
accessories.
•
The safety cable must be kept short.
•
The accessories must be inserted correctly in the accessory
holders (4). The top latch (12) must be closed and snapped in.
•
The barndoor must be secured by an additional safety cable.
•
Tripods must be set up in a stable way and must be rated to carry
the required load. Please observe the weight of the accessories
and the cables. Please refer also to our leaflet "Operating your
ARRI Lampheads Safely" L5.40731.E.
•
The stirrup (6) must be mounted hanging or standing vertically.
Lateral load can cause deformation or breaking of the spigot (7)
and the stirrup (6).
Summary of Contents for T12
Page 12: ......


