Chapter 2
:
Wall-Mounting the TB130
Release 2.5 STANDARD 1.0 August 2017
Touchstone TB130 DC Output UPS User Guide
© 2017 ARRIS Enterprises LLC. All Rights Reserved.
6
If AC power fails after the battery is fully charged, then the battery provides DC power to
your Touchstone device. Once AC power is restored, the TB130 recharges the battery. The
LED on the TB130 flashes green to show the Touchstone device is running on battery power.
Your Touchstone device may provide further information about power status. See the User
Guide for your Touchstone device for details.
Wall-Mounting the TB130
Use this procedure to wall-mount the TB130.
Requirements
Two screws (#10 x 1.5in wood screws or equivalent) or drywall anchors
Pencil
Ruler
Drill with 1/8in (3.5mm) bit (for wood screws; if using drywall anchors, see the packaging
for correct drill size) and driver bit
Level
Action
To wall-mount the TB130:
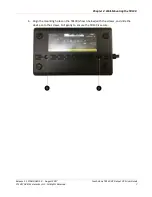
1.
Determine where you want to mount the TB130.
When mounting on drywall, either use drywall anchors or drive both screws into a stud.
2.
Mark two drill points 4in (102mm) apart, vertically. Use a level to make sure they are
straight.
3.
Drill pilot holes at the marks.
4.
If using drywall anchors, set them into the wall. If using wood screws, drive the screws
into the wall.
Leave a gap of about 1/8” (3 mm) between the screw head and the wall.
5.
Orient the TB130 as needed (so, for example, the AC power cord side is closest to the
nearest outlet).


