background image


46 

CHAPTER 5 - Transport and Installation


FlexiBowl® - Models 200 - 350 - 500 - 650 - 800


5.5.3


Compressed air connection 

The machine has a pneumatic drive.


Before setting up the compressed air connection, ensure that:


the compressed air supply system guarantees the right amount of air to the machine at the right pressure; 


the compressed air tank provided is properly sized.


The compressed air connection must be set up by connecting the main line to the machine circuit. 

The customer must also guarantee an air supply with the characteristics listed in the “Technical Specifications” section in t

his manual. 

CAUTION! 

Never exceed a pressure of 6 bar in the machine’s compressed air system.


CAUTION!


It is the responsibility of the user/customer to ensure that the main air handling unit is connected properly with 
rigid pipes, firmly fixed to prevent 

a whip effect or protected with other guards that prevent or block “jet” leaks.


Compressed air connection


Operator qualification


Mechanical maintenance technician


PPE required


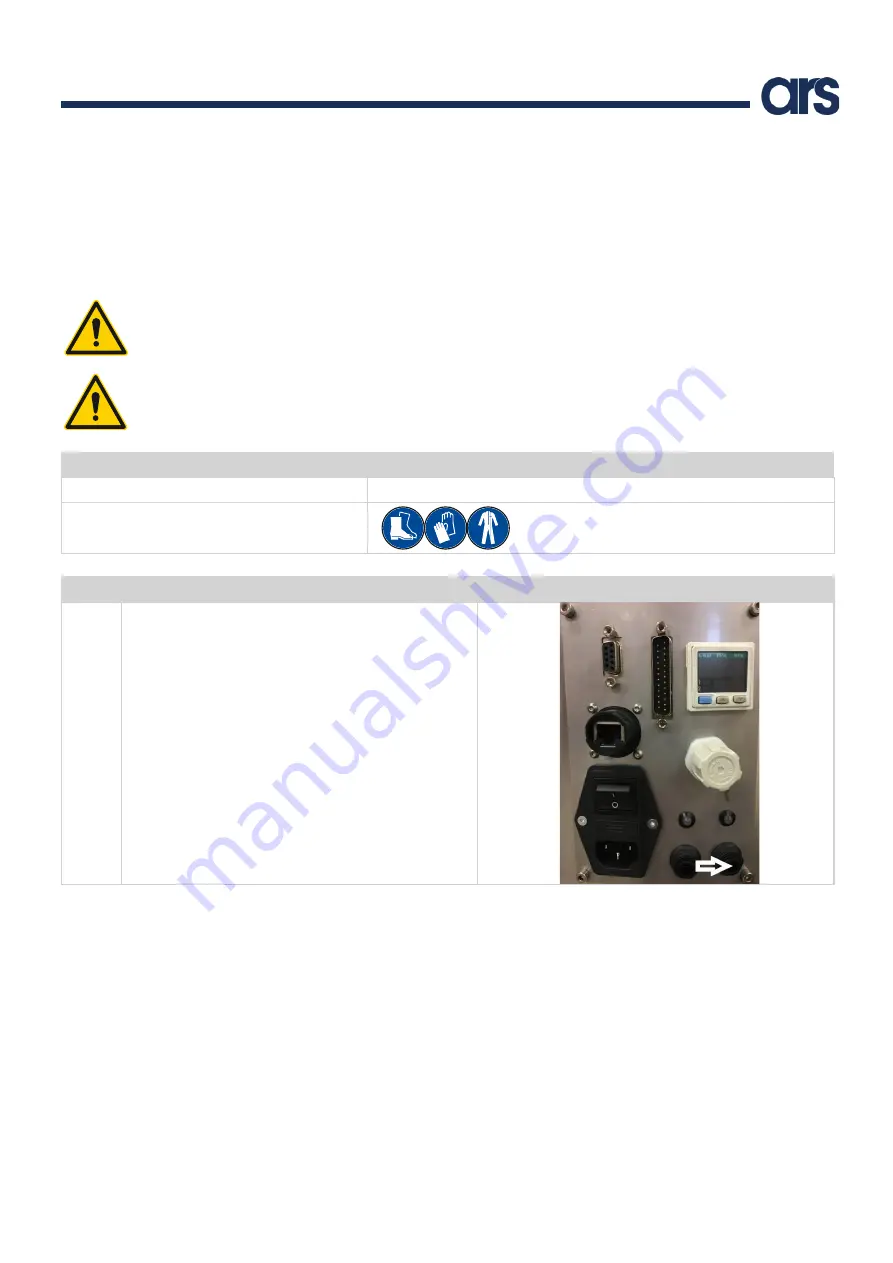
Proceed as described below for connection to the compressed air line:


Step


Action


Picture


1


Connect a Ø6 mm air pipe to the “Air Supply” socket in 

the control panel (as shown in the picture). The exact air 
pressure is indicated on the display above the pressure 
regulator.


Note:  make  sure  there  is  a  shut-off  valve  between  the 
room air supply and the Flexibowl®.


Summary of Contents for Flexibowl 200

Page 1: ...THE ORIGINAL INSTRUCTIONS Flexibowl Models 200 350 500 650 800 Manufactured Year 2020 Revision 1 7 Edition 04 2020 ARS S r l Via P Gobetti 19 52100 Arezzo AR Italia Tel 39 0575 398611 Fax 39 0575 398...

Page 2: ...e detailed further The Publisher is in no way responsible for the information and data in this manual all of the information contained herein has been provided checked and approved by the Manufacturer...

Page 3: ...sonal protective equipment 15 2 9 User s safe area 16 2 10 Warranty 17 3 SAFETY MEASURES 19 3 1 Safety devices 19 3 2 Noise 20 3 3 Vibrations 20 3 4 Electromagnetic compatibility 20 3 5 Residual risks...

Page 4: ...nd weights 39 5 3 Installation 40 5 3 1 Preparations by the customer 40 5 3 2 Permitted environmental conditions 40 5 3 3 Installation site 41 5 3 4 Machine position 41 5 4 Connections 42 5 5 Electric...

Page 5: ...ing via digital I O 68 6 3 3 3 Programming with Ethernet IP 69 6 3 4 Pressure adjustment 70 6 3 5 Switching off 70 7 MAINTENANCE 72 7 1 Safety warnings 73 7 2 Routine maintenance 74 7 2 1 Checks and i...

Page 6: ...3 2 Replacing the solenoid valve 85 7 3 3 Replacing the anti vibration mount 86 7 3 4 Replacing the Driver 87 7 3 5 Replacing the power supply unit 88 7 3 6 Replacing the motor 89 7 4 Troubleshooting...

Page 7: ...nufacturer s identification 1 2 Identification of the machine Machine Flexibowl Model 200 350 500 650 800 Year of Manufacture 2020 Manufacturer ARS S r l Address Via P Gobetti 19 52100 Arezzo AR Italy...

Page 8: ...s identification data to be provided to ARS S r l in case of need Pos Item 1 Manufacturer s logo 2 Serial no 3 Year of manufacture 4 Machine model 5 Supply voltage 6 Power 7 Air pressure CAUTION It i...

Page 9: ...ndards or with other regulations DLGS 17 2010 2006 42 EC Partly completed machinery In compliance with the directive 17 2010 including the use of 2006 42 EC We also hereby declare that the machinery d...

Page 10: ...compliance with the essential health and safety requirements of the Directive as well as the tests and inspections required by the applicable reference standards The technical construction file was pr...

Page 11: ...intact in its entirety If it is lost or damaged immediately ask for another copy it must be kept with the machine until it is scrapped even if it is relocated sold hired etc the attached manuals are a...

Page 12: ...an operator work on the mechanical parts for adjustments maintenance and repairs read pneumatic and hydraulic diagrams technical drawings and spare parts lists In extraordinary cases he she is traine...

Page 13: ...echnician Qualified technician employed by the Manufacturer and or its supplier for complex operations as he she knows the construction production cycle of the machine This person intervenes following...

Page 14: ...with or intended to be fitted with a drive system consisting of linked parts or components at least one of which moves and which are joined together for a specific application Malfunction Defective or...

Page 15: ...Obligation to wear safety glasses Indicates a requirement for personnel to wear safety glasses to protect the eyes Obligation to wear safety shoes Indicates a requirement for personnel to wear safety...

Page 16: ...ts These areas are considered hazardous and not accessible during normal machine operation Operators must be fully aware of the safety warnings and personal protective equipment to be worn Danger zone...

Page 17: ...llation and use of the machine in unsuitable premises removal of or tampering with the monitoring and safety devices guards photocells sensors micro switches etc removal of or tampering with the ident...

Page 18: ...18 CHAPTER 2 General Preliminary Information FlexiBowl Models 200 350 500 650 800 PAGE INTENTIONALLY LEFT BLANK...

Page 19: ...Rotary Discs the operator could be exposed to the bruising and or cutting hazard in case of contact with them Wear the appropriate P P E when working near these Rotary Discs CAUTION In case of emerge...

Page 20: ...ing mode are not dangerous to the health of the operators CAUTION Excessive vibrations can only be caused by a mechanical breakdown that must immediately be reported and fixed so as not to undermine t...

Page 21: ...CUTTING IMPACT HAZARD PICTOGRAMS Due to the presence of spikes on the Rotary Disc the operator could be exposed to the bruising and or cutting hazard in case of contact with them Wear the appropriate...

Page 22: ...ted the machine s electrical and air supply It is the responsibility of the user to analyse the risks that might occur while handling and installing at one s premises the analyses carried out on machi...

Page 23: ...prohibition is not complied with CAUTION The user must replace the warning plates which may become illegible as a result of wear The table below lists the pictograms on the machine Refer to the pictur...

Page 24: ...e followed routine maintenance is carried out within the times and in the ways indicated unscheduled maintenance is promptly carried out if required the safety devices are not removed and or bypassed...

Page 25: ...he electrical panel on the junction boxes on the cables and on all electrical components with the main switch turned off When starting the machine make sure there is nobody inside the danger zones Dur...

Page 26: ...ibowl 800 Backlit area dimensions 90 cm2 177 cm2 475 cm2 900 cm2 1183 cm2 Infrared backlight 20 000 30 000 hours 850 nm LED Ethernet ports 1 Digital I O 13 inputs 3 outputs Weight Flexibowl 200 Flexib...

Page 27: ...he machine 27 Instructions for use and warnings 4 5 Layouts 4 5 1 Flexibowl 200 Reference Flexibowl 200 A 470 mm B 427 mm C 319 mm D 264 mm E 15 mm F 10 mm G 254 mm H 230 mm I 216 mm L 289 5 mm M 191...

Page 28: ...200 350 500 650 800 4 5 2 Flexibowl 350 500 Reference Flexibowl 350 Flexibowl 500 A 326 mm 501 mm B 359 mm 533 mm C 10 mm 10 mm D 30 mm 28 mm E 380 mm 556 mm F 404 mm 580 mm G 300 mm 296 mm H 368 mm 3...

Page 29: ...4 5 3 Flexibowl 650 800 Reference Flexibowl 650 Flexibowl 800 A 662 mm 810 mm B 692 mm 842 mm C 410 mm 409 mm D 250 mm 325 5 mm E 716 mm 866 mm F 740 mm 890 mm G 296 mm 296 mm H 362 mm 362 mm I 28 mm...

Page 30: ...c making the parts jump It is located so that it flips the parts before they reach the vision window A Flip shield located above the disc over the Flip unit keeps parts from being ejected from the fee...

Page 31: ...CHAPTER 4 Description of the machine 31 Instructions for use and warnings...

Page 32: ...ore a production change The Quick Emptying option can be commanded via digital I O or software When a Quick Emptying command is sent a portion of the ring lowers to let the residual pieces come out Th...

Page 33: ...CHAPTER 4 Description of the machine 33 Instructions for use and warnings...

Page 34: ...lexibowl is available in four models 200 350 500 650 and 800 Each model is built mainly of stainless steel with anodised aluminium parts 4 8 1 Processing cycle A simplified description of the processi...

Page 35: ...fting and handling operations must only be carried out by specialised and trained staff who are qualified for these activities The machine is designed to be packed transported and assembled using a fo...

Page 36: ...is discovered leave the packaging in question as it was found and immediately ask the competent shipping company to assess the damage afterwards send a damage report to inform the transport company s...

Page 37: ...rklift truck under the wooden crate containing the machine 2 Make sure the forks come out of the front of the load by at least 5 cm far enough to eliminate any risk of the transported part from overtu...

Page 38: ...t of the crate CAUTION 2 operators are needed to manually lift the Flexibowl out of the wooden crate To handle the machine and or its parts see the Transport and handling section 5 1 4 Disposing of th...

Page 39: ...ions personnel duly trained to safely perform the loading unloading and handling operations with lifting equipment and who are aware of the accident prevention rules CAUTION ARS S r l shall not be hel...

Page 40: ...in hail snow fog suspended dust combustible dust protected from aggressive agents such as corrosive vapours or sources of excessive heat and it must not be ATEX classified It is not permitted to use t...

Page 41: ...stable surface Note if the Flexibowl is installed on a machine platform sensitive to vibrations put some insulating and vibration damping material between the platform and the Flexibowl 2 Fix the Fle...

Page 42: ...customer s power supply has already been disconnected The buyer is responsible for compliance of the connection between the machine and the earthing system CAUTION The operation must only be carried o...

Page 43: ...ceed as described below for connection to the mains AC Step Action 1 Connect the system to the power supply Note the power cable is not supplied by ARS s r l 2 Make sure the earthing system is install...

Page 44: ...Alarm 10 Quick Emptying 11 Emptying Door open Read only 12 Emptying Door closed Read only 13 24Vdc out 14 24Vdc common 15 24Vdc out 16 Strobe Backlight 17 Strobe Backlight Note If the strobe light is...

Page 45: ...ts the functions of each contact of the Output connector DE9F Pin Signal Picture 1 Busy 2 Ready 3 Fault 5 Common 4 6 7 8 9 Below is an example of an output connection Output electrical specifications...

Page 46: ...this manual CAUTION Never exceed a pressure of 6 bar in the machine s compressed air system CAUTION It is the responsibility of the user customer to ensure that the main air handling unit is connecte...

Page 47: ...nect a 6 mm air pipe from the Air Blow socket in the control panel to the Air Blow unit 5 5 4 2 Mapping of connections between the control devices The Flexibowl is supplied already wired If necessary...

Page 48: ...lation FlexiBowl Models 200 350 500 650 800 5 5 4 3 Connecting the user interface Proceed as described below to connect the user interface Step Action Picture 1 Connect the user interface to the Ether...

Page 49: ...eration the machine does not need to be continuously manned by an operator CAUTION Using the machine for a purpose other than intended by the Manufacturer can cause serious damage to people and or pro...

Page 50: ...OR The pressure regulator controls the strength with which the Flip unit bumps the underside of the rotating disc to flip the parts over Note The pressure regulator does not control the pressure of th...

Page 51: ...ram supplied on the USB Note if you have an older version of the program it must be uninstalled first 2 Connect the Flexibowl with an Ethernet cable 3 Turn the device on 4 Run the program 4 For the co...

Page 52: ...inserted 3 Default It inserts in the pop up table the default Flexibowl IP addresses 4 Read from Drive It reads the currently set IP addresses 5 Save to Drive It saves the currently set IP addresses...

Page 53: ...N Disconnect the power supply before performing the following procedure For the Flexibowl 200 and 350 follow the instructions below to place the dip switch in a different position from the current one...

Page 54: ...ow to place the dip switch in a different position from the current one Step Action Picture 1 Unplug the power cable in the control panel 2 follow the procedure described in Chapter 7 3 1 replacing th...

Page 55: ...mmands It opens a window to try a sequence of several combined movements 3 Monitor It opens a window to monitor the I O statuses of the Flexibowl the status of the driver and any list of errors 4 Cons...

Page 56: ...Acceleration Acceleration used for each subsequent Move command 3 Deceleration Deceleration used for each subsequent Move command 4 Speed Speed in RPM at which the Flexibowl will advance at each subse...

Page 57: ...Speed in RPM at which to shake the Flexibowl at each subsequent shake command 5 CCW Angle Counterclockwise angle the Flexibowl moves for each shake at subsequent shake command 6 CW Angle Clockwise an...

Page 58: ...milliseconds 5 Light Turn the backlight on off 6 Enable Digital I O Enable the option to command the Flexibowl via I O Note The Flexibowl must be restarted to apply 7 Test Flip It performs a Flip comm...

Page 59: ...he available commands 3 Add command It is used to enter the command selected in the work sequence 4 Selected Commands List of commands added to the work sequence 5 Loops Number It is used to set the n...

Page 60: ...k the Flexibowl status and eventually if are present some alarms 6 2 5 1 I O Status Pos Item Description 1 I O Status View the inputs and outputs status 2 Input status It shows the input status in the...

Page 61: ...CHAPTER 6 Controls and use 61 Instructions for use and warnings 6 2 5 2 Driver Status Pos Elemento Descrizione 1 Driver Status It shows the Flexibowl status...

Page 62: ...wl Models 200 350 500 650 800 6 2 5 3 Alarm Status Pos Elemento Descrizione 1 Alarm Status It is used to view the Alarm present in the Flexibowl 2 Alarm Type of alarm present in the Flexibowl 3 Reset...

Page 63: ...Pos Item Description 7 Console It is used to send a command to the driver 7 A Command Window Command terminal window 7 B Command area It is used to send a command to the driver Note The command is se...

Page 64: ...et It resets the Flexibowl at factory default status Before pressing the Factory Reset button you have to select the Flexibowl model Flexibowl Model if the Flexibowl is clockwise or counterclockwise F...

Page 65: ...Check that the power supply phases are correct Check that the surface is free to rotate Check that the Flip can run its stroke without obstruction Check that the machine is not under Maintenance 6 3 2...

Page 66: ...with the current parameters QX10 Blow Turns the Air blow on with the current parameters QX11 Quick Emptying Perform the Quick Emptying sequence of the Flexibowl QX12 Reset Alarm Reset the alarm and e...

Page 67: ...at are made with every Shake instruction Example sh_count 3 means that the Flexibowl will move counterclockwise at an angle of ccw_angle clockwise at an angle of cw_angle for 3 times 1 positive 8 Cloc...

Page 68: ...to turn green after about 2 seconds the Flexibowl will be in I O mode The operating principle is as follows Apply 24Vdc to the input relating to the command to be carried out for about 50ms The Busy o...

Page 69: ...grammed and controlled from the PLC by the Ethernet IP protocol The PLC must be equipped with a suitable port to communicate with the aforesaid protocol and must be configured with the correct eds fil...

Page 70: ...ockwise will increase it 2 When the pressure has been adjusted as required push the knob towards the power supply and the setting will automatically be locked in Note This prevents accidental changes...

Page 71: ...CHAPTER 6 Controls and use 71 Instructions for use and warnings PAGE INTENTIONALLY LEFT BLANK...

Page 72: ...ance staff must be well trained and have thorough knowledge of the accident prevention regulations unauthorised staff must stay outside the work area during the operations Machine system cleaning and...

Page 73: ...machine in working condition and or with the protections disabled requires adequate skill and knowledge and extreme care by the maintenance technician who must be appropriately trained on possible an...

Page 74: ...and interventions to be carried out following a recommended timetable The frequency of the routine maintenance operations indicated refers to normal operating conditions i e that meet the intended co...

Page 75: ...works properly Check that the safety devices work properly Check the Rotary Disc conditions before every start up Replace at least once a year Check for wear of the relays Check that the fuses works...

Page 76: ...rly Step Action 1 Check that the machine covers are in place and fixed properly 2 Check that the power cable is not damaged and or worn 7 2 1 3 Checking for wear of the drill Proceed as follows to che...

Page 77: ...and Air Blow and 3 mechanical relays which control the READY FAULT STATUS LED on the control panel the Quick Emptying option and the backlight There are also 4 protection fuses Position Item 1 24Vdc...

Page 78: ...the Rotary Disc should be replaced every 3 months if used with particularly sharp components yearly in any case it is recommended to replace the Rotary Disc at least once a year Proceed as follows to...

Page 79: ...on abrasive products such as degreasers or common household soap To remove fragments and dust use a brush and wear safety glasses CAUTION Do not use acids or solvents to clean the Rotary Disc 7 2 3 1...

Page 80: ...ilter Proceed as described below to clean the air filter Step Action Picture 1 Disconnect the power and air supply of the machine 2 Take the cover off the Flexibowl 3 Rotate the filter holder to unloc...

Page 81: ...Disc Step Action Picture 1 Unscrew the flange fixing screws with an Allen key and leave them in position 2 Turn the flange counterclockwise and remove it 3 Remove the Rotary Disc and clean it with al...

Page 82: ...nd air supply of the machine 2 Manually remove any product residues 3 Remove the dirt with non flammable and non toxic commercial cleaning solvents 4 If necessary use a vacuum cleaner to remove any re...

Page 83: ...ied out will be agreed with the routine maintenance technicians and the most suitable solution will be chosen from the list below the Manufacturer will send an authorised trained and qualified technic...

Page 84: ...sed Allen key small Phillips screwdriver CAUTION Disconnect the power supply before taking the cover off Proceed as follows to replace the backlight Step Action Picture 1 Follow the procedure describe...

Page 85: ...cover off the Flexibowl 3 Remove the solenoid valve power cable 4 Unscrew the 2 fixing screws A Note keep the removed screws for reassembly 5 Remove the solenoid valve and replace it with one with th...

Page 86: ...BRATION MOUNTS Operator qualification Mechanical maintenance technician PPE required Tool to be used Allen key Proceed as follows to replace the anti vibration mounts Step Action Picture 1 Disconnect...

Page 87: ...len key CAUTION Disconnect the power supply before taking the cover off Proceed as follows to replace the Driver Step Action Picture 1 Unplug the power cable from the control panel 2 Take the cover of...

Page 88: ...l to be used Allen key CAUTION Disconnect the power supply before taking the cover off Proceed as follows to replace the power supply unit Step Action Picture 1 Unplug the power cable from the control...

Page 89: ...as follows to replace the motor on models 200 and 350 Step Action 1 Unplug the power cable from the control panel 2 Take the cover off the Flexibowl 3 Take the Rotary Disc off 4 Loosen the shrink disk...

Page 90: ...cover by unscrewing the screws that secure it to the surface 5 Loosen the screws of the motor 6 Loosen the screw that tensions the belt until it is possible to remove the belt from the motor s pulley...

Page 91: ...inside the interface board and replace it if necessary Note if the problem persists contact ARS S r l 4 The Flip does not work Check that the screen displays the correct pressure Check the air pressu...

Page 92: ...lution 6 The backlight does not work Check that the power supply is correct and working Check operation of the backlight relay inside the interface Check the condition of the fuse inside the interface...

Page 93: ...icised or galvanised ferritic steel 300 400 series stainless steel plastic polyethylene material elastomers PTFE graphite gear oil lubricating grease electric motors power cables with relative sheaths...

Page 94: ...machine CAUTION For disassembly of trade parts or sub supply materials that are part of the machine supplied by ARS S r l please see the relative supplier s manual Pursuant to the WEEE Directive 2012...

Page 95: ...CHAPTER 8 Decommissioning and disposal 95 Instructions for use and warnings 9 Attachment Attachments A Flexibowl Rotary Discs B Flexibowl 2 0 what changes...

Page 96: ...Istruzioni di uso e di avvertenza ARS S r l Via P Gobetti 19 52100 Arezzo AR Italia Tel 39 0575 398611 Fax 39 0575 398620 info arsautomation com www arsautomation com...

Reviews: