background image

23

215 Tremont Street

(716) 436-3942 (FAX)

Rochester, NY 14608 USA

We’re on-line!

For Product information, questions, applications, tips, answers and
general discussion with A R T employees look for A R T on the
Internet.. Email us at artroch@aol.comCheck out our Web Page at:
http://www.artroch.com

Warranty and Service Information

Limited Warranty

Applied Research and Technology, Inc. will provide warranty service
for this unit in accordance with the following warranty
statement.Applied Research and Technology, Inc. (A R T) warrants to
the original purchaser that this product is free from defects in
workmanship and materials for a period of three years from the date of
purchase. A R T will, without charge, repair or replace, at its option,
defective product or component parts upon prepaid delivery to the
factory service department or an authorized service center,
accompanied by proof of purchase date in the form of a valid sales
receipt.EXCLUSIONS: This warranty does not apply in the event of
misuse or abuse of the product or as a result of unauthorized
alterations or repairs. This warranty is void if the serial number is
altered, defaced or removed.
A R T reserves the right to make changes in design and make
additions or improvements upon this product without any obligation to
install the same on products previously manufactured.A R T should
not be liable for any consequential damages, including without
limitation damages resulting from the loss of use. Some states do not
allow limitation of incidental or consequential damages, so the above
limitation or exclusion may not apply to you. This warranty gives you
specific rights and you may also have other rights, which vary, from
state to state.For products purchased outside the United States, service
will be provided by an authorized distributor of Applied Research and
Technology, Inc. products.

Service

The following information is provided in the unlikely event that your
unit requires service. Use this procedure to return units in the United

Summary of Contents for Tube Channel

Page 1: ...TUBE CHANNEL USER S MANUAL ...

Page 2: ...utput 8 OPTICAL COMPRESSOR CIRCUIT 9 Slope Switch 9 Speed Switch 9 Compressor Bypass Switch 9 Compressor Threshold and Output Controls 10 Compressor Threshold Control outer control 10 Compressor Output Level Control inner Control 10 Clip Indicator 11 EQUALIZER CIRCUIT 11 Low Frequency Control 11 Low Shift Switch 11 Lo Mid Frequency Control 12 Lo Mid Shift x 10 Switch 12 Hi Mid Frequency Control 12...

Page 3: ...P INSERTS 15 Preamp Compressor Loop 16 Compressor EQ Loop 16 Loop Connections 16 APPLICATIONS 17 SPECIAL EFFECTS 18 EQ TIPS 19 What is the best way to use EQ 19 TUBE REPLACEMENT 20 BLOCK DIAGRAM 21 A R T TUBE CHANNEL SPECIFICATIONS 22 WE RE ON LINE 23 WARRANTY AND SERVICE INFORMATION 23 LIMITED WARRANTY 23 SERVICE 23 ...

Page 4: ...ization circuitry XLR balanced inputs and outputs TS unbalanced inputs and outputs A Custom extruded aluminum chassis unbalanced insert points between the preamp and compressor and between the compressor and equalizer 48V phantom power Phase reversal Over 70dB of gain Detented rotary controls Compression and limiting ratios Selectable release time settings 90dB dynamic range An Internal power supp...

Page 5: ...recording channel a mic line preamp or a DI direct box the Tube Channel is designed to work seamlessly with any recording sound reinforcement or electronic instrument setup A R T s Tube Channel circuitry is a hybrid design utilizing the latest most advanced solid state and tube technology With a transformerless design the Tube Channel maintains exceptional signal integrity and extremely low noise ...

Page 6: ... in great sounds from even the poorest of sources Setting Up Unpacking Your Tube Channel was packed with care at the factory The shipping carton was designed to protect the unit during initial shipment Please retain this carton for use in transporting the Tube Channel or in the unlikely event that you need to return your Tube Channel for servicing AC Power Hookup The Tube Channel has an internal p...

Page 7: ... Refer all servicing to qualified personnel Note If your power cord becomes damaged and must be replaced always replace it with the proper 3 prong type Powering Up When the power switch is turned on the VU meter will illuminate It is important to remember to turn the Tube Channel on before any monitoring levels or power amps are turned on The Tube Channel has the ability to add over 60dB of gain t...

Page 8: ...ode LED in the Tube Drive array is lit Gain Switch Use the Gain switch to set the range of the Gain control When the switch is in the out 0db position the gain range is 11 to 30dB Depressing the switch adds 20dB of gain With the switch in the gain range is 9 to 50dB Note With most microphone applications you ll find using the Tube Channel with the 20dB gain switch in is needed Use the setting that...

Page 9: ... LEDs are labeled warm This is the optimal operating range for the Tube Channel s preamp At this level the tube is producing an output signal that most would term warm Whatever you would like to call it is fine simmering toasty etc You ll find the output signal has an enhanced bottom to low mid quality with smooth high frequency detail The last LED is labeled Clip This LED will light approximately...

Page 10: ...s ideal for smoothing all types of signals In its in position the compression ratio is greater than 6 1 This is typically called soft limiting as it allows only a 1dB change in signal level for any signal reaching over 6dB of the set threshold This setting is ideal for applications where exceeding a set level is not desirable i e mixing popping bass digital recording etc Speed Switch The position ...

Page 11: ...act on the input signal Turning this control counterclockwise lowers the threshold adding more compression to a signal Turning this control clockwise raises the threshold Setting the Threshold control is dependent on the Preamp Output control or the output of the device plugged into the compressor return insert point The easiest way to set the threshold control is to start with the control fully c...

Page 12: ...tube based semi parametric four band equalizer Each of the bands overlap giving you the ultimate in flexibility The Q or bandwidth of each of the filters is purposely wide to provide a very musical sound Low Frequency Control The Low Frequency control adjusts a shelving filter with a selectable corner frequency of either 40Hz or 120Hz The low shelving filter affects all frequencies below the corne...

Page 13: ...the Hi Mid control is a dual concentric pot there are two controls one outer and one inner The outer control is used to select a frequency while the inner control is used to apply 12dB of gain The Hi Mid control can cover two frequency ranges depending on the position of the Shift x 10 switch These ranges are 200Hz to 2KHz and 2KHz to 20KHz Hi Mid Shift x 10 Switch The Hi Mid Shift x 10 switch det...

Page 14: ...utting 20KHz with the Hi Mid control for a very bright yet noise free result EQ Bypass Switch A Bypass switch is included in the equalizer circuit to enable you to remove it from the signal chain When set to its in bypass position signal is allowed to pass from the compressor circuitry to the output jacks with no equalization The LED will glow red when Bypass is engaged This informs you that the e...

Page 15: ... phase will produce no audible change in the output signal Output Level VU Meter A backlit average reading VU meter is provided to accurately monitor the output level of the Tube Channel The 0 level is calibrated to 4dBm with a 600 ohm load on the output using either the XLR or connector Use the VU meter for a visual reference to the signal level leaving the Tube Channel Note When using the Tube C...

Page 16: ... any unused cables to avoid pick up of extraneous noise hum or RF interference Output Both balanced and unbalanced output connections may be used simultaneously This is particularly useful when using the Tube Channel as a direct box for instruments or line level signals Note If you experience a hum when using both output connectors simultaneously one to the console and one to an instrument amp a g...

Page 17: ...f the compressor circuit in the Tube Channel Since there is no input level control to the compressor in the Tube Channel the piece of equipment in the insert loop should have level matching capabilities i e an output level control Compressor EQ Loop A loop is provided between the output of the compressor circuit and the input of the equalizer circuit The Compressor Send jack is located directly af...

Page 18: ...hannel is as a processing channel for a microphone instrument or line level source To use the Tube Channel as a mic or line preamplifier only simply press the Bypass switches to bypass the compression and equalizer circuitry Plug a microphone directly into either input and set the input and output controls to provide an appropriate level into the next stage of your system The Tube Channel is ideal...

Page 19: ...p options and for using single circuits in the Tube Channel Special Effects For industrial metal or just flavor textures experiment with the Tube Channel Overdriving the preamp compressor and equalizer circuitry can add interesting textures when blended with vocals and other instruments Placing signals purposely out of phase can also yield interesting results No harm will come to the Tube Channel ...

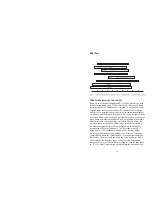
Page 20: ...ents You d be surprised at how bad a killer guitar track can sound when it is isolated from the rest of the mix Remember what makes it killer is how it sounds in relation to the other instruments Always keep the big picture in mind Most people think of EQ as boosting only we ll just add a little EQ Many times a bad sounding instrument can be fixed by simply isolating the bad frequency and pulling ...

Page 21: ... when you record the tracks you shouldn t be spending a lot of time re EQing during the mix During mixing you should be concentrating on the blending of tracks and the dynamics of the song If you find yourself EQing everything take a break and come back to it later Start mixing with a group of instruments the whole drum kit or guitars and bass instead of listening to individual tracks Mixing is th...

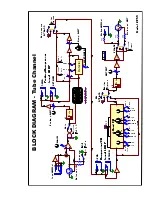
Page 22: ... 6 1 1RUPDO QYHUW DQG 4 2 6KLIW 6KLIW UHT 6KLIW R0 UHT 6KLIW L0 1 287 3UH PS RPSUHVVRU QVHUW 223 5 7851 6 1 RPSUHVVRU 4 QVHUW 223 5 7851 RPSUHVVRU 1 287387 3 66 FWLYH SDVV 4 1RUPDO G 98 OQ DUP OLS G 6ORSH 6SHHG RPSU LPLW DVW XWR 7XEH ULYH DLQ 5HGXFWLRQ 3 1720 2II Y 0RGHO 3UH PS 287 7 5 6 2 RPS 287 3 6 203 3 66 4 3 66 ...

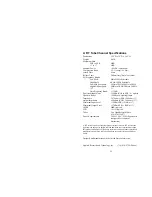
Page 23: ...ng Input Impedance 1 67k ohms XLR 1M ohm Output Impedance 600 ohms XLR 300 ohms Maximum Input Level 15dBu XLR 21dBu Maximum Output Level 27dBu XLR 22dBu CMRR 90dB typical THD 0 1 typical Tubes Two Hand Selected Tubes 12AX7A 12AT7 Power Requirements 100 125 VAC 25W Export units configured for country of destination A R T retains a policy of constant product improvement A R T reserves the right to m...

Page 24: ...he form of a valid sales receipt EXCLUSIONS This warranty does not apply in the event of misuse or abuse of the product or as a result of unauthorized alterations or repairs This warranty is void if the serial number is altered defaced or removed A R T reserves the right to make changes in design and make additions or improvements upon this product without any obligation to install the same on pro...

Page 25: ...stitute The packing box is not recommended for a shipping carton Put the packaged unit in another box for shipping Print the RA number clearly under the address 5 Include with your unit a return shipping address we cannot ship to a P O Box a copy of your purchase receipt a daytime phone number and the description of the problem 6 Ship the unit to Applied Research and Technology Inc 215 Tremont Str...

Reviews: