background image

IL6000 Chassis Installation and Operations Manual 

7


Ventilating the IL6000 Chassis


Unpacking the IL6000

When unpacking the your IL6000, set aside the packing material in case you need to repackage the unit later.
To unpack the IL6000, perform the following steps:

1.  Remove the IL6000 chassis and function modules from the shipping cartons.

2.  Check the configuration of the unit against the items listed on the packing slip. If you find any 

discrepancies, report them in accordance with the instruction in 

“About This Manual”

.

Ventilating the IL6000 Chassis

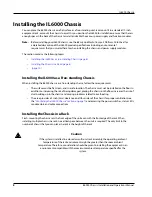
It is important that your IL6000 operates within the specified temperature range as described in the IL6000 

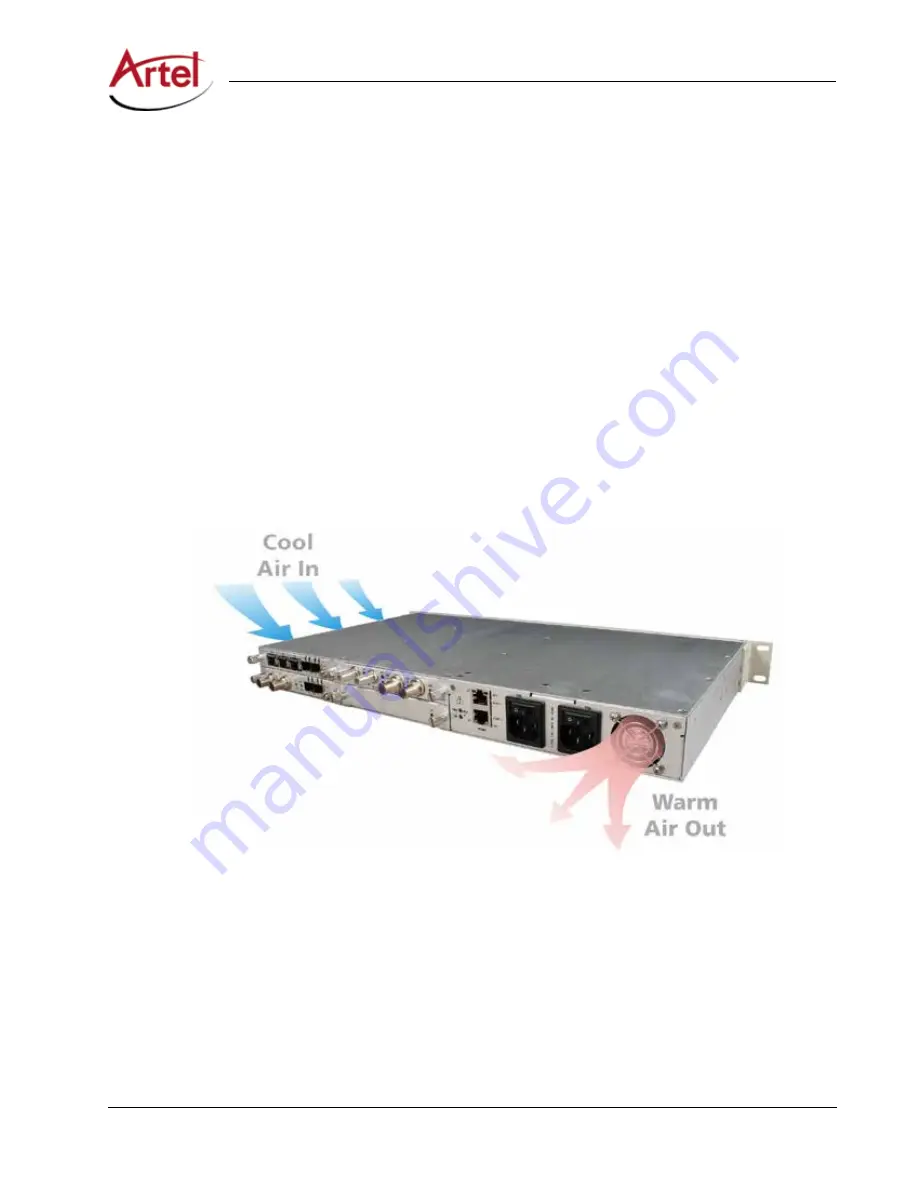
data sheet. A single fan provides ventilation for the IL6000 chassis by drawing air in through the ventilation 

slots located on the side of the chassis near the function module slots. 

Figure 4

 shows how the fan draws air 

through the side of the chassis and over the function modules when power is applied. The IL6000 uses a 

variable speed fan to provide quiet operation at normal temperatures. The internal temperature is constantly 

monitored and the fan speed automatically increases should the temperature increase.

Figure 4. 

IL6000 Air Flow

To ensure proper ventilation of the chassis and the installed modules, you must adhere to the following 

requirements when installing and operating your IL6000:

• 

Maintain at least a 2 inch (5 cm) clearance around the sides and rear of the chassis where the fan and 

ventilation slots are located. Keep these areas clear of any obstructions that might restrict air flow in 

or out of the chassis.

• 

Install the module blank trays in any unused module slots.

• 

Visually inspect the ventilation fan for proper operation when the power is applied.

Summary of Contents for InfinityLink IL6000

Page 1: ...WWW ARTEL COM Manual Installation and Operations Manual INFINITYLINK IL6000 Chassis...

Page 2: ...ii IL6000 Chassis Installation and Operations Manual...

Page 3: ...IL6000 Chassis Installation and Operations Manual iii Document Number AR200 006000 00_A Released December 2016 IL6000 Chassis MediaTransport Chassis Installation and Operations Manual...

Page 4: ...iv IL6000 Chassis Installation and Operations Manual...

Page 5: ...ness information or other pecuniary loss arising out of the use of this documentation even if ArtelVideo Systems Corporation has been made aware of the possibility of such damages Information containe...

Page 6: ...ntially harmful levels of optical laser radiation may be present at the optical output ports and unconnected receive fiber ends Prior to applying system power connect fiber cables to either another In...

Page 7: ...at riel brouilleur Appareils Num riques NMB 003 dict e par le Minist re des Communications This digital apparatus does not exceed the Class A limits for radio noise emissions from digital apparatus as...

Page 8: ...ollowing InfinityLink media platform products IL6000 to which this declaration relates is in conformity with the following standards and other normative documents Product Safety EN 60950 EMC EN55 022...

Page 9: ...ations Manual ix Revision history for the IL6000ChassisInstallationandOperationsManual Table 0 1 Manual Revision History Revision History Revision Document Number Date Reason for Change A AR200 006000...

Page 10: ...w 4 ILM121 Assembly Overview 6 Required InstallationTools and Equipment 6 Unpacking the IL6000 7 Ventilating the IL6000 Chassis 7 Installing the IL6000 Chassis 8 Installing the IL6000 as a Free standi...

Page 11: ...IL6000 Chassis Installation and Operations Manual xi...

Page 12: ...diaTransportSolutionData Sheet Product operating and environmental specifications and regulatory conformance information for the chassis InfinityLinkManagerSetupandOperations Manual Information about...

Page 13: ...al support Outside the US call 978 263 5775 then select 1 for technical support When requesting assistance please be ready to provide the following information Your name and telephone number Product m...

Page 14: ...hat provides switching capabilities for interconnecting installed modules through the backplane Simple Network Management Protocol SNMP management Unlimited non spaced installation Provision and monit...

Page 15: ...rd safety practices for handling a Class 1 laser product including the following warning Warning Never stare directly into a fiber optic connector Although the light used in most fiber optic transmiss...

Page 16: ...Warning The InfinityLink element management modules utilize an internal RTC RealTime Clock with battery backup that provides the system software with the time of day on system power up The backup batt...

Page 17: ...le slot to cover the slot opening and maintain proper ventilation Figure 1 IL6000 Chassis Front PanelView Table 1 describes the components called out in Figure 1 Table 1 The IL6000 Chassis Front Panel...

Page 18: ...r PanelView Table 2 describes the components called out in Figure 2 Table 2 The IL6000 Chassis Rear Panel Elements Item Description for details see Slot 1 Function module Slot 1 Installing a Function...

Page 19: ...bly includes voltage temperature and cooling fan alarms Figure 3 ILM121 Assembly Components Table 3 describes the components called out in Figure 3 Table 3 ILM121 Assembly Components Item Description...

Page 20: ...ion slots located on the side of the chassis near the function module slots Figure 4 shows how the fan draws air through the side of the chassis and over the function modules when power is applied The...

Page 21: ...ts The surface must be flat clean and in a safe location The chassis must not be installed on the floor In addition to increasing the risk of being damaged placing the chassis on the floor increases t...

Page 22: ...eration should be given to the connection of the equipment to the supply circuit and the effect that overloading of the circuits might have on over current protection and supply wiring Appropriate con...

Page 23: ...assis mounting brackets into the threaded screw holes on the rack The chassis requires two screws for each side of the chassis mounting screws not included Figure 5 Flush Mounted Chassis Bracket Mount...

Page 24: ...IL6000 Chassis Installation and Operations Manual 11 Installing the IL6000 Chassis Figure 6 Wall Mounted Chassis Bracket Wall Mounting Screw Holes 3...

Page 25: ...lies connected dissipates more power that a chassis with one power supply connected due to internal power dissipation within the power supplies To connect the AC power supplies to a power source you n...

Page 26: ...to installing them because they are configured using the DIP switches mounted to the top of the module board Other function modules must be configured after you install the module by using IL Manager...

Page 27: ...erve the status LEDs for proper operation as described inTable 4 Table 4 IL6000 Chassis Status LEDs LED Description State Status Operating status of the chassis backplane and installed function module...

Page 28: ...tage is present Internal failure of the power supply Replace the chassis FAN Operating status of the fan Off No power is applied to the chassis Green The fan speed is in the normal range Red The fan i...

Page 29: ...vice If you are going to connect IL Manager to your management network you must first configure its network IP address as needed to connect to your network The chassis rear panel contains two manageme...

Page 30: ...n Application Using the IL6000 Reset Switch The IL6000 rear panel includes a recessed push button reset switch RST that resets the chassis Resetting the chassis does not erase any user selected parame...

Page 31: ...18 IL6000 Chassis Installation and Operations Manual...

Page 32: ...mail address Customer Service xiii F fan ventilation 7 front panel reset switch 17 status LEDs 14 I IL Manager cabling 16 ILM121 Status page 17 overview 16 ILM121 assembly overview 6 install 8 L lase...

Page 33: ...Index Index 2 IL6000 Chassis Installation and Operations Manual...

Page 34: ......

Page 35: ...lysis and design services Training and installation support available 24x7x365 technical support available Proven Products Unrivaled Service and Great Support Content subject to change without notice...

Reviews: