background image

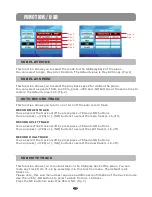
PRACTICING THE RIGHT HAND MELODY OF THE SONG

1.Press


the


SONG


LEFT


and


the


SONG


RIGHT


buttons


simultaneously

the


PLAY

/

STOP


indicator


will flash blue and the first play along song will appear on the display. Both 

   SONG LEFT and SONG RIGHT indicators


will


be


off

.

2.Use


the


buttons


or


to


select


a


song

The


song


number


and


title


will appear


on


the


display

.

3.Press


the


SONG


RIGHT


button

The


indicator


will


turn


on

.

4.Press


the


PLAY

/

STOP


button

after


the


metronome


sound


counts


in

the


auto


accompaniment


will play

and


you


can


play


the


right


hand


melody


notes

.

5.The


song


will


stop


automatically


when


it


is


finished

or


you


can


press


the


PLAY

/

STOP


button


at


anytime to return to Play Along Song standby.

   You will have a percentage grade displayed in the LCD screen when


the


song


is


finished

,


if


you


stop


the


song


early


there


will


be


no


grade

6.Press the PLAY/STOP button to try again, or next try the Left Hand, or press the SONG
   LEFT and the SONG RIGHT buttons simultaneously to exit the play along song mode, 
   the PLAY/STOP indicator will go out, then press both track buttons, one at a time, so 
   the indicator lights turn off.

PLAY ALONG SONGS

PRACTICING THE LEFT HAND ACCOMPANIMENT OF THE SONG

1.Press


the


SONG


LEFT


and


the


SONG


RIGHT


buttons


simultaneously

the


PLAY

/

STOP


indicator


will flash blue and the first play along song will appear on the display. Both 

   SONG LEFT and SONG RIGHT indicators


will


be


off

.

2.Use


the


buttons


to


select


a


song

The


song


number


and


title


will appear


on


the


display

.

3.Press


the


SONG


LEFT


button

The


indicator


will


turn


on

.

4.Press


the


PLAY

/

STOP


button

after


the


metronome


sound


counts


in

the


melody


notes


will


play

and you


can


play


the


left


hand


auto


accompaniment

.

5.The


song


will


stop


automatically


when


it


is


finished

or


you


can


press


the


PLAY

/

STOP


button


at


anytime to return to Play Along Song standby.

   You will have a percentage grade displayed in the LCD screen when


the


song


is


finished


if


you


stop


the


song


early


there


will


be


no


grade

6.Press the PLAY/STOP button to try again, or next try Both Hands, or press the SONG 
   LEFT and the SONG RIGHT buttons simultaneously to exit the play along song mode, 
   the PLAY/STOP indicator will go out, then press both track buttons, one at a time, so 
   the indicator lights turn off.

45

Summary of Contents for AG-30

Page 1: ......

Page 2: ......

Page 3: ......

Page 4: ...VOICES VOICE SELECT ADJUSTING THE KEYBOARD VOICE VOLUME LAYER VOICE SPLIT VOICE REVERB CHORUS DUET EQUALIZER RHYTHM RHYTHM STYLE SELECT USING THE RHYTHM STYLE ADJUSTING THE TEMPO SPLIT POINT FOR AUTO ACCOMPANIMENT ADJUSTING THE CHORD ADJUSTING THE AUTO ACCOMPANIMENT VOLUME AUTO ACCOMPANIMENT SINGLE MODE FINGERED MODE USING THE AUTO ACCOMPANIMENT 4 4 4 4 4 5 6 12 13 14 14 14 14 15 15 16 17 18 19 20...

Page 5: ... TYPE MAIN SPLIT DUAL PAN REVERB TYPE REVERB LEVEL CHORUS TYPE CHORUS LEVEL USB MIDI IN MIDI OUT LOCAL USB PLAY MODE USB PLAY SPEED AUTO RECORD TRACK USB MUTE TRACK BLUETOOTH AUTO CLOSE TIME FACTORY RESET REGISTRATION MEMORY SAVE REGISTRATION RECALL REGISTRATION STYLE HOLD 29 30 30 31 31 31 31 31 32 32 32 32 32 33 33 33 34 35 35 35 36 36 36 36 37 37 37 38 38 38 39 ...

Page 6: ... LEFT HAND MELODY OF THE SONG PRACTICING BOTH HANDS OF THE SONG USB INSERT THE USB REMOVE THE USB PLAY BLUETOOTH BT 1 ARTESIA BLUETOOTH CONNECTION BLUETOOTH CONNECTION MIDI MIDI CONNECTION MIDI OUT LOCAL ON OFF MIDI IMPLEMENTATION CHART AUTO BASS CHORD FINGERING GUIDE VOICE LIST STYLE LIST TROUBLESHOOTING SPECIFICATIONS 40 40 41 41 42 42 43 44 44 45 45 46 47 47 47 47 48 48 48 50 50 50 50 51 52 53 ...

Page 7: ...nnect all cables before moving the instrument Physical shocks caused by dropping bumping or placing heavy objects on the instrument can result in scratches and or more serious damage Avoid placing vinyl objects on top of the instrument vinyl can stick to and discolor the surface CLEANING Clean the cabinet and panel with a soft nonabrasive dry cloth A wax based polish may be used on the cabinet Do ...

Page 8: ...ument is spattered with liquid Do not switch the unit on and off in quick succession this places an undue load on the electronic components Unplug the AC power cord during an electrical storm Avoid plugging the AC power cord into the same outlet as appliances with high power consumption such as electric heaters or refrigerators Carefully check the amplifier volume control before starting to play E...

Page 9: ...to the right to increase the volume and turn to the left to decrease the volume Please note at higher volumes there may be audio clipping or distortion depending on the frequencies being played Please reduce the volume if this occurs Please also note the keyboard and accompaniment volumes can adjusted independently from each other by using the KB VOL and ACCOMP buttons 3 BASS With the bass tone kn...

Page 10: ...f your choice 1 4 2 4 3 4 4 4 5 4 6 4 3 8 6 8 7 8 9 8 or12 8 10 METRO Press the ACCOMP buttons to adjust the volume of rhythm style and the auto accompaniment only the keyboard instrument voice will not be affected 6 7 8 9 10 ACCOMP KB VOL TRANS TEMPO METRO LAYER REVERB CHORUS FUNCTION SYNCHRO START STOP INTRO ENDING FILLIN1 FILLIN2 VARIATION ACCOMP SPLIT DUET EQ 7 Press the KB VOL buttons to adju...

Page 11: ...onally completed with an ending pattern from the next measure by pressing the INTRO ENDING button 14 FILL IN 1 The fill in feature provides the accompaniment with a short rhythm pattern of one or two measures for each style Press the FILL IN1 button at any time while the accompaniment is playing to add a fill If you holddown the FILL IN1 button the fill pattern will repeat until the button is rele...

Page 12: ...s left A1 C3 and right C 3 C7 that have the exact same notes The two sections will share the same voice and volume This is a great feature for teaching or when two people want the play the pianosimultaneously Please see the Keyboard Voices section for more information Please note engaging the DUET feature will disable the Layer the Split and the Auto Accompaniment modes The FUNCTION button is used...

Page 13: ... can be selected quickly by pressing one of the quick select voice style buttons The voice name is printed above the select button and the style name is printed under the select button Press the select button the indicator will light and the selected voice or style name and its number will be shown on the display 26 VIOCE STYLE Press VOICE STYLE button to switch between voice and style the light n...

Page 14: ...ual for more information 32 TRACK 1 SONG LEFT TRACK 2 SONG RIGHT When in the melody recording mode these indicators will be lit when the corresponding tracks are selected Use the TRACK button s to choose which track s to record in or to playback Please see the Record section of this manual for more information These buttons are also used in conjunction with the play along songs music teacher When ...

Page 15: ...n the right side of the control panel Please also note do not turn on the piano with the USB cable connected to the computer to avoid having to restart your computer It can be connected without driver installation under the Windows XP Windows 7 and MAC OSX environment The piano will be recognized as USB audio device to receive and transmit MIDI messages 4 BLUETOOTH Plug the tiny Bluetooth receiver...

Page 16: ...eleased Keys that are played after the pedal has been pressed are not affected 3 SUSTAIN PEDAL Like the damper pedal on an acoustic piano the the right sustain or damper pedal will sustain the sound of the piano voice after releasing the piano keys while engaged The length of sustain time is determined by the amount of pressure used to depress the pedal 13 1 2 3 AC 110 220V 50 60Hz CAUTION PEDAL A...

Page 17: ...he DEMO button again to stop the demonstration PLAY ALONG SONGS DEMO 1 Press the LEFT and RIGHT SONG buttons simultaneously to enter the music teacher feature The PLAY STOP and DEMO button indicator lights will flash and the display will show the first play along song 2 Use the buttons to change songs before or while the demo is playing 3 Press the DEMO button to start the song 4 Press the DEMO bu...

Page 18: ...by pressing one of the voice select buttons GRAND PIANO E PIANO VIBES ORGAN N GUITAR BASS STRINGS CHOIR BRASS EFFECT The voice name is printed above the select button QUICK SELECT VOICE BUTTONS R B SWING BALLAD POP LATIN STYLE GOSPEL M1 WORLD M2 DANCE M3 TRADITIONAL M4 BOSA NOVA STYLE HOLD STORE BANK REGISTRATION GRAND PIANO BASS E PIANO VIBES ORGAN N GUITAR VOICE STRINGS CHOIR BRASS EFFECT 1 Pres...

Page 19: ...Than use YES NO buttons or KB VOL buttons to adjust the volume Fig 2 3 Use the buttons to select the EXIT and press OK button to return to the main interface Second method 1 Press the KB VOL buttons to enter the VOLUME MIXER interface 2 Use the buttons to select main volume split volume layer volume learn volume USB song volume Than use YES NO buttons or KB VOL buttons to adjust the volume 3 Use t...

Page 20: ... the layer feature off the indicator will go out If the LAYER button indicator is lit the layer feature is engaged Please also note engaging the DUET feature will disable the Layer and Split modes LAYER LAYER VOICE Layer or dual refers to an additional voice that is tone mixed with the selected keyboard voice The assigned layer voice will be heard with the original voice when the layer feature is ...

Page 21: ... split voice The default split point for voice is the B2 key It can be changed in the Function menu please see the Function section for more informations SPLIT 1 Press the SPLIT button the currently assigned split voice will show on the display 2 While the indicator is lit use the YES NO buttons to select the desired split voice The display will show the split voice number and name 3 Use the butto...

Page 22: ... 3 Use the YES NO buttons to select a reverb type The reverb level for the main split and layer voices can be changed in the unction menu Please see the Function section for more information Fig 1 The Chorus effect adds depth and spaciousness to the selected keyboard voice Press the REVERB CHORUS button to engage the chorus effect and the indicator will light up Press the button again to turn off ...

Page 23: ...t up 2 To turn the duet feature off press the DUET button so that the indicator goes out Please note engaging the DUET feature will disable the Layer and Split modes and the Auto Accompaniment feature DUET EQUALIZER 20 You can change the Overall EQ settings for the piano to increase or decrease the high and low frequencies Normally the piano is set at a flat EQ However certain types of rooms may a...

Page 24: ...re 6 sets of fixed settings for you to choose CLASSICAL JAZZ POP ROCK COUNTRY ELECTRONIC Fig 1 IN the EQUALIZER interface 1 Use the buttons to select a set of fixed setting 2 Press OK button to confirm 3 Press EQ button to exit ...

Page 25: ...to the desired style The style name and its number will show on the display and the newly selected style is available for playing There are ten styles that can be selected quickly by pressing one of the voice select buttons R B SWING BALLAD POP LATIN GOSPEL WORLD DANCE TRADITIONAL BOSA NOVA The style name is printed under the select button R B SWING BALLAD POP LATIN STYLE GOSPEL M1 WORLD M2 DANCE ...

Page 26: ...t hand accompaniment section of the keyboard 2 Press the START STOP or the SYNCHRO button again to stop the rhythm style If the SYNCHRO button is used the synchronized start mode will be put back on standby SYNCHRO Fig 1 INTRODUCTION AND ENDING PATTERNS All of the 100 styles and their variations can be started with an appropriate introduction 1 Press the INTRO ENDING button the rhythm of the intro...

Page 27: ...the variation of any of the rhythm styles The indicator will light up and the variation pattern will be selected If the rhythm style is playing the variation will start at the beginning of the next measure after the variation fill 2 Press the FILL IN 1 button to revert to the main pattern from the beginning of the next measure after the fill pattern FILLIN2 VARIATION When playing the rhythm there ...

Page 28: ...ndently from each other and the master volume by using the KB VOL and ACCOMP buttons SPLIT POINT FOR AUTO ACCOMPANIMENT For auto accompaniment the keyboard is split into two sections The default split point is the G2 key A different split point for the auto accompaniment can be assigned in the Function menu Please see the Function section of this manual for more information ADJUSTING THE CHORD The...

Page 29: ...s the root key and any black key to its left in the auto accompaniment section of the keyboard simultaneously to produce the minor chord Seventh Chord Press the root key and any white key to its left 7th key in the auto accompaniment section of the keyboard simultaneously Minor Seventh Chord Press the root key and both a black key and a white to its left in the auto accompaniment section of the ke...

Page 30: ...le and auto accompaniment SYNCHRONIZED START Synchronized Start mode puts the piano auto accompaniment on standby It allows you to start the rhythm style and its auto accompaniment by playing on the keyboard Single The rhythm style and auto accompaniment will start as soon as a note is struck in the auto accompaniment section of the keyboard Fingered The rhythm style and auto accompaniment will st...

Page 31: ...stop the rhythm style and auto accompaniment Or press the INTRO ENDING button again to stop the auto accompaniment after a finishing ending pattern The ending pattern can be engaged anytime an auto accompaniment is playing whether or not it was started with an introduction The fill feature will insert a short rhythmic pattern of one to two measures in length depending on the auto accompaniment sel...

Page 32: ...URE Fig 1 2 Use the YES or NO buttons to change the time signature At the same time press YES and NO buttons to restore the default value 4 4 TIME SIGNATURE 1 Use the buttons to select the TEMPO Fig 2 2 Use the YES NO or the TEMPO buttons to change the value Range 20 280 At the same time press YES and NO buttons to restore the default value TEMPO 1 Use the buttons to select the sound Fig 3 2 Use t...

Page 33: ...EFFECT USB Midi In Midi Out Local MIDI USB Play Mode USB Play Speed Auto Rec Track Rec Main Track Rec Split Track Rec Dual Track USB Mute Track USB Blue Tooth Auto Close Time Factory Reset OTHER All of the above listed Function Menus are accessed and adjusted as described below 1 Press the FUNCTION button The menu item that can be manipulated will appear on the display 2 Use the buttons to select ...

Page 34: ... styles Touch Soft Touch Normal Touch Hard Fixed the default is Normal Fig 3 1 Touch Soft the most sensitive keyboard response which permits maximum sound levels with a light touch 2 Touch Normal an intermediate response suitable for most styles of music Normal is the default setting 3 Touch Hard a less sensitive keyboard response which requires a heavier touch to obtain maximum sound levels 4 Fix...

Page 35: ...ingered Fige 4 MAIN PAN SPLIT PAN DUAL PAN This function allows you to set the stereo position of each orchestration part to create a board stereo image to your sound It can move one part of the piano sound to the left or right speakers to create more of a stage sound Fige 6 Fige 7 The split voice pan value can be set from 64 to 63 Press YES and NO buttons at the same time to restore the default v...

Page 36: ... from 0 127 press YES and NO buttons at the same time to restore the default value 18 Fig 3 DUAL REVERB LEVEL In this function you can adjust the reverb depth for the layer or dual voice The Reverb Level value can be adjusted from 0 127 press YES and NO buttons at the same time to restore the default value 18 Fig 4 CHORUS TYPE There are eight chrous effects available 1 Chorus1 2 Chorus2 3 Chorus3 ...

Page 37: ...e 110 Fig 1 MAIN CHORUS LEVEL In this function you can adjust the chorus depth for the split or lower voice The split chorus Level value can be adjusted from 0 127 press YES and NO buttons at the same time to restore the default value 110 Fig 2 SPLIT CHORUS LEVEL In this function you can adjust the chorus depth for the layer voice The dual chorus Level value can be adjusted from 0 127 press YES an...

Page 38: ...ue You can mute the piano sounds while still sending out the MIDI messages This mode is called Local Off Fig 3 MIDI OUT This function allow you to turn on or off the USB MIDI IN function the default is MIDI on Fig 1 Please note if the Local is off there will be no sound from your keyboard LOCAL This function allow you to select the MIDI transmission track from 01 16 or to turn the MIDI transmissio...

Page 39: ...the piano You can mute any track from 01 16 by selecting it in this function menu The default is all tracks no Please note this sub menu does require an additional confirmation of the track to mute Use the YES NO buttons to select a track from 01 16 tracks Press the OK button to select the YES or NO Fig 7 FUNCTION USB 36 This function allows you to turn on or turn off the auto record track You can...

Page 40: ...nactivity Set the length of standby time before a power down in this function menu The default power off can be set from 20 60 minutes or the feature can be turned off Press YES and NO buttons at the same time to restore the default value Off Fig 2 FACTORY RESET You can Reset your piano to the initial factory settings Please be aware that this will erase all saved data from the User buttons the Re...

Page 41: ... quickly by the press of a button The registration will not be lost when the power is turned off The following data can be preset and stored in a registration memory Main Split Layer Voice Main Split Layer Volume Main Split Layer Pan Transpose Main Split Layer Octave Metronome Volume Reverb On Off Reverb Type Chorus On Off Chorus Type Main Split Layer Reverb Level Main Split Layer Chorus Level Sty...

Page 42: ...o select Save REG to USB the LCD will show a message XXX REG 001 REG and then use the OK button to confirm RECALL REGISTRATION 1 Press the STORE BANK button to select a bank BANK1 4 2 Press the number M1 M4 button that corresponds to the settings you want to recall in the selected bank the stored settings will be recalled instantly and the display will show the registration memory number with a Lo...

Page 43: ...Y button will light up If your USB disk is plugged in but the MEMORY button indicator is turned off then you can press the MEMORY button again to restore the USB mode TRACK 1 TRACK 2 DELETE MULTI RECORD SELECTION LEFT RIGHT SONG RECORD MEMORY PLAY STOP TRACK Press the RECORD button and the buttons indicator is flashing then you can start recording 40 2 Start Recording Press RECORD button again to ...

Page 44: ...separation voice recording track will change into 4 automatically and double voice recording track will change into 5 automatically Split voice recording track set Main voice and layer voice recording track will not change automatically Layer voice recording track set Main voice and split voice recording track will not change automatically 41 Multi Recording Press RECORD button and the TRACK butto...

Page 45: ...the TRACK1 button the TRACK1 and the RECORD indicator flashes to indicate ready to record You can start recording simply by playing the key board or playing styles Melody Track1 Recording Press the RECORD button again to stop recording and the data will save to local memory track1 NOTE If the TRACK 2 has data recorded the indicator will light and it will play when the record is started You can pre...

Page 46: ... MEMORY button is light you should press the MEMORY button again to turn off it Press the PLAY STOP to play the local recording During song playback you can select which track you wish to hear by press the TRACK 1 or TRACK 2 button Press the PLAY STOP button again to stop playing the song Delete local recording If the TRACK 1 has data recorded hold the TRACK 1 button for 3 seconds and the LCD will...

Page 47: ...ll return to standby for you to listen again choose another song or try the Play Along Song Left Hand Right Hand or Both Hands 5 Press the SONG LEFT and the SONG RIGHT buttons simultaneously to exit the play along song mode the PLAY STOP indicator will go out then press both track buttons one at a time so the indicator lights turn off There are 55 songs of varying difficulty built into the piano f...

Page 48: ...or will go out then press both track buttons one at a time so the indicator lights turn off PLAY ALONG SONGS PRACTICING THE LEFT HAND ACCOMPANIMENT OF THE SONG 1 Press the SONG LEFT and the SONG RIGHT buttons simultaneously the PLAY STOP indicator will flash blue and the first play along song will appear on the display Both SONG LEFT and SONG RIGHT indicators will be off 2 Use the buttons to selec...

Page 49: ...rs will turn on 4 Press the PLAY STOP button after the metronome sound counts in you can play the left hand auto accompaniment and the right hand melody notes 5 The song will stop automatically when it is finished or you can press the PLAY STOP button at anytime to return to Play Along Song standby You will have a percentage grade displayed in the LCD screen when the song is finished if you stop t...

Page 50: ...ard MIDI File format songs that are on the USB flash drive 1 Insert the USB flash drive into USB TO DEVICE slot The blue indicator light on the MEMORY button will be lit and the screen will show the first song available for playback 2 Use the buttons to select a song 3 Press the PLAY STOP button the blue indicator will flash and the music sequencer will automatically load the first MIDI File Song ...

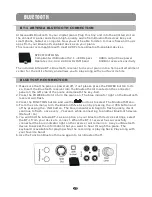
Page 51: ...luetooth receiver into the Bluetooth slot located on the connector panel on the left side of the piano underneath the key bed 2 Press the POWER button to turn the piano on The blue indicator light on the Bluetooth receiver will flash 3 Press the FUNCTION button and use the buttons to select The Bluetooth Menu 4 From the sub menu turn the Bluetooth feature on by pressing the YES button and off by p...

Page 52: ...sconnect the first Bluetooth and then reconnect to the new device following the above instructions Please also note due to differences in Bluetooth technology some Bluetooth enabled devices may be incompatible function improperly or may not support all features when used with the wireless receiver Please make sure the volume of the piano and the Bluetooth device is turned up If you are unable to c...

Page 53: ...ection of this manual for more information MIDI OUT This terminal transmits data from this instrument to other MIDI devices The transmitted data includes the note and touch velocity produced while playing on the keyboard as well as voice changes wheel operation and recorded playback for the melody tracks Demo songs and auto accompaniment are not transmitted LOCAL ON OFF This function allows you to...

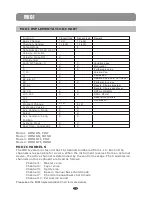
Page 54: ...ft Pedal Portamento yes no Reverb Chorus program Reverb Chorus send level NRPNL NRPHH RPNL RPNH Reset all controllers All notes off Mode 1 OMNI ON POLY Mode 2 OMNI ON MONO Mode 3 OMNI OFF POLY Mode 4 OMNI OFF MONO MIDI CHANNELS The MIDI system in this unit has 16 channels numbered from 1 16 Each of the channels is responsible for a voice When the instrument receives from an external device the act...

Page 55: ...g Sus4 7sus4 1 3 5 1 3 5 6 1 3 5 7 1 2 3 4 5 7 1 2 3 5 1 2 3 5 7 1 2 3 5 6 1 3 5 1 b3 5 1 b3 5 6 1 b3 5 b7 1 b3 b5 b7 1 2 b3 5 1 2 b3 5 b7 1 2 b3 4 5 b7 1 b3 5 7 1 2 b3 5 7 1 b3 b5 1 b3 b5 6 1 3 5 b7 1 4 5 b7 1 2 3 5 b7 1 2 3 4 5 b7 1 3 5 6 b7 1 3 b5 b7 1 b2 3 5 b7 1 3 5 b6 b7 1 2 3 5 b7 1 3 5 7 1 3 5 b7 1 4 5 1 4 5b7 The Fingering Guide table above lists all of the 32 playable chords of the Finge...

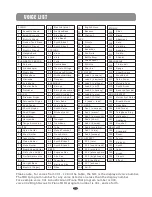
Page 56: ...72 PIPE 73 74 75 76 77 78 79 80 SYNTH LEAD 81 82 83 84 85 86 87 88 SYNTH PAD 89 90 91 92 93 94 95 96 SYNTH EFFECT 97 98 99 100 101 102 103 104 English Horn Bassoon Clarinet Piccolo Flute Recorder Pan Flute Bottle Blow Shakuhachi Whistle Ocarina Lead 1 square Lead 2 sawtooth Lead 3 calliope Lead 4 chiff Lead 5 charang Lead 6 voice Lead 7 fifths 8 bass lead Pad 1 new age Pad 2 warm Pad 3 polysynth P...

Page 57: ...E JAZZ SWING 1 DIXIE BALLAD 50 S BALLAD POWER BALLAD JAZZ BALLAD PIANO BALLAD LOVE SONG POP BALLAD BIG BAND BALLAD JAZZ BALLAD 2 16 BEAT BALLAD COUNTRY BALLAD SLOW COUNTRY SLOW 16 GOSPELL BALLAD MODERN BALLAD 8 BEAT POP 1 POP 16 POPVILLE POP SHUFFLE GUITAR POP SYNCHOPATE POP COUNTRY POP COUNTRY SWING COUNTRY 2 STEP COUNTRY WALTZ COUNTRY COUNTRY TWAIN EASYPOP FUNKY POP FOLK 1 LATIN POP 1 LATIN POP ...

Page 58: ...is is normal The digital toe generation uses multiple recordings samples of an instrument across the range of the keyboard The actual sound of the voice may be slightly different from note to note The volume is too soft The sound quality is poor The rhythm stops unexpectedly or will not play The recorded data of the song does not playcorrectly The LCD display suddenly goes dark and all panel setti...

Page 59: ...s Level EQ Bass Level EQ Treble Level 100 Synchro Start Intro Ending Fill In1 Fill in 2 Variation Startstop Accompaniment Volume Metronome Real Time Recording and Playback with U disk Local two tracks recording Save local recording to U disk or Load U disk midi song to Local Recording track 4 x 4 per reg file Save Load reg file to from U disk Split Layer Duet Piano 3 touch sensitivity and fixed to...

Page 60: ......

Page 61: ......

Reviews: