


Hardware Preparation and Installation
RTM-ATCA-7350 Installation and Use (6806800H30G)
23
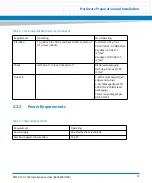
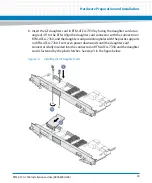
RTM-ATCA-7350 is installed in the slot paired with the server blade slot at the back side of
the shelf. RTM-ATCA-7350 is powered from the payload power of the front board. You
should install RTM-ATCA-7350 before payload power of the front board is turned on. Hot
swap of the RTM-ATCA-7350 while under power is not supported.
Hold the ejector handles and the face plate when you insert or remove RTM-ATCA-7350.
Do not touch the components inside of the blades.
Keep the blade vertical when you install RTM-ATCA-7350. Align the blade with the slot and
then insert it in the shelf.
2.4.1
Ejector Handles
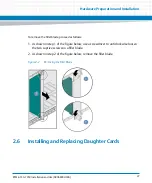
RTM-ATCA-7350 is powered by the server blade in the slot paired with the RTM-ATCA-7350
slot. RTM-ATCA-7350 does not support hot swap. As shown in
, the face plate of
RTM-ATCA-7350 provides an upper and a lower ejector handles. The ejector handles help to
insert, remove, fasten, power on, and power off RTM-ATCA-7350.
2.4.2
ESD Prevention
Static electricity may hurt you or damage the device. To minimize the damage, pay attention
to the following points:
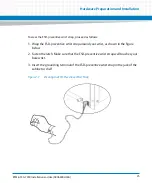
Before you operate the device, wear the ESD-preventive wrist strap. Both terminals of the
ESD-preventive wrist strap must contact well. One terminal touches your bare skin, and
the other is inserted in the jack at the front or back side of the shelf. For details on how to
wear the ESD-preventive wrist strap, refer
Wearing the ESD-Preventive Wrist Strap
.
Avoid moving your body as much as possible. Movement gathers static electricity around
you.
Do not touch the solder point, pin, or bare circuit.
Do not leave the device in the place where others can operate it.
Install the device at once after you take it out of the antistatic package. If you need to lay
down the device, place it back in the antistatic package. Do not lay the device on the shelf
or cabinet.
Monitor the temperature and humidity of the equipment room. Warm air decreases the
humidity and increases the static electricity in the room.
Summary of Contents for RTM-ATCA-7350
Page 1: ...RTM ATCA 7350 Installation and Use P N 6806800H30G September 2014 ...
Page 6: ...RTM ATCA 7350 Installation and Use 6806800H30G 6 List of Tables ...
Page 8: ...RTM ATCA 7350 Installation and Use 6806800H30G 8 List of Figures ...
Page 14: ...RTM ATCA 7350 Installation and Use 6806800H30G About this Manual 14 About this Manual ...
Page 18: ...Introduction RTM ATCA 7350 Installation and Use 6806800H30G 18 ...
Page 46: ...Hardware Preparation and Installation RTM ATCA 7350 Installation and Use 6806800H30G 46 ...
Page 60: ...Controls LEDs and Connectors RTM ATCA 7350 Installation and Use 6806800H30G 60 ...
Page 66: ...Functional Description RTM ATCA 7350 Installation and Use 6806800H30G 66 ...
Page 69: ......