


Hardware Preparation and Installation
RTM-ATCA-7350 Installation and Use (6806800H30G
)
34
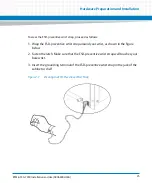
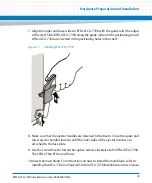
7. Insert
RTM-ATCA-7350
with the GE daughter card installed in the shelf. For more
information refer,
.
After installation, check if RTM-ATCA-7350 can be powered on and work normally. Use the
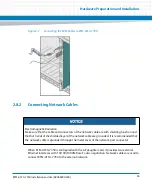
network cable to connect RTM-ATCA-7350 to the external network. Check if the network is
connected properly and monitor whether the network port indicator is normal.
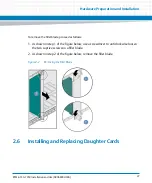
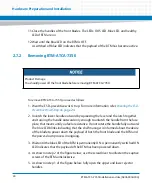
2.6.3.3
Replacing the GE Daughter Card
To replace the GE daughter card, proceed as follows.
1. Wear the ESD-preventive wrist strap. For more information refer,
.
2. Remove the RTM-ATCA-7350 whose GE daughter card is to be replaced. For more
information refer,
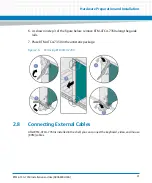
3. Open the plastic latches fastening the GE daughter card.
4. Exert even force upwards until the daughter card connector is removed from the
connector on RTM-ATCA-7350. Remove the daughter card by facing the daughter
card at an angle of 45° to the RTM.
5. Place the removed GE daughter card in an antistatic package.
6. Take the new GE daughter card out of the antistatic package.
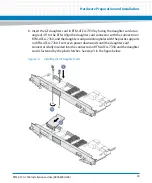
7. Insert the GE daughter card in RTM-ATCA-7350 by facing the daughter card at an
angle of 45° to the RTM. Align the daughter card connector with the connector on
RTM-ATCA-7350, and the daughter card positioning holes with the plastic supports
on RTM-ATCA-7350. Exert even power downwards until the daughter card
connector is fully inserted into the connector on RTM-ATCA-7350 and the
daughter card is fastened by the plastic latches.
8. Install RTM-ATCA-7350 whose GE daughter card is replaced. For more information
refer,
.
Summary of Contents for RTM-ATCA-7350
Page 1: ...RTM ATCA 7350 Installation and Use P N 6806800H30G September 2014 ...
Page 6: ...RTM ATCA 7350 Installation and Use 6806800H30G 6 List of Tables ...
Page 8: ...RTM ATCA 7350 Installation and Use 6806800H30G 8 List of Figures ...
Page 14: ...RTM ATCA 7350 Installation and Use 6806800H30G About this Manual 14 About this Manual ...
Page 18: ...Introduction RTM ATCA 7350 Installation and Use 6806800H30G 18 ...
Page 46: ...Hardware Preparation and Installation RTM ATCA 7350 Installation and Use 6806800H30G 46 ...
Page 60: ...Controls LEDs and Connectors RTM ATCA 7350 Installation and Use 6806800H30G 60 ...
Page 66: ...Functional Description RTM ATCA 7350 Installation and Use 6806800H30G 66 ...
Page 69: ......


