FRU Installation
AXP640 Installation and Use (6806800M24F
)
158
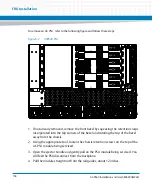
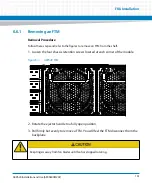
To remove an AC PSU, refer to the following figure and follow these steps:
1. If not already removed, remove the front bezel by squeezing the retention clasps
incorporated into the top corners of the bezel and rotating the top of the bezel
away from the chassis.
2. Using the appropriate tool, loosen the chassis retention screws on the top of the
AC PSU module being serviced.
3. Open the ejector handle and gently pull on the PSU module being serviced. You
will feel the PSU disconnect from the backplane.
4.
Pull the module straight out from the rail guides, about 12 inches.
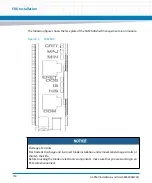
Figure 6-2
AXP640 PSU
Summary of Contents for AXP640
Page 1: ...AXP640 Installation and Use P N 6806800M24F May 2014 ...
Page 8: ...AXP640 Installation and Use 6806800M24F Contents 8 Contents Contents ...
Page 10: ...AXP640 Installation and Use 6806800M24F 10 List of Tables ...
Page 50: ...Platform Architecture AXP640 Installation and Use 6806800M24F 50 ...
Page 70: ...AXP640 Shelf Description AXP640 Installation and Use 6806800M24F 70 Figure 2 14 AC Inlet 220V ...
Page 101: ...Site Preparation AXP640 Installation and Use 6806800M24F 101 Figure 3 13 Planning Checklist 2 ...
Page 102: ...Site Preparation AXP640 Installation and Use 6806800M24F 102 ...
Page 112: ...AXP640 Operations AXP640 Installation and Use 6806800M24F 112 ...
Page 136: ...AXP640 Shelf Installation AXP640 Installation and Use 6806800M24F 136 ...
Page 164: ...FRU Installation AXP640 Installation and Use 6806800M24F 164 ...
Page 186: ...Shelf Management Alarm Module AXP640 Installation and Use 6806800M24F 186 ...
Page 189: ......


