9
Doc.-no.:
DS85P_01_EN
issue:
09/2018
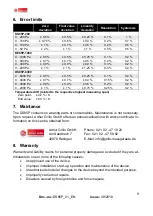
6. Error limits
Zero
deviation
Final value
deviation
Linearity
deviation
Resolution
hysteresis
DS85P-200
0…200 Pa
± 0.5 %
± 0.5 %
± 0.25 %
0.1 %
1 %
0…150 Pa
± 0.75 %
± 0.6 %
± 0.4 %
0.2 %
0.7 %
0…100 Pa
± 1 %
± 0.7 %
± 0.5 %
0.2 %
0.5 %
0…50 Pa
± 2 %
± 1 %
± 1 %
0.3 %
0.5 %
DE85P-1000
0…1000 Pa
± 0.5 %
± 0.5 %
± 0.25 %
0.1 %
0.2 %
0…500 Pa
± 0.7 %
± 0.7 %
± 0.5 %
0.2 %
0.2 %
0…300 Pa
± 0,9 %
± 0.9 %
± 0.9 %
0.3 %
0.2 %
0…200 Pa
± 1 %
± 1 %
± 1.25 %
0.3 %
0.2 %
DS85P-6000
0…6000 Pa
± 0.5 %
± 0.5 %
± 0.25 %
0.1 %
0.2 %
0…4000 Pa
± 0.7 %
± 0.7 %
± 0.4 %
0.15 %
0.2 %
0…3000 Pa
± 0.9 %
± 0.9 %
± 0.6 %
0.2 %
0.2 %
0…2000 Pa
± 1 %
± 1 %
± 0.75 %
0.25 %
0.2 %
Temperature drift (related to the respective highest measuring span)
Zero point:
± 0.2 % / K
End value:
± 0.3 % / K
7. Maintance
The DS85P contains no wearing parts or consumables. Maintenance is not necessary.
Upon request, Arthur Grillo GmbH offers an annual calibration with works certificate. In-
formation on this can be obtained from:
Arthur Grillo GmbH
Am Sandbach 7
40878 Ratingen
Phone: 0 21 02 - 47 10 22
Fax: 0 21 02 - 47 58 82
E-Mail: info@grillo-messgeraete.de
8. Warranty
Warranty and liability claims for personal property damage are excluded if they are at-
tributable to one or more of the following causes:
•
Unapproved use of the device.
•
Improper installation, start-up, operation and maintenance of the device.
•
Unauthorized structural changes to the device beyond the intended purpose.
•
Improperly carried out repairs.
•
Disasters caused by foreign bodies and force majeure.


