5 of 8
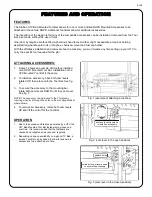
Fig. 1 (example of attaching a tool box)
ATTACHING ACCESSORIES:
1. Figure 1 shows an example of a toolbox installed
on a
ROPS Mounted Tool Bar
. Installation onto a
UTV Mounted Tool Bar
is the same.
2. To install an accessory, have both cam levers
rotated UP, then place onto the Tool Bar. See fig.
2.
3. To secure the accessory to the mounting bar,
rotate both cam levers DOWN until they cam over.
See fig. 3.
NOTE: The accessory can be locked to the Tool Bar by
inserting a padlock through the holes in the mounting bracket
where shown.
4. To remove an accessory, rotate both cam levers
UP and lift the unit off of the Tool Bar.
OPERATION
1. Due to the excessive vibrations generated by a UTV, the
UTV Bed Mounted Tool Bar fasteners may loosen up
over time. It is recommended that the fasteners are
checked and retightened, as required, regularly.
2. Depending on space availability on a given UTV Bed, a
second Tool Bar can be added to allow for even more
accessories to be attached at a time.
FEATURES AND OPERATION
Fig. 2 (cam lever in the open position)
Fig. 3 (cam lever in the closed position)
rotate both cam levers up
to install an accessory
padlock holes
rotate both cam levers down
to secure the accessory
FEATURES
The Artillian UTV Bed Mounted Tool Bar allows for one or more Artillian ROPS Mounted Accessories to be
attached to the vehicle ROPS. Additional Tool Bars allow for additional accessories.
The innovation of the design is that any of the compatible accessories can be installed or removed from the Tool
Bar in seconds, without the use of tools.
One job may require a toolbox filled with various hand tools. Another might necessitate a tool rack holding
assorted long-handle yard tools or maybe a chainsaw mount and fuel can holder.
With the effortless installation and removal of each accessory, you won’t waste any time setting up your UTV to
carry the specific tool required for the job!

