4 of 8
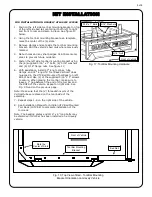
7.
Using a T30 Torx bit, remove the (4) screws on the
inside of the left and right side of the bed. When
removing the screws, the side panels will fall off the
bed of the body. Hold the side panels when removing
the screws. See Fig. 7.
8.
Put the bed back down. Using (6) of the supplied
5/16”
X
6”
long bolts and (6)
5/16”
washers, use a
1/2”
socket to install the left mounting bracket and
backing plate. Repeat this step on the right side of
the bed with right mounting bracket and backing
plate. Torque the
5/16”
bolts to 150 (Inch
-
Pounds)
or 17 (Newton
-
Meters). See Fig.8.
Note: Make sure that the threaded inserts on the backing
plates are pointed towards the ground as shown in Fig. 8.
9.
With assistance, install
42”
long tool bar, tube
clamps, and
32”
long UTV Tool Rack Vertical Tubes
(supplied in the UTV Bed Mounted Tool Rack) on left
side of bed. Use (4) of the supplied
5/16”
X
1”
screws
to secure. When placing the tool bar, make sure to
leave a
1”
gap between the end of the tool bar and
the ROPS of the vehicle. Repeat on right side. See
Fig. 9.
Note: Make sure that the (2) threaded inserts of the
Vertical tubes are placed on the top/inside of the
assembly.
10.
See Installation Manual for Artillian UTV Bed Mounted
Tool Rack (1UTVRK) to complete installation of the
tool rack. Once installation of the tool rack is
complete, finish the below steps to complete this kit
installation.
11.
Tilt the bed back. Re
-
install the bed
’
s side panels
removed on Steps 5
-
7. See Fig. 11.
Note: When tilting the bed back, grab the tool rack and
slowly allow the bed to tilt back. Do not let it free fall.
12.
Close the bed and open the tailgate. Re
-
install the
tail lights removed in Steps 2 and 3. Close the
tailgate. See Fig. 12. The kit installation is now
complete.
Note: The
5/16”
x
1”
long bolts &
5/16”
flange nuts may
be discarded if the tool bar has been installed on a Polaris
vehicle.
Fig. 11; Re
-
install the Bed
’
s Side Panels
Fig. 7; Remove Left Tail Light
Fig. 8; Install Left Bracket and Backing Plate
Fig. 9; Install Tool Rack
’
s Vertical Tubes.
Fig. 12; Re
-
install Tail Lights
KIT INSTALLATION
Remove Hardware (4 Places)
1”
gap
Inserts on Underside
Mounting Bracket
Backing Plate
Inside of
tube


