background image

141 

DIGITAL I/O TAB 

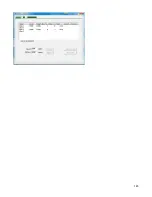
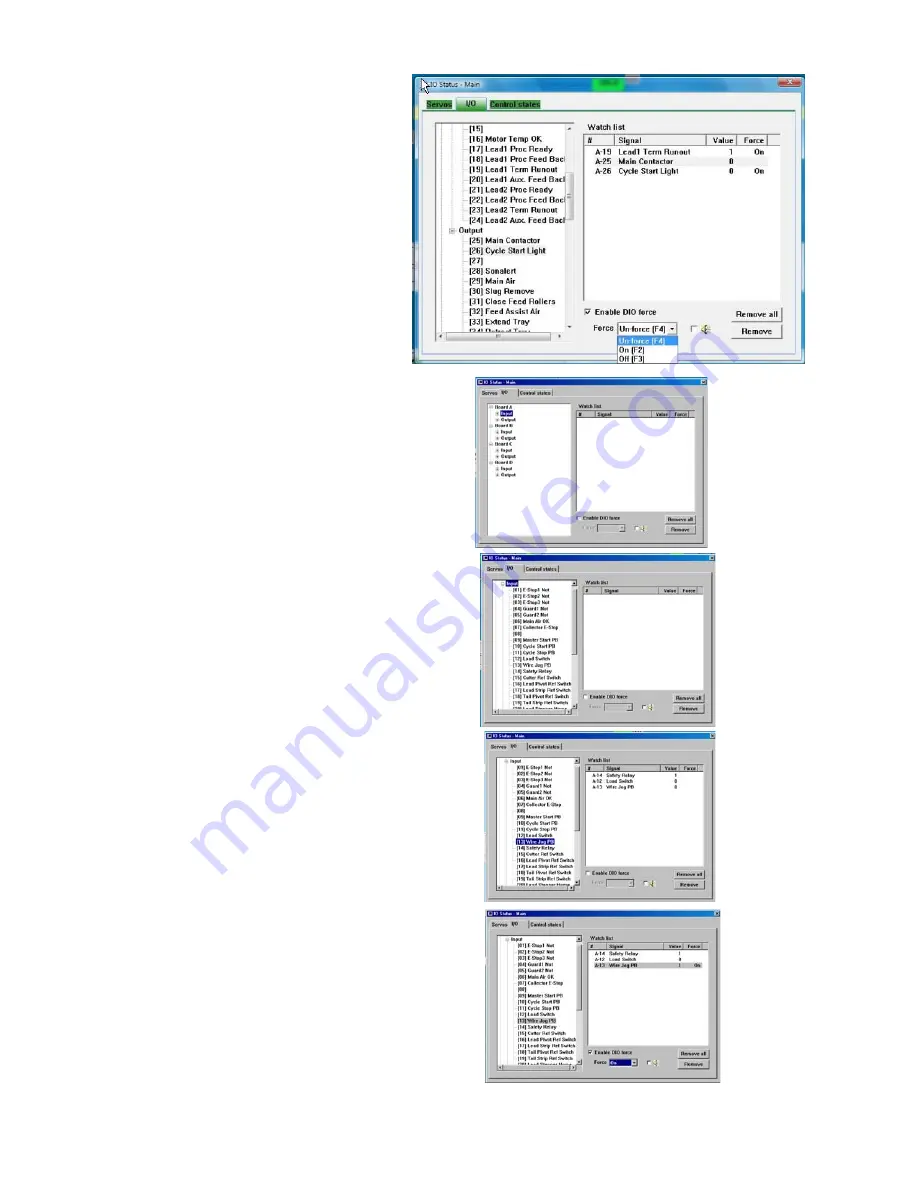
The Unity software includes powerful on-
line input/output help screens for use in 
problem diagnostics. 
 
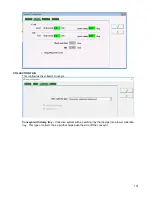
To monitor or force an I/O, find the I/O 
point in the left panel of the screen. 
Expand it as in Windows Explorer. Double 
click on the point. It will open in the right 
panel. Highlight point in the right panel.   
Now you can view the state of the point, 
True or False, If you like, turn on the 
‘Annunciator” and the sonalert will sound 
whenever a point goes “True”. Enable the 
“DIO” forcing and inputs and outputs can 
be forced on or off.  
 
The I/O point values can be useful along 
with the States Screen information in 
troubleshooting a problem. 


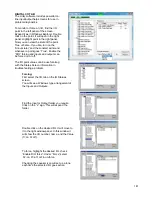
Forcing: 

First select the I/O tab on the IO Statues 
screen. 
You will see a Windows type arrangement of 
the Inputs and Outputs. 


Find the Input or Output folder you require. 
Click on the “

+

” sign. This will expand the 

folder. 


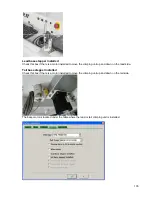
Double click on the desired I/O. It will move to 
it to the right window panel. In this window it 
will show the I/O number, name, and the Value 
(1=on  0=off). 


To force, highlight the desired I/O, check 
“Enable DIO force”. Under “Force” select 
 F2-on, F3-off, or F4-un-force.  
 
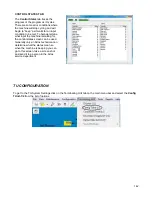
Checking the speaker icon will set up a tone 
each time the selected I/O goes active. 


Summary of Contents for CR.11

Page 1: ...1 Machine Model CR 11 22 Dual End Processor Owner s Manual P N 6 119916 Rev 7 07 Date 03 Apr 2017 For Artos Unity Version 7 00 and higher ...

Page 2: ...2 Artos Engineering Company 21605 Gateway Court Brookfield WI 53045 Phone 262 252 4545 Fax 262 252 4544 www artosnet com service artosnet com ...

Page 3: ... program 30 Group program 30 Machine control 30 Qualification 31 Crimp Force Monitoring 31 General software features 31 SETUP MODE FUNCTIONALITY 32 RUNNING A PART 33 Load the part program 33 Change the wire guides 33 Install the applicators 33 Load the wire 33 Checking the cut and strip 34 Set gripper and wire feed pressure 34 Checking the processes 34 Starting Production 36 CREATING OR EDITING A ...

Page 4: ...PROCESS 66 WIRE MARKING 66 Marker Physical Setup 67 HOT STAMP MARKING 67 WM6 67 Continuous Stamp Even Step 68 2 End Stamp 68 Table Stamping Individual 69 INK JET PRINTING 69 UV CURING LIGHT OR SPARK TESTER STEADY ON OTHER 73 BRADY WIRE WRAPTOR LABELER WRAPTOR 73 LABEL PRINTING OPTION 74 CONFIGURING THE COMPUTER 74 CONFURING THE LINK TO THE NICELABEL SOFTWARE 75 SELECTING THE PRINTER 76 CREATING A ...

Page 5: ...inal Applicator 109 Entering bar code data for the Seal Boot 110 Operation of material validation 112 ADDING TERMINAL ICONS 113 CONFIGURING SPECIAL PROCESSES 113 Closed Barrel termination 113 Using Process Funnels for Closed Barrel 115 BD 4 Wire burning device 117 LANGUAGE CONFIGURATION AND TRANSLATION 117 Configuring the machine for a language 117 Translated text files 119 Changing the translatio...

Page 6: ...ng Mechanical Index Position 160 SETTING THE SERVO REFERENCE 161 TU 11 12 15 Servo Reference procedure 164 Shut HEIGHT adjustment 167 Shut Height Setting 167 Setting Shut Height 167 MACHINE INSTALLATION 168 Setting the machine in position 168 Installing the straightener bar 170 Checking the 1 5M or 2M collector 171 Installing the 4M collector 172 Installing the computer 177 Installing the monitor ...

Page 7: ...e main guard is open and the machine is in setup mode the power and air are live on the machine When the machine is in this state always leave your hands on the two handed controls If other personnel are in the area they should never lean over or reach into the machine Feed drive Never place fingers in between the wire feed wheels or belts Cutter head Never place fingers between the blades The bla...

Page 8: ...s in the terminal applicator If it is necessary to remove debris use a screwdriver or similar tool Wire pick and place device Never place your fingers in the gripper Seal Applicator Never place fingers inside the frame of the seal applicator ...

Page 9: ...e burns will result Always wear eye face protection and high temperature gloves when servicing the solder pot Wire twister Never touch the rotating head of the twister BD 4 burning device Never the touch the heated blades severe burns will result ...

Page 10: ...cumented GUARD Opening the guard will stop the machine and display the warning Guard Open The same message will appear if the Master Start is pressed with the guard open There are two operating switches located around the machine One is on the side of the infeed station and one is on the side of the operator station Momentarily press the top of the rocker switch to open and again on the bottom to ...

Page 11: ...in fact safe DAILY SAFETY CHECK Have the machine loaded with wire so that it will be able to do a wire feed in one of the steps below If any item in this list does not perform as stated the machine should be locked out and the appropriate maintenance personnel notified Safety circuit check 1 Turn the setup key to run mode 2 Close the machine guard 3 Master start the machine Press the E stop button...

Page 12: ...lowly feed a length of wire and then stop 10 Turn the setup key to Run a The message Hood guard is open will appear on the screen b The orange master start lights turn off on machine operator stations and on the back of each crimping unit c The air pressure gauges on the front of the machine go to 0 d The motors de energize Mechanical checks 1 Look for any damage to the plastic guard 2 Make sure a...

Page 13: ...ly if disregarded No immediate danger damage or personal injury WARNING The CR 11 22 Uses sharp cutting tools to perform its function Great care must be taken to protect the operator and others from harm WARNING Never attempt in any way to operate this machine with the guards removed Never attempt in any way to operate this machine with the guards open Never attempt in any way to disable the safet...

Page 14: ...tandard transformer 230VAC 10 1 Phase 50 60 Hz 16Amps CR11 Power Supply universal transformer 200 208 230VAC 10 1 Phase 50 60 Hz 16Amps CR22 Power Supply standard transformer 230VAC 10 1 Phase 50 60 Hz 16 Amps standard 25 Amps if soldering or seal applicators CR22 Power Supply universal transformer 200 208 230VAC 10 1 Phase 50 60 Hz 16 Amps standard 25 Amps if soldering or seal applicators CR22 wi...

Page 15: ...inty is the upper limit of the range in which the level measured may be located Wire Range Min 0 05mm2 30 AWG Max 4 0mm2 12 AWG OD 5mm 0 210 In Note Additional sizes may be possible see Artos for Details Wire Length Min 25 mm 1 inch depending on strip length Max 100m 3938 inches Stripping Lengths Min 0 1mm 0 004 in Max 32mm 1 26 in Wire overhang for lead and tail 10mm 0 4 in strip length CFM chop ...

Page 16: ...t Brookfield WI 53045 USA Model Cr 22c 2015 Serial Cr 22c 00001 001 Q Electrical Diagram 7 144743 Assembly Diagram 4 147221 Voltage 230V 1Ph 50 60 CY Full Load Current 16 Amps SCCR 10 kA Compressed Air 5 cfm 80psi www artosengineering com ...

Page 17: ...on unit Mode Type CR 11 or CR 22 Serial number s CR 21 CR 01 00001 001 Q though CR 22 99999 999 Q Complies with the requirements of the following European Directives Machinery Directive 2006 42 EC Electromagnetic Compatibility Directive 2004 108 EC Main standards considered EN ISO 12100 2010 EN 60204 1 2006 A1 2009 EN ISO 13849 1 2008 EN 61000 6 2 2005 EN 61000 6 4 2007 Date February 6 2015 At Art...

Page 18: ...essed it is accumulated in a collection tray in batches for easy removal by the operator of the machine Limits of Use The CR machine is intended for use in a dry indoor working environment The machine cannot be exposed to liquid spray or mist damage will result Safety guarding and circuits should never be removed or tampered with or injury may result The electrical cabinets should only be opened b...

Page 19: ...of the machine to facilitate loading and set up The second is at the outfeed Operator Station to use in conjunction with the Unity operating system as well as the wire collection tray INFEED STATION CR11 CR22C Jaw clamp and feed roller pressure valves OUTFEED STATION JAW PRESSURE FEED ROLLERS PRESSURE JAW PRESSURE FEED BELT PRESSURE ...

Page 20: ...step Cycle stop Master Stop will stop the cycle at the end of the current part running Holding the button down for 3 seconds will cause an orderly cycle stop and turn off the Master Start Feed Jog will feed wire through the feed system to the cutting area Cut This will pivot the end of the wire to the cut blades and cut the wire Open Close feed rollers for CR22C machine Setup mode key switch Setup...

Page 21: ...uides The Cr11 22 uses easy to change guides to accommodate the range of wire specified to control the wire trough the feed system and to the terminators The Infeed Guide controls the wire going into the measuring encoder The Center Guide controls the wire between the encoder and the feed wheels The Feed Tube guides the wire to the front gripper For these guides you want to choose one that the wir...

Page 22: ...e Nozzle should be sized to be just slightly bigger than the wire Leading gripper Complete guide tube kits Feed Tube Kit for CR11 NOZZLE LATCH PIN INFEED GUIDE CENTER GUIDE NOZZLE FEED ROLLERS OPENER INFEED GUIDE FEED TUBE ...

Page 23: ...the rocker switch to open and on the bottom to close Do not hold the down switch on The safety re open feature will not function CR11 closed guard CR open guard Guard switch Terminal Reel Carts The Terminal reel cart mobile termination cart allows for off line set up of the next part without stopping the current production run Tool less change over is quick and easy When ready to change simply rem...

Page 24: ...tional Crimp Force Monitor sensor installed The base has two stationary clamps and one rotating clamp To install the applicator 1 Slide the top of the applicator in to the T slot 2 Pull the body down and engage it in the two stationary Clamps 3 From the rear of the press pull the larger lever to you and rotate the smaller lever clockwise to engage the moving clamp 4 Release the larger lever This w...

Page 25: ...tion As the press activated the CR will control the air feed based on the timing set in the Crimp Settings window Nominal feed time is approx 400 ms Press Jog The orange button on the back of the press is for slowly jogging the press through a cycle When operating the machine in setup mode you can hold down the setup button and push this button to jog the press To reverse the direction of the RAM ...

Page 26: ... the data in the currently selected folder to an xml file Import Import an xml part or folder Backup This is to back up the entire Artos system to a zip file Restore This is to restore the entire Artos system from a zip file See section Data Storage in CR11 22 Restore from old backup To restore the Artos system from an old non unity backup Print Label If the machine is equipped with a paper label ...

Page 27: ...during the initial installation of the machine see section Device Configuration Machine Configuration Configures values such as the jaw clamp time bade style collector type crimping unit and CFM type Normally only used for setup during the initial installation of the machine see section Machine Configuration Controller ports Defines which computer COM ports the serial cables from the machine contr...

Page 28: ...figuration and translation G Help About Reports the software versions in the machine Icon ribbon Save if data has been changed this icon turns from light to dark color Click it to save Folders for selecting or creating the folder to work out of The use of different folders is recommended if your company has many part programs Only the parts jobs process wire and crimp settings from the currently s...

Page 29: ...ains information related to wire stripping and wire feeding Usually the name for the wire would be your company s inventory number for this particular barrel or spool of wire C Lead Tail Process Setup This is a selection from the Process database This database can be edited by clicking on the 3 dots by the Tail Lead selection drop down Process setup defines each device the swing arm should stop at...

Page 30: ...bs that you would like to run This list can then be sorted to minimize applicator seal and or wire change out When you go to run a group the group list is displayed on the screen When the first part on the list is completed the part is removed from the list and the machine automatically loads the next part and reminds the operator what needs to be changed out If the list is closed the machine reve...

Page 31: ...of the actual crimp force curve compared to the learned curve From this window you can jog through a crimp learn a crimp profile open the setup screens and go to a full view screen that will show you a recent history of the crimping see section Crimp Force Monitor Operation CFM2100 General software features In any Window where you can change settings you will find the following 3 buttons Click che...

Page 32: ...by the machine One hand must press and hold the Second hand Set up Button while the other presses the green Cycle Start Button Each time the Cycle Start button is press the machine will execute one step of the program Cycle Start Button The set up mode is set to a slowed pace for better visibility of function and safety The wire end can be positioned at the end process device such as the applicato...

Page 33: ... nozzle that is just slightly larger than the wire This gives you better alignment between the tip of the wire and the blades and tooling Install the applicators Dock the properly set up Terminal Reel Cart to the machine Install the applicators in the Terminating units Check the terminal path and if the machine is equipped with air blow off adjust the tube so that the air blows on the tooling See ...

Page 34: ...ot be nicked There should be no cut strands and no scraping on the strands If necessary make adjustments to the strip diameter to improve the strip shoulder and set the Way Back so there is no scraping See section Creating or editing wire properties for more detailed information Set gripper and wire feed pressure The pressure settings are usually known in advace If the settings for a particlar typ...

Page 35: ...ang value so that you have the least amount of wire beyond the jaw This gives you the best wire control Remember for the overhang adjustment to take effect you must click apply and run a new part Notice space between jaw and applicator is minimized Overhang value in process setup screen If you are not able to properly see the process open the guard set the key switch for setup mode and use two han...

Page 36: ...f the wire or terminal is accedentally touching one of the devices on the machine To correct this you have to change the Depart Extension Arrive Extension or Return Extension Example when the lead arm moves from the press to the cutter the terminal on the end of the wire hits the seal applicator To stop thes you would go to the Lead Process Setup screen and decrease both the Depart Extension at th...

Page 37: ...ed with the part B Wire Properties Wires database selection C Lead Tail Process Setup Process database selection D Crimping setting TU10Crimp database selection E Preprocess setup Preprocess database selection Any database entry that you select can be edited from the main run screen New entries can also be added from the main run screen Creating a new part program Before creating a new part progra...

Page 38: ...duce wasted wire if the machine tail crimp is a Gross Fault and it needs to shut down Having this checked will slightly reduce the parts per hour Double This box can only be checked if there is a wire doubler installed on the CR22 machine When it is checked the main run screen will display 2 wires that will be joined together Description Any part information that you would like to keep with the pa...

Page 39: ...d with a steady on device such as a UV curing light it is possible to select a second pre process PostProc tab No Batch If this box is checked the machine will run with the batch tray in the lower position This is used for running very large batches or if the wire collects better with the tray in the lower position Release delay This is how long the tail gripper waits for the wire to fall off the ...

Page 40: ... section Creating or Editing a Wire Selecting lead and tail processes For the tail Use the dropdown labeled Tail to select the desired process If only a strip is required select none For the lead Use the dropdown labeled Lead to select the desired process If only a strip is required select none To edit the process or create a new process see section Creating or editing Lead Tail process If the tai...

Page 41: ...sses are normally the same tail process However if the two wire shoulders are not aligning in the crimp it is possible to use two different tail processes each with a different insertion depth in the doubler Both wires must use the same type of pre process mark Both wires must use the same crimp terminal on the leading end Or you can have one wire with a terminal and one with a strip only for the ...

Page 42: ...rtical wires one above the other or horizontal wires side by side To change from a vertical double to as horizontal double simply remove the indicated screw Rotate the doubler to the desired position Insert the screw in to the indicated position in Vertical configuration Horizontal configuration ...

Page 43: ... in the Parts Properties window on the tool bar Enter the name of the double program Click the The parts properties screen will appear as below The pre processes can be set at this time The upper and lower entries will apply to the upper and lower wires respectively ...

Page 44: ...he two wires together and presents them to the tail side press Step 1 Step 2 Step 3 Step 4 Doubler sequence for a horizontal double Step 1 The first wire of the double is placed in the left hand jaw and is shifted to the left Step 2 The second wire is placed in the right hand jaw Step 3 The two wires are then brought together Step 4 The tail side strip jaw gathers the two wires together and presen...

Page 45: ...ocess is selected for both tail ends The machine will only terminate after the second wire of the double is completed REMEMBER The Double end process requires the Doubler as the first step and the termination device second Creating or editing a Wire Before creating a new wire first make sure you select and load a part that is simular to the new one you are going to make This is because all the inf...

Page 46: ...ity as it leaves the cutter For very flexible wires it may be necessary to reduce this speed to prevent the wire from bending Depart Velocity is the speed of the arm as it leaves the cutter For very flexible wires it may be necessary to reduce this speed to prevent the wire from bending Feed Pivot is the position of the arm as the wire is fed 1 means the wire is feeding down the center of the conv...

Page 47: ...on value Wire calibration by using System Default Calibration wire Length 1 Open the wire properties screen shown above 2 Click the bullet for System Default Calibration wire length 3 Cycle start the machine to allow the machine to make 1 part 4 Measure the part that was just produced 5 Enter the measured value 6 Click Calculate Calibration Value Cut Strip tab The first field to set is Strip Diame...

Page 48: ... when the wire is moved into the strip blades This reduced opening increases the parts per hour rate of the machine Uncheck this box if the wire has a great deal of curl and has trouble stubbing on the strip blades instead of going in between them Cutter Home This is the min opening required to safely feed the terminated wire through the cutter head The smaller the distance the faster the machine ...

Page 49: ... tab Barcode Barcode information for the wire this would be used for barcode validation Description Any wire information like ordering numbers or revisions Color Clicking on the top color bar will bring up the Color chart Use this to select the primary wire color to display on the run screen Clicking on the bottom color bar will bring up the color chart Use this to select the color of the strip on...

Page 50: ... machine To set the strip diameter using the Sencor device 1 Load the wire in the machine the wire should extend slightly past the blades 2 From the main screen go to the Wire Properties screen 3 Click the learn button The following screen will appear ...

Page 51: ...wing screen will appear with the learned wire diameter Click Accept to keep the value An error message occurs If the blades do not touch the core of the wire the following screen will appear One of two problems needs to be corrected Either the wire is not in the strip blades or the steel pin in the Sencor device is not piercing the insulation of the wire For this check the air pressure and the sha...

Page 52: ...hat does not have a standardized tool location then you can incorporate the name of the terminal seal or crimp tooling into the name of the process for easy reference Overhang and stripping adjustments Overhang Additional wire extending from the strip jaws The minimum amount is determined by the strip length you would increase this amount so that the wire can reach into the seal applicator or term...

Page 53: ...steps as necessary to process the end of the wire The name of each step is one of the process stations located on the machine It is possible to call up the same device twice For example you could call up the Crimp device twice For the first one on the list you can select the Check box NO DEVICE TRIP And then you could set the depart speed very low This would cause the wire to move slowly into the ...

Page 54: ...re the Pivot Position is the offset value from the pivot calibration Likewise the Extension is the offset value from the extension calibration To edit the process position first click on the process name in the list and then click on the Position tab Pivot Position The rotational left right position of the wire end at the process station Arrive Extension The axial in out position of the wire end a...

Page 55: ...his time is automatically calculated during running so you do not need to enter a value Post Trip Time The time in milliseconds that the wire will remain in the process position after the process is tripped nominally 125 ms If this process is a crimping unit this time is automatically calculated during running so you do not need to enter a value Use these arrows to increase or decrease the selecte...

Page 56: ...ally If the crimp failed the machine will cut off the bad crimp If the crimp fails the tolerances by a small amount marginal fail the machine will reproduce the part If the crimp fails the tolerances by a large amount gross fail the machine will stop and notify the operator Split Cycle For closed barrel termination and Ignition terminals Checking this causes the crimping unit to move to the captur...

Page 57: ...il One would be when the presses are calibrated differently from one side to the other to accommodate variances in applicator shut height Second would be when you know that the machine will run better with a terminal on a particular side For example a very large terminal should be placed on the tail side because if it is on the lead it gets caught on the cutter blades 7 Click the green check to ex...

Page 58: ...bar codes you must enter a specific terminal name for each terminal you use To add a new Terminal name 1 Click New in the Select Terminal window 2 Click the mouse in the Name field 3 Either enter a name you would like to use or scan in the bar code for use as your name 4 Press the tab key or use the mouse to move the pointer to the Barcode field 5 Scan in the bar code if not using bar codes skip t...

Page 59: ...o save the changes for this terminal If you do not click Apply and then select a different terminal the changes will be lost 4 Make sure to select the desired terminal before clicking the green check box to exit this screen Selecting a Seal Selecting a seal serves two purposes You can choose the picture of the terminal icon to be displayed on the end of the wire For entering the bar code informati...

Page 60: ...e mouse in the Name field 3 Either enter a name you would like to use or scan in the bar code for use as your name 4 Press the tab key or use the mouse to move the pointer to the Barcode field 5 Scan in the bar code if not using bar codes skip this step To change the picture of the seal 6 Click the seal Icon and all the pictures will be displayed see section Adding terminal icons for adding new pi...

Page 61: ...en this window by clicking on the terminal icon shown on the end of the wire diagram Crimping setting window New The settings that are currently displayed are copied to a new name that you enter When creating names for the crimping setting generally you want to use a name that is the combination of the terminal number and gauge of the wire being used This is especially important when qualification...

Page 62: ...only after the crimping cycle When a value is programmed here the carrier strip chopper is activated during the crimp Carrier Chop Cycle is the number of terminations between terminal carrier chop cycles Acceleration The rate at which the ram gains speed For fastest machine cycle time this should be set for 100 Only lower this when using an applicator that has difficulty feeding terminals Velocity...

Page 63: ...Cross Section Tabs Normally a terminal applicator can be adjusted so that it can be used for more than one wire size The three cross section tabs represent up to three different wire sizes that can be used ...

Page 64: ...t show any Cross Sections that may have already been defined for the other end of the wire In this case no values are shown because no cross sections have been defined yet for the other end of the wire If you click on any item in the list the displayed value will be copied automatically to the cross section field Crimp Height If the press is equipped with automatic crimp height adjust this value w...

Page 65: ... below will appear If you do not already have a part made click Set Part Crimp Data Then press Cycle Start on Machine Measure the crimped terminal and press the orange button on the Micrometer to automatically transfer the measurement to the screen If the test passes you can choose to green check box to exit the screen If the machine has automatic crimp height you can choose to optimize the crimp ...

Page 66: ... filled into the Name field Default This will load the default CFM parameters to the currently selected Name Edit This will open the configuration window in the Forceview software List profile for current unit The CFM profiles are stored individually for each crimping unit If this box is checked you will only see the profiles for the unit you are working on If the box is not checked you will see t...

Page 67: ...figuration window but can be adjusted here HOT STAMP MARKING Hot Stamp marking uses a WM 6 or third party marking device to place a hot inked foil transfer mark on the wire The CR allows several formats for these marks The PreProcess window allows you to select from existing preprocesses or make a new one Click on Detail Setting and the window below will open WM6 With the WM 6 two type sets are us...

Page 68: ... along the wire The example above would produce a wire with marks every 6 2 End Stamp This allows you to use a single type set marker to mark the same mark on both ends of the wire with same or different spacing from the ends The example above would space the marks 2 from each end ...

Page 69: ...g the wire The size can vary by the distance the face of the ink jet is from the wire Normally we try to get this pretty close but too close and it will be hard to change the wire guide Too far and quality will suffer Font height and width Size in dots H x L S H the number of dots printed perpendicular to the length of the wire L the number of dots printed parallel to the length of the wire for th...

Page 70: ...s is set for 2 then the each of the 5 lines is printed twice consuming 10 encoder pulses If the boldness is set to 3 then each of the 5 lines is printed 2 times consuming 15 encoder pulses The visual effect of boldness is the portions of the character that are perpendicular to the wire length are twice as thick the portions of the character that are parallel to the wire length are twice as long DI...

Page 71: ...nside of the wire In continuous marking the time stamps are appended to the end of the message For the last message printed it is appended to the beginning of the message Basically for the marks at the end the stamp is toward the inside of the wire In continuous marking simple the time stamp is appended to the end of the message If using Chimney fonts the message will be printed in chimney but the...

Page 72: ...aximum length for each message Continuous Marking This will apply the same mark to both ends of the wire spaced from the ends as programmed It will also place marks along the length spaced according to the value set in the center window This mode causes the machine to produce less parts per hour as compared to Continuous marking simple 35 characters maximum length Continuous Marking Simple This wi...

Page 73: ...as occurred When a fault does occur the machine will either not start or it will shut down and it will display a message pre process fault BRADY WIRE WRAPTOR LABELER WRAPTOR The Brady wire Wraptor is a labeling machine that wraps a label around the wire The positioning of this label is the same as the positioning of a hot stamp mark WM 6 mode The Wraptor can only apply 1 label unlike the WM 6 that...

Page 74: ...y does not exist then create a directory called Label Data in C Program Files Artos Engineering CR11 3 Create a text file named label lbl o In Windows click Start Programs Accessories Notepad o Click file save o Navigate the Save In location to be C Program Files x86 Artos Engineering CR11 Label Data If the x86 directory does not exist then go to C Program Files Artos Engineering CR11 Label Data o...

Page 75: ...R software to the printer software o Click the label printer icon o If the CR software goes directly to the print label window then you are finished with this section o If an error message comes up that says the Label software appears not installed Then click the green check ...

Page 76: ...ssume that the printer is connected to the computer and installed in Windows From the main menu click Configuration Machine Configuration Drop down the Label printer and select the desired printer Example Zebra TLP3844 Z The Label report file directory should default to C program files x86 Artos Engineering CR11 Label Data label or if x86 does not exist then it should default to C program files Ar...

Page 77: ...for future development CREATING A LABEL Opening a new label existing label to edit or existing label to save to a new name 1 Click on the Parts Properties Icon to open the Parts Properties window 2 Select the Label tab Click the browse button If you would like to edit an existing label select the name of that label and click Edit you can edit an existing label and save to a new name To create a Ze...

Page 78: ...As Enter the new name you would like to use for this label The location you should save this to is C Program Files x86 Artos Engineering CR11 Label Data if the x86 directory does not exist then save it to C Program Files Artos Engineering CR11 Label Data Programming the variables to print When starting to create a label you first need to load the variable values you want to display on your label i...

Page 79: ... This manual is a PDF document you can use windows copy and paste routines to copy a string of text from a PDF to this Variable window In the Description line you can enter information about the variable up to 60 characters However this is not displayed anywhere in the label and is only for information about the variable 4 Enter the maximum length to be 50 ...

Page 80: ...ist 10 If you need to add another variable go back to step 2 11 After you have loaded all the variables you plan to use click ok to close the dialog boxes back to the Nice Label main window 12 To place the variable on the label select Text Box Use Existing Variable Variable name Or if you would like to use Rich Text select Rich Text box Use Existing Variable Variable name The difference between th...

Page 81: ... in each text box click View Variable names 14 To add other text or objects to the label see the Nicelabel help menu 15 To change the font or size of text click on the variable box and use the menu ribbon to select the desired attributes ...

Page 82: ...82 16 To change the position of the text in the window enable font resizing or rotation Double click on the variable box 17 When finished editing remember to click File Save ...

Page 83: ...t 63 Name ID of the job Job Description text 126 Description of the job Job Parts number 3 Number of parts in the job Job Harness_Programmed number 6 Total harness loop programmed Job Harness_Current number 6 Current harness loop Part Name text 63 Part name ID Part Description text 126 Part description Part Length number 8 Part wire length Part Batch_Programmed number 6 Programmed batch size Part ...

Page 84: ...aluate and a series know good crimps From this it will learn the average crimp profile curve The CFM will then compare all subsequent crimps to the learned curve plus or minus a give tolerance range The compared curves are displayed in a mini window at the bottom of the run screen See the CFM 2100 manual for complete details on the CFM2100 system The CFM check box in the process window must be che...

Page 85: ...ick Popup Mode in the main menu bar of Forceview Creating and Editing Job Programs The CR11 can be programmed to run a Job Program This is a series of existing part programs run either in a batch or harness A maximum of 500 parts can be entered on a job list There are two modes to run the machine Batch and Harness both are described below Batch Mode will produce all the parts programmed in the tot...

Page 86: ...k the green check If the job has the loops set to 1 enter the number of harnesses to make in the Program multiplier box and click the green check Creating a New Job Program To create a new Job Program click on JOB the following screen will appear Programming for Batch Mode Click on NEW enter the Job Program name and click To add parts Click on the desired part in the left column and drag it to the...

Page 87: ...ue you program in the field will automatically appear in the Enter Quantity Multiplier box You can still change this value at run time In the above sample each harness will have 4 wires and there will be 10 harnesses Each time you select a job to run the multiplier can be changed NOTE Job Programs save when you exit Click Creating and Running groups of parts or jobs General Description The purpose...

Page 88: ...ere you last left off by using the group drop down and selecting the group you wish to continue running Wire Terminal and Seal names used for grouping The wire name shown on the list is the wire name displayed under the image of the wire on the main run screen The Terminal name and seal name is shown on the information tab of the process setup screen Remember to click on the Device name first then...

Page 89: ...e group drop down When clicking on Group the following screen appears In this example the name of the group is group 1 and test parts 1 through 7 have been dragged over to the group list When clicking the green check this window will disappear and the Production Group window will open ...

Page 90: ...the tail terminals then within these smaller lists sort by the wire To move an item click on it so it is highlighted in blue then click the up or down arrow to move it in the list When you click OK on the screen above the list will be automatically organized If you are just opening this group and want to organize the list with the last grouping order settings you programmed click the Organize butt...

Page 91: ... to the next As an example you may have a folder called Ford F150 and one called Chevy Silverado 1500 When the F150 folder is selected you will only see the Part programs processes terminals wires jobs and pre processes that are for the F150 The selected folder is shown at the top of the screen To select a folder Clicking on the down arrow will allow you to select from a list of the last 10 used f...

Page 92: ...Jobs Preprocesses Wires to view the contents If you wish to work on a single item right click on the name of the item you wish to manipulate If you wish to work on a numbers of items that are in a row Click on the first item to highlight it Hold down the Shift key and click on the last item All the items in between will be selected Then right click to show the menu If you wish to select a number o...

Page 93: ... Main Wires 2 Select the items to delete right click and select delete Using the Library for wires instead of the current folder You can choose to run the machine in a mode where the wires displayed in the drop down of the main menu are from a library instead of the particular folder you are in This way you can use the same wire list no matter what folder you are in The only problem with this mode...

Page 94: ... Part Properties screen Mtxjobs mtx Jobs screen Preprocess mtx Pre process screen Process mtx Tail or Lead process setup screen TU10crimp mtx Crimping setting Wires mtx Wire Properties screen These files are in binary format they are not man readable and they are not compatible with any other format The structure of these files can change when upgrading the CR11 software For these reasons the file...

Page 95: ...oftware that connects to individual computers on the network and automatically backs up selected data on that computer The directory to select to be backed up on such a company network would be C program files x86 Artos Engineering CR11 if the x86 directory does not exist on the computer then backup C program files Artos Engineering CR11 This directory contains all the parts jobs and machine confi...

Page 96: ...86 Artos Engineering CR11 if the x86 directory does not exist on the computer then copy to C program files Artos Engineering CR11 Data Export The data export and data import functions can be used to transfer parts jobs wires and process data between machines or between a desktop computer and the machine There are two types of data exports 1 Export the current part and job that is on the screen Thi...

Page 97: ...der This will save all the parts jobs wires and processes that are accessible in the currently selected folder From the main menu bar click File Export Current Folder Select the location to create the file in The file name will already be filled in with the current folder name If you need a name different than this change it now ...

Page 98: ...l file and imports it into the folder that is currently open The new data is added to the folder existing data will not be erased If the item like a Part already exists in the folder the new imported data will overwrite this existing Part properties This is true for any of the stored items From the main menu bar click File Import ...

Page 99: ...The following window will appear after the data has been imported Part Qualification Setting what parameters to qualify Unity allows you to qualify your process before running production You can set the points you want to qualify from the list below ...

Page 100: ... the lead and tail process settings and the lead and tail crimp settings Only changing the crimp height in the lead or tail crimp settings window will force the user to do a new qualification Requalify after any crimp setting or processing setting changes default specification any changes in the lead and tail process settings or lead and tail crimp settings will force the user to do a new qualific...

Page 101: ...ne in Machine Settings The tests to be performed are selected under Options Setting test values for integrated pull tester and micrometer The qualification values to be tested to are set in the Cross Section tab of the Crimp setting screen Select Qualification steps here Click here ...

Page 102: ...b The first value in the list below the cross section field shows the current Wire s Cross Section value that is defined on the Wire Properties Cut Strip tab The next 3 values in the list show any Cross Sections that may have already been defined for the other end of the wire In this case no values are shown because no cross sections have been defined yet for the other end of the wire If you click...

Page 103: ...chine will produce a wire appropriate to the test to be performed In the example below the part has 2 terminals on a specific length of wire 1 The first part will be a full length stripped wire The operator will measure the length and inspect the strip If it is OK the operator will click the green check in the window and the program will move to the next step If it is bad make the appropriate adju...

Page 104: ...alled in the terminating units If the Core Height is in range of the Crimp Height Core tolerance in combination with Percentage of Nominal Tolerance see section Terminating Unit Tab 1 2 for setup for the average of the samples this test will pass If the insulation height is within tolerance if active then the screen will fade away and step 3 will appear If the Core Crimp Height it is not in the re...

Page 105: ... accepts keyboard entry For companies that name the parts the same in both the Artos software and on their work orders a bar code scanner can be used to select the part This is especially useful when you have large number of parts programmed in the Artos software Using the scanner to select an item in a drop down menu 1 Use your mouse to click in the drop down field The field will be highlighted i...

Page 106: ...t the items that you want to have the operator validate bar code scan before running For this next part it is important to have a bar code on each one of the crimping units and seal units on your machine Each bar code has to be different From the main menu select Maintenance Device Configuration 1 Select the first device that is installed on the machine 2 Click the mouse in the Barcode data box 3 ...

Page 107: ...ies window of the wire you wish to enter the bar code for Go to the information tab Click in the barcode data field Scan the bar code Click the green check to save and exit Entering bar code data for the Terminal If the configuration was set to validate Terminals you need to enter the bar code for the terminals Go to the lead or tail process setup tab ...

Page 108: ...t an existing terminal name 1 Scroll to the terminal name or scan in the barcode 2 Make the needed changes in the lower part of the screen 3 Click Apply to save the changes for this terminal If you do not click Apply and then select a different terminal the changes will be lost 4 Make sure to select the desired terminal before clicking the green check box to exit this screen To add a new Terminal ...

Page 109: ...r Go to the lead or tail process setup tab The barcode is contained in the Select Applicator information window Click on the button by the Die Unit to bring up the Window To edit an existing applicator name 1 Scroll to the applicator name or scan in the barcode 2 Make the needed changes in the lower part of the screen 3 Click Apply to save the changes for this applicator If you do not click Apply ...

Page 110: ...special cases where you would select lead or tail One would be when the presses are calibrated differently from one side to the other to accommodate variences in applicator shut height Second would be when you know that the machine will run better with a terminal on a particular side For example a very large terminal should be placed on the tail side because if it is on the lead it gets caught on ...

Page 111: ...res When using bar codes you must enter a specific seal name for each seal you use To edit an existing seal name 5 Scroll to the seal name or scan in the barcode 6 Make the needed changes in the lower part of the screen 7 Click Apply to save the changes for this seal If you do not click Apply and then select a different seal the changes will be lost 8 Make sure to select the desired seal before cl...

Page 112: ...hlighted line will move to whatever station you scanned If this is a seal applicator scan the bar code of the seal If this is a crimping unit first scan the barcode of the applicator then the barcode of the terminal The item you need to scan is displayed in large text at the bottom of the screen As you scan each required item the red X will change to a green check When all the items have a green c...

Page 113: ... terminal image 11 pixels wide by 25 pixels high for a seal image 5 Save the file as a bitmap image bmp 6 Copy the file to Program Files x86 Artos Engineering CR11 terminals If there is no x86 directory then copy the file to Program Files Artos Engineering CR11 terminals 7 Close the CR software and reopen it This will refresh the terminal icons list Configuring Special Processes Closed Barrel term...

Page 114: ...ll swing to this first step and will depart with a slow velocity to the second step which is the crimp 1 Add a new step by clicking the plus sign 2 Move the step up to the first position by clicking on it to highlight it and then clicking the up arrow 3 Go to the information tab and check the box for No device trip 4 Click on the position tab and make the pivot position equal to the pivot position...

Page 115: ...is in front of the funnel and does not bump into anything during the swing Set the process position so that the stripped end of the wire is inserted into the terminal but not so far that the strip shoulder of the wire is bumping the funnel and pushing the wire up Set the depart position so it is exactly the same as the process position The post trip time is the amount of time that the machine wait...

Page 116: ... same as the depart position of the funnel Set the process position to be the insertion into the terminal Set the depart position to be what works to get the terminal out of the applicator The post trip time is the amount of time the arm waits before leaving the crimping unit For a TU 10 crimper this value is not used ...

Page 117: ...1 software select Tools Set Language Use the down arrow to select the desired language The Default Language is English For some languages to display properly you may also have to configure Windows to use the language you need a Go to windows Control panel and select Clock Language and Region b Click Region and Language Change the Format to the needed language ...

Page 118: ...dministrative tab If using Windows XP you can change the language in this window If windows 7 continue to the next step d Click the Change system locale box Then change the current system locale to the desired language ...

Page 119: ...ation is done these files can be copied to other machines If the language you need to translate to is not in the list then contact Artos Engineering Changing the translation for a text string in the software Each word or phrase in the software can be translated to a different language Remember for each language there are two language files one is for the I O status window and the other is for all ...

Page 120: ...listed in section Translated text files There are two files for each language open the file you wish to change in a text editor like Notepad The file contains a list of text strings used in the software To perform the translation enter the text you would like to see on the screen after the Semi Colon For example Batch complete To show this phrase in Spanish enter the following Batch complete Lote ...

Page 121: ...e computer if the registry is damaged To do this click file export save the file to a memory stick or network drive The registry key for the Artos software is HKEY_LOCAL_MACHINE SOFTWARE directory name varies see Note Artos Engineering CR11 Note Because Windows places the Artos Engineering key under different directory names depending on the version of Windows it is best to do a search on the regi...

Page 122: ...e are 3 users Account 1 Full access administer privileges Username Artos Password The Artos account must always be on the computer even if you do not use it The CR11 software will not work properly without this account Account 2 Full access Username Manager Password Account 3 Full access Username Operator Password no password required Windows privileges for users The CR11 software must have admini...

Page 123: ...o locate the mtxcfg xml file in C Program Files x86 Artos Engineering CR11 Config If the x86 directory does not exist then go to C Program Files Artos Engineering CR11 Config It is suggested that you make a copy of the existing file before proceeding Just click copy and paste to copy it Right click on the original file and then click edit If edit is not available from the drop down then select ope...

Page 124: ...124 This next step is only if Edit was not available above Right click and then click View Source The file will open in Note Pad ...

Page 125: ...user window from the main menu bar select Tools User Administration The user administration will let you assign passwords and user levels There are four levels Administrator that allows complete access Supervisor Power user and Operator The lower three all can have their access levels determined by an Administrator The levels are progressive A Supervisor can access all Power users and Operators ac...

Page 126: ...on window This is a list of all the interactive features of the machine Select the feature by right clicking on it then select the level desired Import allows the installation of a password file from another machine And Export allows copying this file to another machine via network or portable storage media ...

Page 127: ...t need owner operator interaction DEVICE CONFIGURATION The Device Configuration sets up the devices mounted on the machine In this screen the devices are identified positional datums are set options are assigned and timing values set In this screen the devices are named and the type of device is assigned so the device and the Cr can communicate properly These names are later used to assign the dev...

Page 128: ...ow If the tail jaw has more problems than the lead it could be because a flow control has been installed to decrease the speed Kit 2 146042 has a flow control valve and instructions 6 146041 describing how to install it The normal time for the Jaw closing is 40mS on the Tail and 30mS for the lead These values can be increased to see if it helps the problem Master Start Timeout This setting will Ma...

Page 129: ...129 8M Sec guard Notice this transition ...

Page 130: ...arm with respect to the strip blades If you notice that the wire is not properly centered in the strip blades you can adjust this value Before making adjustments to the pivot comp make sure that the wire is properly centered in the cut blades during the wire cut If it is not reference the machine If after reference the wire is still not centered in the cut blade during cutting then you will need t...

Page 131: ...B This configures the collector conveyor Conveyor with dump tray Collection system with a batching tray that dumps into a lower collection tray This type of collector has a pin that helps push the wire off the conveyor ...

Page 132: ...nt Collection system with a batching tray that dumps into a lower collection tray Pick and place device to grip the wire and place it into the batching tray Dump Tray Stationary lower collection tray Pushing pin Sliding lower collection tray Sorting pin is retracted ...

Page 133: ... with a batching tray that dumps into a lower collection tray The sliding lower collection tray is operated by an air cylinder the operator presses a button to move it in and out instead of sliding it manually CRIMPER TAB CFM Type This is to select the type of CFM installed When the OES CFM 2000 2100 is selected the OES Forceview software will open automatically when the Cr software is opened The ...

Page 134: ...ystem there are 2 ways to work with the pull test data If the box Display force in KG in metric system is checked the force will be entered and displayed in kilograms If the box is not checked the force will be displayed in Newton s Micro meter Check this box if there is a micrometer installed ...

Page 135: ...d to move the crimping unit up and down on the lead side Tail base stepper installed Check this box if there is a motor installed to move the crimping unit up and down on the tail side The base motor is located under the table where the lead or tail crimping unit is installed ...

Page 136: ...Clicking on the Wrench Icon will open tabbed Machine Settings window PREPROCESS TAB Type Select the type of preprocess installed I E Inkjet Hot stamp marker Preprocess Distance Distance from the point of the pre process to the cutting blade Post delay The maximum amount of time allowed after initiation of the preprocess for actuation to occur Error allowance The amount of allowable error of the pr...

Page 137: ...xtension for a large value so the arm extends the wire out away from the back of the collector 2 For long wires it is more desirable to program the extension for a small value This causes the wire to pull back in the same direction the collector belt is running This helps prevent the wire from being tugged and possibly snapping back toward the cutter 3 Using a value of 3400 generally works for the...

Page 138: ...e operator to use a bar code scanner to validate the material need for a part before he is allowed to run See section Bar Code Scanning For instructions on how the set up this mode Production confirmation When no boxes are checked If in batch mode the machine will move from one batch to the next as long as the collection tray has been emptied If in Job batch mode the machine will stop when a part ...

Page 139: ...yed you must click the box on the screen and you must press the cycle start button Qualification This is to activate the part qualification mode This mode will require the operator to check certain parameters of the finished part before he is allowed to run production See section Part Qualification for instructions on how to set up this mode Enforce short wire in step single mode When selected the...

Page 140: ...s revolution It will increment up 512 counts each time the motor completes a revolution The actual value of this data is not important or of any use However it is important knowing when the change occurs This is used when changing belts or motors Feed system excluded and will be explained later The feed uses two encodes Actual for the wire measurement and Second for motor position 1 motor revoluti...

Page 141: ...inputs and outputs can be forced on or off The I O point values can be useful along with the States Screen information in troubleshooting a problem Forcing First select the I O tab on the IO Statues screen You will see a Windows type arrangement of the Inputs and Outputs Find the Input or Output folder you require Click on the sign This will expand the folder Double click on the desired I O It wil...

Page 142: ...mine what input the machine is waiting for the control states screen can be used Generally only an Artos technician can determine what the states mean so when the machine is beeping you can go to this screen take a screen shot and send it to a person in the Artos service department TU CONFIGURATION To get to the TU System Settings click on the Terminating Unit tab on the main menu bar and select t...

Page 143: ...ve to wait for the chopper Ranges from 0 1000 m s NOTE The rest of the settings are standard default settings and cannot be changed Terminating Unit Tab 1 or 2 NOTE Terminating Unit 1 is for Lead Process and Terminating Unit 2 is for Tail Process Gear Ratio The standard terminating unit has a gear ratio of 7 1 The heavy duty crimping unit has a gear ratio of 14 1 ...

Page 144: ... process and only applies if automatic crimp height is installed on the terminating unit This value lets you control when the TU will do an automatic crimp height adjustment For example if the tolerance is set at 0 50mm and the percentage of nominal tolerance is 100 then this will not adjust the TU crimp height unless your measurement error is greater than 0 50mm if at 50 then this will adjust the...

Page 145: ...145 ...

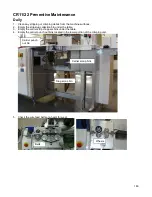
Page 146: ...2 Empty the strip slug collection bin under the table 3 Empty the carrier strip choppers bins under the table 4 Empty the carrier punch out bins located in the lower portion of the crimping unit 5 Check the wire feed belts or wheels for wear Carrier scrap bins Slug scrap bin Carrier punch out bin Belts Wheels ...

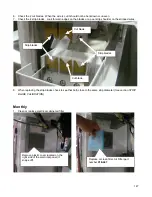
Page 147: ...stripped wires 8 When replacing the strip blades check to see that both close to the same strip diameter See section STRIP BLADE CALIBRATION Monthly 1 Clean or replace electrical cabinet air filter Remove plastic cover located on the right side of the electrical panel it snaps off Replace or clean filter Air Filter part number 918 447 Strip blades Cut blade Strip blades Cut blade ...

Page 148: ...ove the applicators from the TU 11 12 15 s Go to the crimping setting window Set the home position for 1 57 inches 40mm When you master start the machine the RAM should move to the upmost position If it is not re reference the TU 11 12 See TU11 reference pdf Section 2 4 Listen for any air leaks Tighten hoses fittings as needed Crimping setting Set Home to 40mm ...

Page 149: ...hrough the grease fitting This is the moving part on the TU 11 12 15 Use multi purpose lithium grease 905 092 2 Remove the grey pivot arm cover on the lead pivot arm Remove any debris from the rack and pinion gear RAM grease fitting Lead Pivot arm cover ...

Page 150: ...150 3 Check the feed rollers and encoder parts for wear if a groove is forming in them have replacements ready Rack and pinion gear Check for wear on all parts ...

Page 151: ...ose lithium grease 905 092 Clean and grease assembly Check parts for any wear and replace if necessary 2 Grease the shaft bearing of the TU 11 12 15 through the grease fitting This is the non moving fitting of the TU 11 12 15 This only needs a small amount Use multi purpose lithium grease 905 092 Remove 4 screws and remove ram assembly Shaft grease fitting ...

Page 152: ...y need to remove the wire collector cover Clean any debris from the rack and pinion gear Move the arm from one side of the rack to the other make sure it is not binding at either end or has a lot of play in either end Apply a small amount of quad ring lubricant 919 021 See Quarterly maintenance step 2 for pictures of the leading arm Remove the cutting head cover Ball screw Tail pivot arm cover ...

Page 153: ...damage or looseness Replace the cover after inspection 6 Remove the cover from the cutter head motor under the main machine table Check the belt for damage or looseness Replace the cover after inspection View from under the main table Rack and pinion gear Tail strip and pivot belts Cutting head belt ...

Page 154: ... any looseness or wear Clean any debris from the vertical rods Apply a small amount of Teflon grease 917 319 9 Check the gripper arm bearings by pushing to and from the gripper body If you feel looseness in the arm the grippers need to be rebuilt Rear cover Lead strip and pivot belts Rod bearings Gripper arm bearings ...

Page 155: ...assembly Clean any debris check for too much play Lubricate with quad ring grease 919 021 11 Grease the bearing that raises the guard You will notice a grease fitting Use multi purpose lithium grease 905 092 Gripper arm gears Grease fitting ...

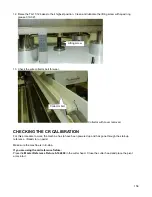
Page 156: ...removed CHECKING THE CR CALIBRATION For this procedure to work the machine has to have been powered up and has gone through the start up reference Ready to run parts Make sure the machine is in E stop If you are using the old reference fixture Place the Master Reference Fixture 5 144860 in the cutter head Close the cutter head and place the pivot arms into it Lifting screw Collector belt ...

Page 157: ...place the pivot arms into it Top Indicator Feed nozzle inserts in the fixture to the bottom of the cavity Out feed jaws closed firmly around pin and tight to the fixture face Master Set up fixture 5 144860 One is shipped with every machine Feed nozzle inserts in the fixture to the bottom of the cavity Master Set up fixture Top Indicator ...

Page 158: ... for the Tail Pivot It should read 0 8 Look at the actual position for the Lead Strip It should read 0 30 Look at the actual position for the Tail Strip If should read 0 30 If any of these counts are out of position perform a CR11 master reference See CR11 servo calibration pdf Section 2 Out feed jaws closed firmly around pin and tight to the fixture face 5 147092 One is shipped with every machine...

Page 159: ... blade opening you would like to adjust Turn the adjustment screw clockwise to make the opening smaller counter clockwise to make the opening larger Make sure to push the bald and holder up against the stop to get an accurate reading The adjustment set screws are on both the top and the bottom tool holders as shown on the picture below REFERENCE POSITIONS MOTOR AND BELT REPLACEMENT Drive Belt Repl...

Page 160: ...escribed below Following the process the machine will first digitally mark its position in the fixture Continuing through the described process the machine will make a series of moves to find the marker pulse relative to the fixtured position Now the number of FBU s between the marker pulse and the 0 position has been established Machine Reference Each Time the machine CPU boots it will require a ...

Page 161: ...Adjust the belt until the free play is gone minimum defection but the belt is not STRETCHED SETTING THE SERVO REFERENCE After you have set the Mechanical Index Position the servo reference must be set This is done using the Master Reference Fixture This is placed in the cutter head and the pivot arms are positioned in it to set the starting position If you are using the old reference fixture Place...

Page 162: ...place the pivot arms into it Top Indicator Feed nozzle inserts in the fixture to the bottom of the cavity Out feed jaws closed firmly around pin and tight to the fixture face Master Set up fixture 5 144860 One is shipped with every machine Feed nozzle inserts in the fixture to the bottom of the cavity Master Set up fixture Top Indicator ...

Page 163: ...llow the prompts With the guard closed press Master Start The machine will go through a series of moves to find the index data marks The machine will then use this information each time it is started from an unpowered state Out feed jaws closed firmly around pin and tight to the fixture face 5 147092 One is shipped with every machine ...

Page 164: ...hen master starting the machine the control will use this prox to determine which way to rotate the motor to return the ram to the home position If this prox is not working the ram could move through bottom dead center before it goes to the home position The prox switch on the right is the reference prox This prox is only used when the machine is master started after a power down CR11 I O Connecti...

Page 165: ...nter of the prox target it should be between 4 and 12mm If you cannot get this distance then loosen the cam and rotate it slightly into position 4 Manually turn the crank counter clockwise until the light on the reference prox turns on Watch the index data on the I O screen very slowly continue to turn the crank until the Index data increments Check the distance between the edge of the cam and the...

Page 166: ...e Shut Height Adjustment 2 Connect the set up fixture to the receptacle cord in the power cabinet 3 Open the servo maintenance screen by clicking Tunit IO 4 Highlight the Ram to reference for Unit 1 or Unit 2 Master start the machine and click Reference Ram The ram will make a series of moves and then go to the home position Tunit servo reference fixture PN 5 138520 The male connector is at the bo...

Page 167: ...5 138986 fixture and 139169 test bar The fixture is installed as you would the applicator Insert the test bar in the fixture Close the guard master start click the appropriate terminal icon on the wire end This will open the Crimping setting window From there you can cycle the Tunit with the Cycle button After crimping the test bar measure the crimped area When the shut is correct this should meas...

Page 168: ...e it to the final location WARNING Make sure the machine is balanced around the center leg Lift machine slowly and not more than 3 inches 75mm off the floor 2 The CR22 guard lifts to a height of 2557mm 101 inches Make sure there are no obstructions the guard could come into contact with ...

Page 169: ...achine The distance from the floor to the table top should be about 35 75 inches If the table is lower than this the carts will not fit into the machine 5 Locate the black frame covers Insert these into the holes in the frame where you removed the lifting bars in step 1 6 Remove any tie wraps that are holding the cutter head and the pivot arms in position ...

Page 170: ...170 Installing the straightener bar Bolt the straightener bar onto the machine frame Single wire straighter Dual wire straightener ...

Page 171: ... for when the machine is equipped with a 1 5M or 2M collector The collector can move around in shipping The leading edge of the collector should be positioned as shown below If not make adjustments as needed to the mounting brackets Collector mounting brackets ...

Page 172: ...d to the machine can be adjusted This may be necessary for some of the steps below 2 Bolt the second section of collector to the first section You should adjust the feet on the leg under the joint so that the feet are not touching the floor This will allow you to move the section around to get the bolt holes to line up 4 Bolts on the inside of the collector Adjustment screws Adjustment screws ...

Page 173: ...and aligned with machine 4 Install the collector belt over the collector pulleys 5 Start to tension the belt so the spacer block can be installed Once the spacer block is installed check the belt tension by lifting up on the lower section of belt If it is very loose tension the belt some more 4 locking screws Loosen to adjust tension and then tighten when finished Tensioning bolt ...

Page 174: ...174 Spacer block not installed Spacer block installed Spacer block ...

Page 175: ...175 6 Install the belt covers and the upper guards 7 Properly align the front of the collector with the machine The belt should almost be touching the scrap collection chute Belt cover Upper guard ...

Page 176: ...76 8 Route the power cable and air lines through the frame of the collector 9 Connect the power cable to the motor a Black first terminal b White second terminal c Red third terminal d Green Ground screw ...

Page 177: ... if it is turning in the proper direction If it is turning backwards disconnect power from the machine and reverse the white and black wires connected to the motor Installing the computer Place the computer into the machine and connect the cables The USB connectors can plug into any USB ports The Ethernet cable should plug into the Ethernet port that is at the center of the computer The Ethernet p...

Page 178: ...178 Installing the monitor Use the 4 screws provided to mount the monitor Plug in the cords UBS cord from computer ...

Page 179: ...the inside of the enclosure an 8mm air line connects to this NPT fitting See picture in section 8 Location of power and air inlets on top of the machine The machine is normally shipped with the fittings located at the top of the machine If it is desired to have the power and air enter from the end of the machine move the two fittings to the holes at the end of the machine Location of power and air...

Page 180: ...ches 22 2mm The power should be connected to the top of the disconnect switch The ground wire should be connected to the ground bar Turn off CB1 down position and energize power to the machine Check the voltage at the top of CB1 it should be 208 or 230 depending on what the machine was ordered for The required voltage is shown on a label by the power disconnect switch If the voltage is correct tur...

Page 181: ...ctor The hole through the enclosure is 875 inches 22 2mm The power should be connected to the top of the disconnect switch The ground wire should be connected to the ground bar Remove fuses FU1 and FU2 then energize power to the machine Check the voltage across the top of fuses FU1 and FU2 it should be 200 208 230 380 415 440 or 480 depending on what the machine was ordered for The required voltag...

Page 182: ...182 The wiring diagram in shows the main power connection coming into the machine ...

Page 183: ...minals and side feed terminals Install the included covers for options you know you will not be using in the machine CR11 147865 Cover lead terminating unit rear feed 147866 Cover lead terminating unit side feed 147867 Cover tail terminating unit rear feed 147868 Cover tail terminating unit side feed 147866 147865 147867 147868 ...

Page 184: ...1L 147869 Cover lead terminating unit side feed 147870 Cover lead terminating unit end feed 147871 Cover tail terminating unit side feed 147872 Cover tail terminating unit end feed 147869 147870 147872 147871 ...

Page 185: ...tep you should see that the computer booted up If it is seems like Windows is actually stuck on a black screen and will not boot up then do the following 1 Power down the computer You might have to turn off power to the machine to do this 2 Unplug the USB cable to the monitor See section 5 for a picture 3 Power up the machine computer The computer should boot up properly now and go to a log in scr...

Reviews: