68
OPERATION OF CATTLEMAXX
CAUTION: KEEP HANDS AND FEET
CLEAR OF AUGER. MAKE SURE
GRATE IS ALWAYS IN PLACE.
Addition of very fine ingredients or commodities that
do not need to be processed should be added to
the mixer either through the supplement hopper or
through the rollermill with an increased roll gap.
Fine ingredients or commodities will tend to pack
onto the rolls set with a narrow roll gap and may
cause the eccentric roll release to trip if the roll gap
is less than the roll scraper clearance.
If micro-ingredients are to be added to the feed, the
best results are obtained with a pre-mix, or by
adding the supplements and micro-ingredients at
the same time. If the micro-ingredients are desired
without a pre-mix or other supplement, open the
mixing tank lid and add the ingredients directly into
the mixer. This should be done at the beginning of
the operation. Make sure to close the lid before
starting the operation. The supplement hopper lid
should always be closed when not in use.
If strong additives are not desired in the batch that
follows, clean out the tank cone and unloading
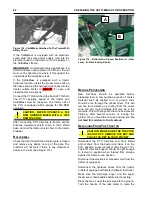
augers through the clean-out doors (See Figure
123).
CAUTION: MAKE SURE THE PTO IS
DISENGAGED AND THE TRACTOR IS
SHUT OFF. PLACE THE KEY IN YOUR
POCKET
BEFORE
OPENING
OR
CLOSING THE CLEAN-OUT DOOR.
Figure 123 - Tank Cone Clean-Out Door On Right-
Hand Side.
Figure 124 - Clean-Out Door Located Under Right-
Hand Side Of Tank Assembly.
Located under the right-hand side of the frame and
tank assembly is a hinged door on the bottom of the
auger trough. Release two spring clamps and allow
door to drop. Keep away from the opening. Run the
mixer slowly until the trough and the mixing tank are
cleaned out. Keep all bystanders away from the
machine.
F
ILLING
T
HE
M
IXER
T
ANK
Make sure the mixing tank unloading door is closed.
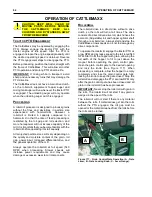
As the mixing tank is filling, watch the ground feed
through the mixing tank windows. If the top window
is covered, this does not mean the tank is full as the
mixing auger throws material away from the center
of the tank. Continue loading until the top window
clears (feed drops) and then becomes covered
again about half-way (See Figure 125). Stop
feeding material into the processor at this point, but
continue operating until the processor has had time
to clear.
Do not overload the mixer.
An overload
can cause damage to the machine. To estimate the
number of bushels that are in the tank, refer to
Table 3.
Filling
Full
Figure 125 - Filling pattern
For the best mixing results, always add lightweight
bulky materials first. Always add high moisture
corn
Summary of Contents for CATTLEMAXX 6105
Page 7: ...TABLE OF CONTENTS 5 ...
Page 14: ...12 INTRODUCTION Figure 5a Safety Decals ...
Page 22: ...20 PREPAIRING THE GINDER MIXER FOR OPERATION Figure 15 PTO Support ...
Page 27: ...OPERATION OF GRINDER MIXER 25 cleaned out Keep all bystanders away from the machine ...
Page 42: ...40 LUBRICATION Figure 70 Hammermill engaging pin shields removed for clarity ...
Page 49: ...SERVICE 47 Figure 96 Belt Removal Shields Removed For Clarity B C ...
Page 78: ...76 OPERATION OF CATTLEMAXX Figure 143 Hopper Inspection Window ...

