background image

SAVE THESE INSTRUCTIONS CAREFULLY

Read these instructions carefully before using your

microwave oven, 

a

nd keep it carefully.

If you follow the instructions, your oven will provide you with

many years of good service.

INSTRUCTION MANUAL

Microwave Oven

MODEL:

AMG28TKB 

Summary of Contents for AMG28TKB

Page 1: ...LLY Read these instructions carefully before using your microwave oven and keep it carefully If you follow the instructions your oven will provide you with many years of good service INSTRUCTION MANUAL Microwave Oven MODEL AMG28TKB ...

Page 2: ...amaged the oven must not be operated until it has been repaired by a competent person ADDENDUM If the apparatus is not maintained in a good state of cleanliness its surface could be degraded and affect the lifespan of the apparatus and lead to a dangerous situation PRECAUTIONS TO AVOID POSSIBLE EXPOSURE TO EXCESSIVE MICROWAVE ENERGY Specifications Approx 18 5kg Model Rated Voltage Rated Input Powe...

Page 3: ... 1 Read and follow the specific PRECAUTIONS TO years and above and persons with reduced physical sensory or mental capabilities or lack of experience and knowledge if they have been given supervision or instruction concerning use of the appliance in a safe way and understand the hazards involved Children shall not play with the appliance Cleaning and user maintenance shall not be made by children ...

Page 4: ...ep an eye on the oven due to the possibility of ignition in sealed containers since they are liable to explode could lead to deterioration of the surface that could 15 Failure to maintain the oven in a clean condition 7 WARNING Liquids and other foods must not be heated 10 If smoke is emitted switch off or unplug the appliance competent person to carry out any service or repair operation that invo...

Page 5: ...rative door open for ovens with a decorative door this oven for ovens provided with a facility to use a 16 Only use the temperature probe recommended for temperature sensing probe adversely affect the life of the appliance and possibly result in a hazardous situation allowed during microwave cooking cleaner 17 The microwave oven must be operated with the 20 Metallic containers for food and beverag...

Page 6: ...liances being used equal or higher than 900mm above the floor and having detacha le turntables But this is not applicable for appliances with horizontal bottom hinged door 22 The appliance must not be installed behind a decorative door in order to avoid overheating This is not applicable for appliances with decorative door 23 The microwave oven is intended to be used built in b 6 ...

Page 7: ... be plugged into an outlet that is properly installed and grounded Consult a qualified electrician or serviceman if the grounding instructions are not completely understood or if doubt exists as to whether the appliance is properly grounded If it is necessary to use an extension cord use only a 3 wire 1 A short power supply cord is provided to reduce the risks resulting from becoming entangled in ...

Page 8: ... for 10 minutes Wipe the oven clean using a soft dry cloth UTENSILS CAUTION Personal Injury Hazard It is hazardous for anyone other than a competent person to carry out any service or repair operation that involves the removal of a cover which gives protection against exposure to microwave energy Utensil Test 1 Fill a microwave safe container with 1 cup of cold water 250ml along with the utensil i...

Page 9: ...wave Safe Some plastic containers soften as the food inside gets hot Boiling bags and tightly closed plastic bags should be slit pierced or vented as directed by package Microwave safe only Use to cover food during cooking to retain moisture Do not allow plastic wrap to touch food Thermometers Microwave safe only meat and candy thermometers Wax paper Use as a cover to prevent splattering and retai...

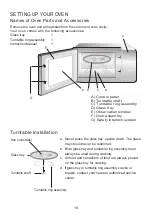
Page 10: ...cessories Glass tray 1 Turntable ring assembly 1 Instruction Manual 1 Hub underside Glass tray Turntable ring assembly a Never place the glass tray upside down The glass tray should never be restricted b Both glass tray and turntable ring assembly must always be used during cooking c All food and containers of food are always placed on the glass tray for cooking d Ifglass tray or turntable ring as...

Page 11: ...nly be connected to a properly installed earthed socket 6 The mains voltage must correspond to the voltage specified on the rating plate 7 The socket must be installed and connecting cable must only be replaced by a qualified electrician If the plug is no longer to accessible following installation an all pole disconnecting device must be present on the installation side with a contact gap of at l...

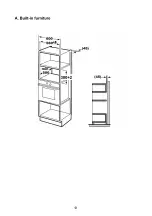
Page 12: ...Instructions Please Read the Manual Carefully Before Installation A gap must be maintained between the wall and the base of the unit above Specific gap size could be referenced by the diagrams Screw Mounting Plate 12 ...

Page 13: ...13 ...

Page 14: ...ttom cabinet template and fix the mounting plate with screw 2 Make the marks on the bottom plane of cabinet according to marks a of the template put the template on the bottom plane of cabinet 1 Read the instruction on the BOTTOM CABINET TEMPLATE Screw Mounting Plate 14 ...

Page 15: ...oven to the cabinet Make sure the back of the oven is locked by mounting plate Do not trap or kink the power cord Mounting Plate 5 Open the door fix the oven to the cabinet with Screw at the installation hole Installation Hole Screw 15 ...

Page 16: ...Control Panel 16 ...

Page 17: ... 1 min 5 seconds 1 5 min 10 seconds 5 10 min 30 seconds 10 30 min 1 minute 30 95 min 5 minutes 2 Press once again or turn to choose 80 microwave power Note 1 2 During the process of clock setting if you press the oven will go back to the previous status automatically 2 Microwave Cooking Press the LED will display P100 Press P30 or P10 will display for each added press Then press to confirm and tur...

Page 18: ...Start 30Sec Confirm Start 30Sec Confirm W T Time Defrost 1 Press twice and the oven will display dEF2 2 Turn to select the defrost time The MAX time is 95 minutes 7 Kitchen Timer 1 Press 2 Turn to enter the correct timer The maximum cooking time is 95 minutes 3 Press to confirm setting 4 When the kitchen time is reached clock indicator will go out The buzzer will ring 5 times If the clock be set 2...

Page 19: ... fish till 350 display 4 Press to start cooking 8 Auto Menu Start 30Sec Confirm Start 30Sec Confirm Start 30Sec Confirm Start 30Sec Confirm vegetable pasta potato 6 Auto Menu Menu Weight Display A 2 A 3 A 5 Vegetable A 4 Fish A 6 Beverage A 7 Pasta A 8 Popcorn 200 g 400 g 250 g 300 g 400 g 200 g 1 about 120ml 2 about 240ml 3 about 360ml 50g with 450 cold water 100g with 800 cold water 50 A 1 Pizza...

Page 20: ...uire the time and the time will display for 3 seconds 11 Lock out Function for Children Lock In waiting state press for 3 seconds there will be a long beep denoting entering the children lock state and the current time will diplay if the time has been set otherwise the LED will display Lock quitting In locked state press for 3 seconds there will be a long beep denoting that the lock is released 9 ...

Page 21: ...llected and treated If at any time in future you need to dispose of this product please do NOT dispose of this product with household waste Please send this product to WEEE collecting points where available It is forbidden to run the unit without any food inside It is very dangerous Trouble shooting 21 ...

Page 22: ...d Semi Integrated and built in All Wine coolers All Dryers Freestanding Cookers Gas and Electric Models in 50cm 54cm and 60cm Widths Portable Appliances Benchtop Models and Portable Gas Models 2 What is not Covered by the Warranty The Warranty does not apply if an artusi product is defective by a factor other than a defect arising in the manufacture of the artusi product including but not limited ...

Page 23: ...wide Appliances to you for a breach of any express or non excludable implied term condition or warranty is limited at the option of Worldwide Appliances to i replacing or repairing the defective part of the artusi product ii paying the cost of replacing or repairing the defective part of the artusi product iii replacing the artusi product or iv paying the cost of replacing the artusi product e Our...

Page 24: ......

Reviews: