background image


or similarly qualified persons in order to avoid a 

hazard. 

•This appliance is intended to be used in 

household and similar applications such as: 

-staff kitchen areas in shops, offices and other 

working environments; -farm houses; -by 

clients in hotels, motels and other residential 

type environments ; -bed and breakfast type 

environments. 

•WARNING: The appliance and its accessible 

parts become hot during use. 

Care should be taken to avoid touching heating 

elements. 

Children less than 8 years of age shall be kept 

away unless continuously supervised. 

•This appliance can be used by children aged 

from 8 years and above and persons with 

reduced physical,sensory or mental capabilities 

or lack of experience and knowledge if they 

have been given supervision or instruction 

concerning use of the appliance in a safe way 

and understand the hazards involved. 

•Children shall not play with the appliance. 

Cleaning and user maintenance shall not be 

made by children without supervision

•WARNING: Unattended cooking on a hob with 

fat or oil can be dangerous and may result in 

fire.NEVER try to extinguish a fire with water, 

but switch off the appliance and then cover 

flame e.g. with a lid or a fire blanket. 

Summary of Contents for CACC60

Page 1: ...Touch Control Cramic Hob Instruction Manual Installation Manual MODEL CACC60 ...

Page 2: ...ctrician Failure to follow this advice may result in electrical shock or death Cut Hazard Take care panel edges are sharp Failure to use caution could result in injury or cuts Important safety instructions Read these instructions carefully before installing or using this appliance No combustible material or products should be placed on this appliance at any time Please make this information availa...

Page 3: ...or cracked cooktop If the cooktop surface should break or crack switch the appliance off immediately at the mains power supply wall switch and contact a qualified technician Switch the cooktop off at the wall before cleaning or maintenance Failure to follow this advice may result in electrical shock or death Health Hazard This appliance complies with electromagnetic safety standards Hot Surface Ha...

Page 4: ...per is exposed when the safety cover is retracted Use with extreme care and always store safely and out of reach of children Failure to use caution could result in injury or cuts Important safety instructions Never leave the appliance unattended when in use Boilover causes smoking and greasy spillovers that may ignite Never use your appliance as a work or storage surface Never leave any objects or...

Page 5: ...that they can use the appliance without danger to themselves or their surroundings Do not repair or replace any part of the appliance unless specifically recommended in the manual All other servicing should be done by a qualified technician Do not use a steam cleaner to clean your cooktop Do not place or drop heavy objects on your cooktop Do not stand on your cooktop Do not use pans with jagged ed...

Page 6: ...hall be kept away unless continuously supervised This appliance can be used by children aged from 8 years and above and persons with reduced physical sensory or mental capabilities or lack of experience and knowledge if they have been given supervision or instruction concerning use of the appliance in a safe way and understand the hazards involved Children shall not play with the appliance Cleanin...

Page 7: ...racked switch off the appliance to avoid the possibility of electric shock for hob surfaces of glass ceramic or similar material which protect live parts A steam cleaner is not to be used The appliance is not intended to be operated by means of an external timer or separate remote control system ...

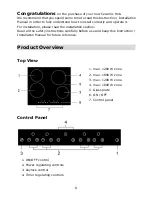
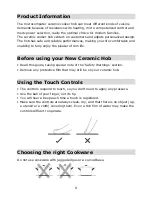
Page 8: ...r installation please read the installation section Read all the safety instructions carefully before use and keep this Instruction Installation Manual for future reference Product Overview Top View Control Panel 1 max 1200 W zone 2 max 1800 W zone 3 max 1200 W zone 4 max 1800 W zone 5 Glass plate 6 ON OFF 7 Control panel 1 ON OFF control 2 Power regulating controls 3 keylock control 4 Timer regul...

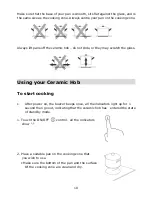
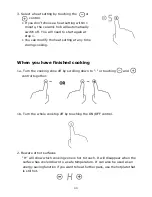
Page 9: ...from life Before using your New Ceramic Hob Read this guide taking special note of the Safety Warnings section Remove any protective film that may still be on your ceramic hob Using the Touch Controls The controls respond to touch so you don t need to apply any pressure Use the ball of your finger not its tip You will hear a beep each time a touch is registered Make sure the controls are always cl...

Page 10: ...ay scratch the glass Using your Ceramic Hob To start cooking After power on the buzzer beeps once all the indicators light up for 1 second then go out indicating that the ceramic hob has entered the state of standby mode 1 Touch the ON OFF control all the indicators show 2 Place a suitable pan on the cooking zone that you wish to use Make sure the bottom of the pan and the surface Of the cooking z...

Page 11: ...ooking When you have finished cooking 1a Turn the cooking zone off by scrolling down to or touching and control together 1b Turn the whole cooktop off by touching the ON OFF control 2 Beware of hot surfaces H will show which cooking zone is hot to touch It will disappear when the surface has cooled down to a safe temperature It can also be used as an energy saving function if you want to heat furt...

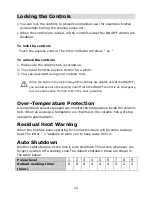
Page 12: ... can always turn the ceramic hob off with the ON OFF control in an emergency but you shall unlock the hob first in the next operation Over Temperature Protection A temperature sensor equipped can monitor the temperature inside the ceramic hob When an excessive temperature is monitored the ceramic hob will stop operation automatically Residual Heat Warning When the hob has been operating for some t...

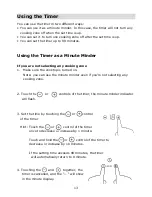
Page 13: ... the cooktop is turned on Note you can use the minute minder even if you re not selecting any cooking zone 2 Touch the or controls of the timer the minute minder indicator will flash 3 Set the time by touching the or control of the timer Hint Touch the or control of the timer once to decrease or increase by 1 minute Touch and hold the or control of the timer to decrease or increase by 10 minutes I...

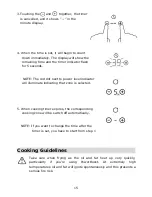
Page 14: ...e finished Setting the timer to turn one cooking zone off 1 Touch the or of the corresponding cooking zone you want to set the timer for 2 Set the time by touching the or control of the timer Hint Touch the or control of the timer once will decrease or increase by 1 minute Touch and hold the or control of the timer will decrease or increase by 10 minutes If the setting time exceeds 99 minutes the ...

Page 15: ...el indicator will illuminate indicating that zone is selected 5 When cooking timer expires the corresponding cooking zone will be switch off automatically NOTE If you want to change the time after the timer is set you have to start from step 1 Cooking Guidelines Take care when frying as the oil and fat heat up very quickly particularly if you re using PowerBoost At extremely high termperatures oil...

Page 16: ...cooking 2 Heat up a heavy based frying pan 3 Brush both sides of the steak with oil Drizzle a small amount of oil into the hot pan and then lower the meat onto the hot pan 4 Turn the steak only once during cooking The exact cooking time will depend on the thickness of the steak and how cooked you want it Times may vary from about 2 8 minutes per side Press the steak to gauge how cooked it is the f...

Page 17: ...er Care and Cleaning What How Important Everyday soiling on glass fingerprints marks stains left by food or non sugary spillovers on the glass 1 Switch the power to the cooktop off 2 Apply a cooktop cleaner while the glass is still warm but not hot 3 Rinse and wipe dry with a clean cloth or paper towel 4 Switch the power to the cooktop back on When the power to the cooktop is switched off there wi...

Page 18: ...ktop off 2 Soak up the spill 3 Wipe the touch control area with a clean damp sponge or cloth 4 Wipe the area completely dry with a paper towel 5 Switch the power to the cooktop back on The cooktop may beep and turn itself off and the touch controls may not function while there is liquid on them Make sure you wipe the touch control area dry before turning the cooktop back on Hints and Tips Problem ...

Page 19: ...tage 220 240V Installed Electric Power 5500 6600W Product Size L W H mm 590X520X50 Building in Dimensions A B mm 560X490 Weight and Dimensions are approximate Because we continually strive to improve our products we may change specifications and designs without prior notice Installation Selection of installation equipment Cut out the work surface according to the sizes shown in the drawing For the...

Page 20: ... below Note The safety distance between the hotplate and the cupboard above the hotplate should be at least 760mm A mm B mm C mm D E 760 50 mini 20 mini Air intake Air exit 5mm Before locating the fixing brackets The unit should be placed on a stable smooth surface use the packaging Do not apply force onto the controls protruding from the hob Fix the hob on the work surface by screw four brackets ...

Page 21: ...operation by yourself 2 The ceramic cooker hob shall not be mounted to cooling equipment dishwashers and rotary dryers 3 The ceramic cooker hob shall be installed such that better heat radiation can be ensured to enhance its reliability 4 The wall and induced heating zone above the work surface shall withstand heat 5 To avoid any damage the sandwich layer and adhesive must be resistant to heat 6 A...

Page 22: ...the proper tools so as to avoid any accidents 2 If the appliance is being connected directly to the mains supply an omnipolar circuit breaker must be installed with a minimum gap of 3mm between the contacts 3 The installer must ensure that the correct electrical connection has been made and that it complies with safety regulations 4 The cable must not be bent or compressed 5 The cable must be chec...

Page 23: ...ed of in the wrong way The symbol on the product indicates that it may not be treated as normal household waste It should be taken to a collection point for the recycling of electrical and electronic goods This appliance requires specialist waste disposal For further information regarding the treatment recover and recycling of this product please contact your local council your household waste dis...

Page 24: ...ed and built in 12 months warranty products Freestanding Cookers Gas and Electric Models in 50cm 54cm and 60cm Widths Portable Appliances Benchtop Models and Portable Gas Models 2 What is not Covered by the Warranty The Warranty does not apply if an artusi product is defective by a factor other than a defect arising in the manufacture of the artusi product including but not limited to a damage thr...

Page 25: ...press or non excludable implied term condition or warranty is limited at the option of Worldwide Appliances to i replacing or repairing the defective part of the artusi product ii paying the cost of replacing or repairing the defective part of the artusi product iii replacing the artusi product or iv paying the cost of replacing the artusi product e Our goods come with guarantees that cannot be ex...

Reviews: