4
Congratulations on purchasing the Arxceo Ally IP1000™. The
following steps will be your guide to Plug and Protect™ your
valuable systems and data, simply and securely.
An Ally IP1000 is easy to install and typically requires very little configuration. However,
the appliance can be extensively configured to allow for use in a wide variety of
networks.
Ally IP1000 Placement
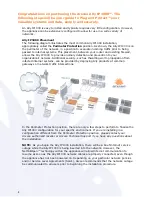
The following diagram illustrates the most common Ally IP1000 installation,
appropriately called the Perimeter Protection position. As shown, the Ally IP1000 is on
the perimeter of the network, in a position to evaluate incoming traffic prior to being
passed to internal systems. This placement, between your router and existing firewall,
allows the Ally IP1000 to provide anomaly detection and prevention to your
organization’s network. Additional security, such as thwarting worm propagation from
infected internal systems, can be provided by deploying Ally products at common
gateways or network traffic intersections.
In the Perimeter Protection position, there are only a few steps to perform to finalize the
Ally IP1000 configuration for your specific environment. If you are installing in a
configuration different from the Perimeter Protection position, please contact your
Arxceo authorized reseller or Arxceo Technical Support if you have any questions about
the installation.
NOTE: As you begin the Ally IP1000 installation, there will be a brief Internet service
outage while the Ally IP1000 is being inserted into the network. However, the
NetFailOpen™ technology within the appliance will allow Internet communication to
resume as soon as the Ally IP1000 network cables are properly connected, even though
the appliance has not been powered on. Depending on your particular network policies
and/or Service Level Agreements (SLA’s), Arxceo recommends that the network outage
be communicated to all users prior to beginning the installation procedure.
Summary of Contents for ALLY IP1000
Page 1: ...User Guide...
Page 34: ......


