background image

24

Preparations

Prior to all maintenance and cleaning tasks:

1. Let the device cool down for at least

20 minutes.

2. Pull off the plug connector.

3. Close the fuel valve and the tank ventila-

tion.

Cleaning position

Fig. 13:

Caution!

Risk of injury.
Guide bar can snap back.

To provide secure stand, place the
guide bar onto the ground.

1. Pull the lever of the height adjustment for

handelbar out of the notch and flip the
guide bar to the front (do not crush the
Bowden cables).

2. Flip the device to the rear as shown in the

figure.

3. Place the guide bar on the floor.

Beware: Do not tilt the device towards the air
filter side because then the engine oil can
enter the air filter and thus render the filter use-
less.

Cleaning the device

Depending on use, clean the device thor-
oughly, especially the bottom and the blade.

Grass cuttings and dirt that are stuck interfere
with the grass ejection and impair the cutting
quality. To sufficiently cool the engine, keep
the engine cover, ventilation grid and engine
clean.

Fire hazard! 

Take particular care that the com-

ponents at the silencer are clean.

For cleaning, use a hand brush. Remove stub-
born dirt with a wooden or plastic spatula.
Clean the outside housing parts with a cloth.

Do not clean the device with water spray or
high-pressure cleaner! Do not use any ag-
gressive cleaning agents.

General inspection

To make sure that the device can be operated
safely, check all nuts, bolts, screws, rubber
elements, air filters, connections of fuel lines,
etc. regularly for proper condition and firm
seating. Check the ignition wire and the spark
plug connector for damage.

Immediately replace damaged or worn parts,
especially covers, silencers or fuel tank
(authorised service centre).

Check all parts that that contain fluids for leaks
and proper condition. These can be: Fuel tank,
fuel valve, fuel lines, carburetor, engine, gears,
battery, hydraulic system.

In case of leaks, contact an authorised service
centre.

Transmission

The transmission is maintenance-free and
filled with oil that is supposed to last the entire
service life of the device. Make sure that there
are no leaks or damages.

Summary of Contents for Allmaher AS 63 2T

Page 1: ... Allmäher AS 63 2T AS 63 4T B S AS 63 4T Honda From serial number Issued AS 63 2T 027015120001 AS 63 4T B S 026915120001 AS 63 4T Honda 027516090001 04 November 2016 V2 0 en Translation of the Original Operator s Manual ...

Page 2: ...pare parts provide your dealer with the serial and engine numbers Serial number see manufacturer s certificate or type plate Engine number Date of purchase Address of dealer Intended use The device is intended only for cutting grass or similar vegetation in well maintained grounds in agriculture forestry and preservation of the countryside that are cut at least once a year Woody growth must not be...

Page 3: ...ice 2 stroke device 18 Starting the device 4 stroke device without choke 18 Starting the device 4 stroke device with choke 18 Engaging the blade 18 Driving 19 Driving 19 Turning 19 Pushing 19 Switching off and parking 19 Transport 20 Transport position 1 20 Transport position 2 20 Loading 21 Unloading the device 21 Maintenance and cleaning 22 Preparations 24 Cleaning position 24 Cleaning the devic...

Page 4: ...4 Troubleshooting 32 Accessories 35 Mixing ratios fuel 36 Technical data AS 63 2T 37 Technical data 4 stroke devices 38 Declaration of conformity 39 ...

Page 5: ...f injury Make sure that no one is within the danger zone of the device Objects may be ejected The quickly rotating blade can cause life threatening injuries or immense property damage Be especially careful to keep your hands and feet away from the blade when the device is put into operation Prior to any repair and mainten ance work pull off the spark plug connector Clean the ventilation grid The c...

Page 6: ...utput in kW engine speed 5 Weight 6 Year of manufacture 7 Serial number 8 CE marking Type overview In this operating manual the following device types are described Depending on their equipment the corres ponding descriptions of this operating manual apply Equipment 63 2T 63 4T B S 63 4T Honda Accelerator lever without choke X X Accelerator lever with choke X Choke and tickler X Number of fuel val...

Page 7: ...ammable There is a burn and explosion hazard Keep fuel away from ignition sources and do not smoke during handling Do not inhale fuel vapours they are dangerous to your health Use gloves and avoid skin con tact with the fuel Always refuel outdoors when the engine is cold and standing still When doing so always use a filler spout or a funnel Do not spill any fuel or do not let fuel enter canalisati...

Page 8: ...rn parts immediately Have an authorised service centre check your device if the blade does not stop within 7 seconds Danger area Fig 1 Within the danger area of the device there is a risk of injury The rotating knife can cause injuries and ob jects can be thrown out The area in front of and to the right of the device is especially dan gerous On slopes the device can topple over and slide towards p...

Page 9: ...andstill and pull off the spark plug connector before you clean or check the device or be fore you carry out work on the device before you unblock or unclog the discharge area Risk of burns Do not touch the engine or the silencer These parts become very hot during operation and you can get burned If a jumpy movement oc curs the risk of additional injuries can result Prior to mowing Personal protec...

Page 10: ...aks on time Have an authorised service centre check the device when the blade has hit an object if the device starts to vibrate unusually severely Mowing surfaces with fire hazard Carry a sufficient amount of suitable extin guishing agent If side inclination is too great fuel may leak from the carburetor or the tank This poses a fire hazard Observe the mowed surface also after mov ing is completed...

Page 11: ...s before you store it in a dry closed sufficiently ventilated room Never store the device when there is fuel in the tank inside a building where fuel vapours might come into contact with open fire or sparks Use caution during maintenance and repair Only carry out work as described in these op erating instructions Have an authorised ser vice centre perform all other work Only use the blades and spa...

Page 12: ...nk ventilation 4 Accelerator lever with engine stop 5 Starter grip 6 Ventilation grid 7 Silencer 8 Cutting height adjustment front 9 Interlock steerable front wheel 10 Protection bow 11 Protection skirt 12 Cover 13 Air filter 14 Choke 15 Cutting height adjustment rear 16 Spark plug connector 17 Fuel valve 18 Type plate 19 Tank filler spout 20 Lever for height adjustment of handle bar ...

Page 13: ...e handlebar Disengaging blade 0 Release the blade clutch lever and set the accelerator lever to MIN Accelerator lever with engine stop 4 With the accelerator lever you can change the engine speed and thus control the engine out put For devices with choke set the accelerator lever to Choke when you start the cold en gine At the lowest position 0 the ignition is switched off and the engine is turned...

Page 14: ...ly Honda at the carburetor The second fuel valve must always be open The fuel supply is regulated with the fuel valve at the tank 2 1 1 Closed 2 Open Operating elements only for 2 stroke devices Carburetor with choke and tickler 14 For cold start of the engine you require the choke 1 and the tickler 2 Open the choke Turn clockwise as far as it will go Close the choke Turn anti clockwise as far as ...

Page 15: ...erns Mulch is shredded into much smaller pieces when you mow the terrain once again in the opposite dir ection If the grass is extremely high mow twice at dif ferent cutting height settings Prior to starting Fuel used 2 stroke devices The engine must be run on a mixture of petrol and two stroke oil For possible mixing ratios see chapter Mixing ratios fuel Use unleaded petrol octane rating at least...

Page 16: ...e may only be used on slopes up to 20 Tanking up Danger Fuel is ignited by hot engine parts Prior to filling up switch off the en gine and wait for at least 20 minutes until the engine has cooled down Observe the safety instructions re garding the fuel Filling up with fuel 1 For filling use a canister with filler spout or a funnel 2 Open the canister carefully so that existing excess pressure is s...

Page 17: ... using your foot 3 Lift the device to the desired height 4 Release the lever and let it engage in the desired height ð The edge 1 shows the set position on the scale Locking steerable front wheel It is more comfortable on an even surface to let the front wheels swivel If you move crossways to the slope make sure the wheels are locked Fig 7 Releasing the steerable front wheel 1 Turn the lever out o...

Page 18: ...g the device 4 stroke device without choke 1 Place the device on even terrain and not in high grass 2 Close the fuel valve and the tank ventila tion 3 Plug in the plug connector 4 Turn the accelerator lever to idle speed 5 Pull the starter rope slowly out until you feel resistance and then pull out quickly en gine starts to run 6 Slowly release the starter rope 7 For mowing set the accelerator lev...

Page 19: ... drive 2 Press the brake lever towards the handle bar to release the brake 3 Swivel the device to the desired side 4 Switch the drive back on Turning on the slope 1 Keep the drive switched on 2 Turn the device uphill 3 Hold back the handlebar and the inside wheel The drive prevents sliding and supports the turning process Pushing 1 Release the drive lever 2 Press the brake lever towards the handle...

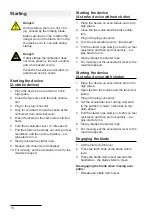
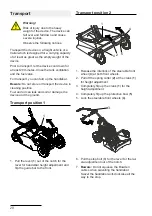
Page 20: ...n Fuel and oil can leak and soil or damage the device and the ground Transport position 1 1 Fig 8 1 Pull the lever 1 out of the notch for the lever for handelbar height adjustment and flip the guide bar to the front Transport position 2 1 4 4 2 5 1 Release the interlock of the steerable front wheel 4 at both front wheels 2 Pull off the spring cotter 2 at the crank 1 for height adjustment 3 Complet...

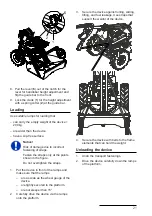
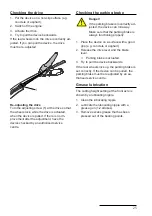
Page 21: ...aps only at the points shown in the figure Do not overtighten the straps 1 Put the device in front of the ramps and make sure that the ramps are as wide as the wheel gauge of the device are tightly secured to the platform are not steeper than 15 2 Carefully drive the device via the ramps onto the platform 3 Secure the device against rolling sliding tilting and fuel leakage Use straps that support ...

Page 22: ...nd fuel line Check parts for leaks and check for good condition Carburetor Does the carburetor close again after starting Ventilation grid Clean Engine cooling Clean Spark plug Check replace Air filter Maintain Blade and fasten ing components Check for wear and damage See chapter Checking the blade Change Blade brake Does the blade function safely and does the blade come to a standstill within 7 s...

Page 23: ...heck tyres and if necessary the tyre pressure Lubrication See chapter grease lubrication For 4 stroke devices Engine For reliable information see the operating manual of the engine manufacturer Check oil level see operating instructions of the engine manufacturer Oil change A B Before and after each use Annually or every 50 h By the user when the engine is not running By the user when the engine i...

Page 24: ...e engine cover ventilation grid and engine clean Fire hazard Take particular care that the com ponents at the silencer are clean For cleaning use a hand brush Remove stub born dirt with a wooden or plastic spatula Clean the outside housing parts with a cloth Do not clean the device with water spray or high pressure cleaner Do not use any ag gressive cleaning agents General inspection To make sure ...

Page 25: ...ake Danger If the parking brake is incorrectly ad justed the device can roll away Make sure that the parking brake is always functioning properly 1 Place the device on a surface with a good grip e g concrete or asphalt 2 Release the drive lever and the brake lever ð Parking brake is actuated 3 Try to pull the device backwards If the rear wheels lock up the parking brake is set correctly If the dev...

Page 26: ...at the blade is worn excessively or on one side or damage to the engine or cutter deck fasten ing Blades that are sharpened improperly increase the workload of the devices and can result in vibration cracks or breaks Ejected broken pieces can cause severe injur ies Blade change 1 2 1 1 1 2 2 2 It is absolutely necessary to change the blade When one of the wear markings 1 was reached Original blade...

Page 27: ... with the torque indic ated in the technical data Maintaining the air filter Danger Cleaning agents pose a fire and explosion hazard Never clean the air filter with flam mable solvents Caution A cleaning of the air filter with com pressed air damages the filter fabric and the air filter becomes useless Change the air filter when it is dirty Caution When you use air filters from ac cessory supplier...

Page 28: ...sk that the oil enters and destroys the air filter For this observe the attached operating in structions of the engine Checking the spark plugs Danger The ignition system generates an electromagnetic field Wearers of pacemakers must not work on live parts Soiled spark plugs reduce the engine output Clean the electrode of the spark plug with a brass wire brush Check the electrode gap see operating ...

Page 29: ...e box Unfolding the device 2 1 Fig 14 1 Pull off the spring cotter 2 between the guide bar and crank of the height adjust ment 1 starting from 2 Unfold the guide bar until it engages 3 4 5 Fig 15 3 Pull the stop bolt 3 for the lever for the lat eral adjustment out of the notch 4 Beware Do not squeeze the Bowden cables when swivelling the handlebar Swivel the handlebar clockwise to the de sired pos...

Page 30: ...e centre Also observe the notices on storage in the at tached operating instructions by the engine manufacturer Restarting If you want to start the device after a longer storage carry out the tasks described in chapter Maintenance Spare parts The reliable and safe operation of the device also depends on the quality of the spare parts used Only use original spare parts and ac cessories that were ap...

Page 31: ...31 Warranty Please see our AS Motor website for warranty information Please print out the documents that you re ceive during the online registration Keep them together with your sales receipt ...

Page 32: ...nnector is pulled off Observe the safety instructions Put spark plug connector back on Engine was flooded due to too many start attempts Unscrew spark plug and start several times when the fuel valve is closed dry the spark plug and screw it back in Air filter is dirty Maintain air filter see also Mainten ance and cleaning Spark plug is sooted dam aged or incorrect electrode gap Clean spark plug a...

Page 33: ...or damaged Authorised service centre Bowden cable is defective Authorised service centre Strong vibrations during operation Unbalance at the blade caused by incorrect sharpening or chips on the blade Have blade resharpened and balanced by an authorised service centre Re place a damaged blade immediately Blade drive shaft is bent due to collisions with foreign objects Authorised service centre Engi...

Page 34: ...material is ejected too quickly Increase speed Discharge channel is jammed Mowed grass was too long or too damp Adjust cutting height and mowing speed to the mowing conditions Blade is worn Authorised service centre Engine speed is too low des pite full power Authorised service centre The device does not stop when the brake is actuated Brake is adjusted incorrectly worn or defective Authorised ser...

Page 35: ...35 Accessories Spray paint 400 ml colour orange G00011050 Operating hours counter G06927008 Clinometer G06950027 Twin tires G06321009 ...

Page 36: ...8 80 0 04 40 5 0 1 100 0 05 50 10 0 2 200 0 1 100 20 0 4 400 0 2 200 Do not use mixtures with more oil than 1 50 e g 1 35 Too much oil results in carbon deposits and reduces the service life of the engine Only use the fully synthetic two stroke oils explicitly intended for mixing Do not use mineral two stroke oil Use of engine oils or even waste oil results in engine damage No warranty is given in...

Page 37: ... approx 100 cm Cutting width 61 cm Starting device Rope start Traction drive Rear wheel drive with Variomat for variable adjustment of the speed Speed forward 2 0 4 0 km h Maximum area coverage approx 2400 m2 h Measures and weight Transport size with packaging L W H Max tyre dimensions L W H Weight 102 72 78 cm 191 70 99 cm 77 kg Capacities Fuel tank 3 litres Sound level according to DIN EN 12733 ...

Page 38: ...dth 61 cm Starting device Rope start Traction drive Rear wheel drive with Variomat for variable adjustment of the speed Speed forward 1 8 3 8 km h Maximum area coverage approx 2300 m2 h Measures and weight Transport size with packaging L W H Max tyre dimensions L W H Weight 102 72 78 cm 191 70 99 cm 74 kg 102 72 78 cm 191 70 99 cm 84 kg Capacities Fuel tank 3 litres Sound level according to DIN EN...

Page 39: ...nt safety and health requirements of the EC directives lis ted 2006 42 EC 2014 30 EC 97 68 EC Function The device is exclusively intended for cutting grass or similar vegetation in well maintained areas in agricul ture forestry and landscape conservation that are mowed at least once a year Applied standards DIN EN 12733 Place where all technical records are filed AS Motor Germany GmbH Co KG Ellwan...

Page 40: ... infinite speed regulation for exceptional cutting and catching performance in any situation Rotary mower The economic alternative to bar mower Ideal for fodder produc tion The grass is not shredded and placed into a pile on the side Flail mower The flail blades are supported movably and avoid rocks and other obstacles and chop the cuttings several times Side discharge mower This solid allrounder ...

Reviews: