background image

23

1.

Retighten the brush holding screw with a
torque of 20-25 Nm.

2.

Change the second brush in the same
manner.

3.

Set the brush height to the highest posi-
tion.

Original AS brushes

Only use original AS brushes with the spare
part number G07325015. Original AS brushes
are engraved like this:

Checking the brush strip and the
brush holder

 Warning

Improperly maintained or mounted brush
strips or holders can pose a high risk of in-
juries.

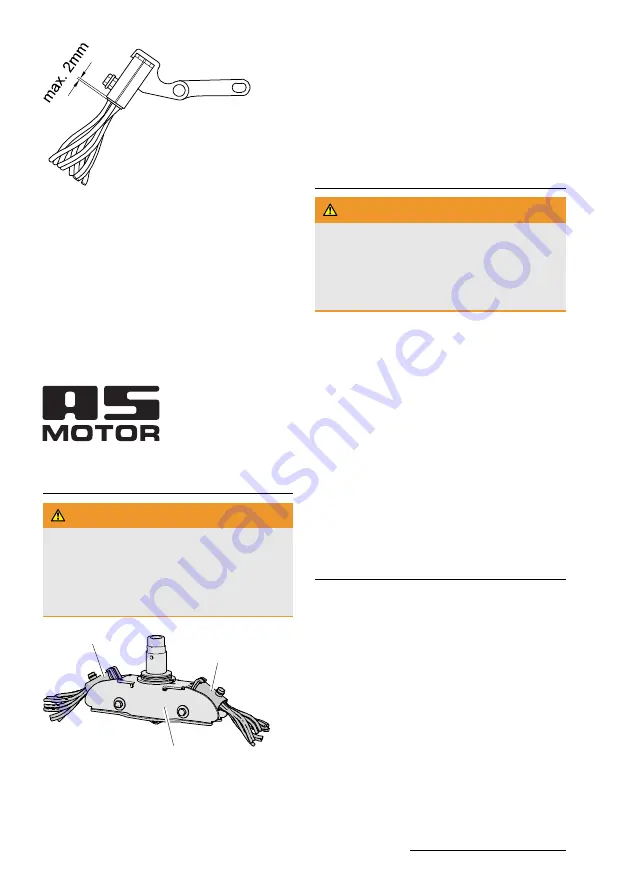
► Work at these parts may only be carried

out by an authorised service centre.

1

2

1

Check the brush strip (

2

) and brush holder (

1

)

regularly and prior to each use and when you
detect noticeable changes regarding cracks
and damages. If there are damages, immedi-
ately contact your service centre.

The brush holders must be moved easily (re-
move dirt).

Maintaining the engine

 Warning

If the speed of rotation is set too high, ob-
jects can be ejected. The engine can be
damaged and noise pollution increases.

► Do not change the basic setting of the

carburetor or the speed control.

The engine manufacturer has prepared the op-
erating manual of the engine. The manual con-
tains all maintenance requirements and war-
ranty conditions for the engine. If warranty
work at the engine is required, contact your au-
thorised service centre or the next authorised
dealer for engines.

To ensure a long service life of the engine, suf-
ficient engine cooling is required.

Keep the
- engine cover (ventilation grid),
- silencer (protective grid) and
- cooling fins of the engine
clean at all times.

Checking the engine oil level

Never allow the oil level to be too low other-
wise the engine can be damaged. Never fill in
too much oil. Otherwise, there is the risk that
the oil enters and destroys the air filter.

For this, observe the attached operating in-
structions of the engine.

Summary of Contents for WeedHex AS 50

Page 1: ...Operator s Manual WeedHex AS 50 From serial number 032919010001 Issued 31 January 2019 V12 0 en Translation of the Original Operator s Manual ...

Page 2: ... international AS partners please see www as motor de Device data Please fill in all data referring to your device When ordering spare parts provide your dealer with the serial and engine numbers Serial number see manufacturer s certificate or type plate Engine number Date of purchase Address of dealer Intended use The device is exclusively intended for cleaning paved areas and edges where moss an...

Page 3: ... device 14 Adjusting the contact pressure of the brushes 14 Adjusting pressure of brushes 15 Driving 15 Driving 15 Turning 15 Brushing at a kerb or wall 16 Switching off and parking 16 Transport 17 Loading 17 Unloading the device 17 Maintenance 18 Maintenance overview 19 Cleaning the device 21 Basic inspection 21 Checking the engine brake 21 Checking the brushes 22 Changing the brushes 22 Checking...

Page 4: ... result in minor or moderate injury Caution Hazardous situation Indicates a possibly hazardous situation with a low level of risk that if not avoided could result in minor or moderate injury Notice Danger of property damage Indicates a possible risk of damage of the device and its surroundings Signs on the device The following signs are attached to the device to provide a reminder that during use ...

Page 5: ...er spray or high pressure cleaner Type plate The type plate on the device provides you with information on the device type and the technical data 1 Name and address of the manufacturer 2 Device designation 3 Type designation 4 Rates power output in kW engine speed 5 Weight 6 Year of manufacture 7 Serial number 8 CE marking ...

Page 6: ...e fitted with pace makers are not allowed to touch any cur rent carrying parts of the ignition system Safe handling of fuel Fuel is toxic and highly flammable There is a burn and explosion hazard Keep fuel away from ignition sources and do not smoke during handling Do not inhale fuel vapours they are dangerous to your health Use gloves and avoid skin contact with the fuel Always refuel outdoors wh...

Page 7: ...ge or override any safety devices or control elements Observe the maintenance instructions see chapter Maintenance Have an authorised service centre check your device if the blade does not stop within 3 seconds Danger area Fig 1 The danger zone extends for at least 15 metres Within the danger area of the device there is a risk of injury The rotating brushes can cause injuries and objects can be th...

Page 8: ...you carry out work on the device before you unblock or unclog the discharge area Risk of burns Do not touch the engine or the silencer These parts become very hot during operation and you can get burned If a jumpy movement oc curs the risk of additional injuries can result Prior to brushing Personal protective measures During brushing always wear safety shoes with good grip long trousers and glove...

Page 9: ...he brushes or brush strips hit an object if the device starts to vibrate unusually severely Fire hazard The brushes produce sparks as they stroke over the stones There is a burn and explosion hazard Never brush in explosive areas Brushing areas with fire hazard Slightly moisten flammable material before you brush over it Carry a sufficient amount of suitable extin guishing media If the device lean...

Page 10: ... off the spark plug connector After switching it off let the device cool down for at least 20 minutes before you store it in a dry closed sufficiently ventilated room Never store the device when there is fuel in the tank inside a building where fuel vapours might come into contact with open fire or sparks Use caution during maintenance and repair Only carry out maintenance work as described in the...

Page 11: ...kirt 4 Spark plug connector 5 Silencer 6 Rear flap 7 Collection bag 8 Lever for lateral adjustment of handlebar 9 Clamping lever to fasten bar 10 Oil filler neck 11 Adjustment of contact pressure of brushes 12 Starter grip 13 Ventilation grid 14 Tank filler spout 15 Fuel valve 16 Air filter 17 Type plate 18 Side flap 19 Cover ...

Page 12: ...ss the lever towards the handlebar and con tinue to hold Vario lever C With the vario lever you can continuously ad just the speed of the device while the engine is running MIN slow MAX fast Lever for lateral adjustment of handlebar D 1 Release the eccentric tension lever 2 Attention Do not crush the Bowden cables when pivoting the handlebar Swivel the handlebar to the side to the de sired positio...

Page 13: ...rate the device preferably when weather conditions are humid If this is not possible wear a dust mask or sprinkle some water on the area To make sure that weeds and dirt are ejected without clogging we recommend to brush only while moving forward Prior to starting Fuel As fuel use unleaded petrol see operating in structions of the engine manufacturer You can use E10 petrol Do not store E10 pet rol...

Page 14: ...e bar 5 Pull the starter point slowly out until you feel resistance then pull out quickly en gine starts to run 6 Let the starter rope retract slowly Adjusting the contact pressure of the brushes Notice During adjustment of the brushes damage to the ground can occur Find a sturdy area for these adjustment operation The brush pressure can only be assessed while the engine is running Set the brushes...

Page 15: ...g it round Make sure that the area is clear of ob jects and watch for safe footing Driving Immediately switch off the brushes in case of a dangerous situation by releasing the engine brake lever Drive on 1 Press the drive lever towards the handle bar device is running Drive off 1 Release the drive lever Adjusting speed The driving speed can be continuously adjus ted with the vario lever Adjust the...

Page 16: ...e left side of the device move up closely to the kerb or wall 5 Release the side flap lever to close the side flap and to avoid the danger of objects be ing ejected 6 The grinding protection 2 serves as guide along the kerb or wall Switching off and parking Warning On a slope the device can roll away Put the device on even ground only or secure it against rolling away 1 Release the drive lever 2 R...

Page 17: ...t of the device 200 kg are wider than the device have a slip free surface Notice Risk of damage due to incorrect fastening of straps Fasten the straps only at the points shown in the figure Do not overtighten the straps 1 Put the device in front of the ramps and make sure that the ramps are as wide as the wheel gauge of the device are tightly secured to the platform are not steeper than 15 2 Caref...

Page 18: ...oning risk Prior to all maintenance and cleaning work when the engine is not running Fig 6 Notice Engine oil can enter the air filter and dam age it Do not tilt the device towards the air filter side 1 Let the device cool down for at least 20 minutes 2 Pull off the plug connector 3 Close the fuel valve 4 Release the handlebar by pulling it to wards the tie rod and flip the handlebar in a vertical ...

Page 19: ...pter Checking the brushes Brushes Change Motor brake Do the brushes stop in 3 seconds Release the drive lever Does the device stop when the lever is in zero position Drive Check V belt Are the belts tensioned correctly without fissures and in good condition Bowden cables Check for proper function and ease of movement Chassis and impact protection Check for rust and fissures and check the welding s...

Page 20: ...s from the engine and the device Tyres Check tyres and if necessary the tyre pressure A B Before and after each use Annually or every 50 h By the user when the engine is not running By the user when the engine is running By the authorised service centre ...

Page 21: ...collecting performance Basic inspection To make sure that the device can be operated safely check all nuts bolts screws connec tions of fuel lines air filters etc regularly for proper condition and firm seating Check the ignition wire and the spark plug connector for damage Immediately replace any damaged or used parts especially covers brush strip side and rear cover protection skirt dirt collect...

Page 22: ...brushes A change of the brushes is necessary If the wire bristles no longer touch and clean the ground despite the strongest contact pressure If an imbalance exists If the brushes are worn out unevenly Changing the brushes Use solid gloves when you check or change the brushes Notice Unbalance of the brush system leads to de struction of the engine bearing and device Observe the following notices C...

Page 23: ...ining the engine Warning If the speed of rotation is set too high ob jects can be ejected The engine can be damaged and noise pollution increases Do not change the basic setting of the carburetor or the speed control The engine manufacturer has prepared the op erating manual of the engine The manual con tains all maintenance requirements and war ranty conditions for the engine If warranty work at ...

Page 24: ...operating hours change the filter insert at least once a year Do not operate the engine without air filter The foam rubber prefilter picks up the coarse dust It is possible in case of strong dust form ation that it has to be cleaned or changed already again after 10 minutes We recom mend to carry along some cleaned or new pre filter in reserve and to replace them at short in tervals For this obser...

Page 25: ...lip the guide bar 1 backwards and en gage it with the bar fixing 2 1 2 3 4 5 4 Fig 9 Attention Do not crush the Bowden cables 1 when fixing the handlebar 1 Slacken the hexagonal nut 2 at the ec centric lever 3 and remove the hexagonal nut and the two lever bearings 4 2 Apply the handlebar to the bar 3 Push on a lever bearing the slide flap lever 5 and the second lever bearing Make sure that the co...

Page 26: ...2 2 Fasten the dirt collecting bag with plastic profiles to the frame Attaching the dirt collecting bag 1 2 1 Switch off the brushes and wait until the brushes come to a standstill 2 Lift up the rear flap 1 3 Insert the dirt collecting bag 2 into the re cesses 4 Lower the rear flap onto the dirt collecting bag ...

Page 27: ...Spare parts The reliable and safe operation of the device also depends on the quality of the spare parts used Only use original spare parts and ac cessories that were approved by AS Motor Germany When foreign parts are installed the warranty and guarantee shall be void for the foreign part and for the device and for any resulting damage Inform your authorised service centre about the device type a...

Page 28: ...ector is pulled off Observe the safety instructions Put spark plug connector back on Air filter is dirty Maintain air filter see chapter Mainten ance Spark plugs are dirty dam aged or incorrect electrode gap Clean spark plugs and check electrode gap see chapter Maintenance Re place spark plugs if necessary Poor quality dirty or old fuel Clean fuel system authorised service centre Always use fresh ...

Page 29: ...ised service centre Engine is smoking Air filter is dirty or drenched with oil Maintain or replace air filter see chapter Maintenance Oil level is too high Have authorised service centre lower the oil level to the marking Engine gets hot Ventilation grid is dirty Clean ventilation grid Oil level in the engine is too low Refill engine oil see operating instruc tions of the engine manufacturer Cooli...

Page 30: ...wheel drive with Variomat for variable ad justment of the speed 1 6 2 5 km h Maximum area coverage up to approx 1000 m2 h Measures and weight Transport size with packaging L W H max tyre dimensions L W H Weight 112 65 65 cm 192 61 99 cm 68 kg Capacities Fuel tank Engine oil Dirt collecting bag 1 2 Liter approx 0 65 litres SAE 30 or 10W 30 see Checking the oil level approx 25 litres Sound level acc...

Page 31: ...31 Accessories Operating hours counter G06927008 Spray paint 400 ml colour orange G00011050 ...

Page 32: ... to all relev ant safety and health requirements of the EC direct ives listed 2006 42 EC 2014 30 EC Function The device is exclusively intended for cleaning paved areas and edges where moss and weeds are growing Applied standards DIN EN ISO 5395 in parts Place where all technical records are filed AS Motor Germany GmbH Co KG Ellwanger Straße 15 D 74424 Bühlertann Bühlertann in January 2019 Eberhar...

Page 33: ...33 ...

Page 34: ...34 ...

Page 35: ...35 ...

Page 36: ...th rear or side discharge for every require ment even with all wheel drive brake and reverse gear Brush cutter An agile lawn mower for maintenance of extensive grassed areas The Allmäher reliably mows and mulches metre high grass brushes and weeds Flail mower High grass with undergrowth steep slope or extensive areas in unknown terrain The movably mounted flail blades of the AS Motor flail mower g...

Reviews: