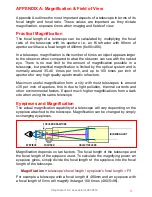
background image


© Opticstar Ltd / Ascension 2007-2014                                                     

18 

APPENDIX C: The Focuser 
 
Focuser Adjustment 

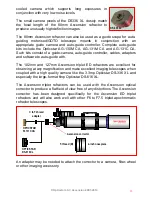
The  Ascension  comes  with  a  1:10  dual-speed  focuser 
that has been adjusted at the factory. In certain cases it 
may  be  necessary  to  regulate  the  tension  to  improve 
performance  by  adjusting  the  two  silver  thumb-screws 
below  the  focuser.    This  may  be  required  if  the  focuser 
was adjusted at room temperature and then used in sub-
zero temperatures.  
 
Also  as  the  focuser  is  worked-in  over  time  surfaces  smoothen  out  and  the 
focuser  may  need  slight  re-adjusting.  When  done  for  the  first  time  this 
procedure requires patience and time. 
 
We  recommend  only  adjusting  the  focuser  beyond  simply  re-adjusting  the 
two  silver  thumb-screws,  as  outlined  below,  if  there  was  a  real  need.  The 
focuser has been designed to be fine-tuned 

externally

 by the user. 

 
It  is  also  possible  to  re-adjust  the 

internal

  clutch  of  the  focuser 

mechanism to regulate the tension 
on  the  focuser  drawtube  for  which 
the clutch will need to be removed 
for  the  adjustment  to  take  place. 
Please  keep  in  mind  that  this  is  a 
rather 

difficult 

procedure 

to 

perform  without  experience  and 
the right set of tools. 
 
To set the tension on the focuser drawtube follow the instructions below: 
 

1. 

Remove all accessories from the telescope drawtube  

2. 

Tilt the telescope to say 60 degrees and pointing to the sky 

3. 

Loosen thumbscrew 

A


4. 

Loosen thumbscrew 

B


5. 

Tighten/adjust thumbscrew 

B

 in very small increments till you obtain 

the preferred focus  tension 

6. 

Attach a heavy accessory to the focuser like a 2-inch diagonal and 
eyepiece. 

7. 

Go to step 

4

 and repeat the process until the tension is right. 

8. 

Lightly tighten thumbscrew

 A

 until it comes in contact with the  

Summary of Contents for 80ED

Page 1: ......

Page 2: ... Opticstar Ltd Ascension 2007 2014 1 ...

Page 3: ...TLY ALWAYS SEEK ASSISTANCE IF IN DOUBT TO GET THE MOST OUT OF YOUR EQUIPMENT TAKE THE TIME TO READ THROUGH THIS MANUAL NEVER LOOK AT THE SUN WITHOUT THE CORRECT EYE PROTECTION LOOKING AT OR CLOSE TO THE SUN WITH OR WITHOUT AN OPTICAL INSTUMENT AND WITHOUT PROTECTION WILL PERMANENTLY DAMAGE YOUR EYES CHILDREN SHOULD ALWAYS BE SUPERVISED BY A RESPONSIBLE ADULT WHILE OBSERVING ...

Page 4: ... Opticstar Ltd Ascension 2007 2014 3 ...

Page 5: ...e yourself with your telescope so that you can get the best use of the equipment This manual details the setting up operation specification and optional accessories of the Ascension triplet air spaced apochromatic refractors Parts Depending on the model the following items are included with the telescope unless stated otherwise Ascension 80mm F6 Refractor Optical tube assembly with 1 10 Precision ...

Page 6: ...ovetail High quality 2 dielectric diagonal 99 reflectivity Two 1 25 wide angle 70O high contrast eyepieces 10mm and 20mm High quality illuminated 8x50mm finder scope with bracket High quality telescope and accessories aluminium case Twenty page printed manual Interferometer report with HP models optional with Premium models Mounting the Telescope The telescope can be mounted on a telescope mount a...

Page 7: ...ring by holding one firmly and turning the other loosen them enough to allow a good adjustment range Look through the finder scope and adjust the dioptre focusing ring so that the crosshair looks sharp finally tighten the dioptre locking ring against the dioptre focusing ring To focus the finder scope separate the finder scope focusing ring from the finder scope locking ring by holding one firmly ...

Page 8: ...hese can be found at camera shops and electronics suppliers Finder scope Alignment To assemble the finder scope first remove the illuminator by unscrewing it form the finder scope Slide the finder scope in its bracket as shown in the above picture and gently tighten the three thumb screws to hold it in place take care not to over tighten the thumbscrews Screw the illuminator back in place Make cer...

Page 9: ...e The image will by correctly oriented when looking through the finder scope 6 Turn the focuser knob to bring the target in focus and centre the object in the eyepiece 7 Re tighten the tripod mount movement locks so that the telescope remains stable during the finder scope alignment procedure 8 Look through the finder scope 9 Use the three collimating thumbscrews on the finder scope s bracket to a...

Page 10: ...o observe like a large building or large tree Point the telescope towards the target so that it roughly lines up with the target Look through the finder scope if you have not aligned it already this is a good time to do so before you proceed Move the telescope until the target is visible in the finder scope and positioned under the cross hair Once the object is lined up in the finder scope you wil...

Page 11: ...s are a unique sight and you should be able to observe the Cassini division which appears as a black gap between the rings Mars also known as the Red planet will reveal a good amount of detail when close to Earth Its orange colour is prominent and surface markings are visible as are the Polar caps when present Venus can be observed early in the morning before dawn or just after sunset Venus appear...

Page 12: ...lease keep in mind that targets near the horizon will not look as sharp targets near the zenith will look substantially sharper Avoid setting your telescope on concrete wood and grass are better as they do not release heat Your line of sight should ideally not pass just over a warm house as the rising heat will substantially affect the quality of the image When conditions are not favourable the ma...

Page 13: ...st all telescopes including the Ascension refractors light pollution filters can also help by reducing sky glow and incoming light from other local light sources Imaging Accessories When imaging with a camera attached to the telescope infra red IR block nebula UHC and narrow band filters O3 H alpha S2 are recommended depending on requirements For colour imaging an IR block filter will work well to...

Page 14: ...to auto guide with The 102mm and 127mm Ascension triplet ED refractors are excellent for observing at any magnification and make excellent imaging telescopes when coupled with a high quality camera like the 3 3mp Opticstar DS 336 XL and especially the large format 6mp Opticstar DS 616 XL The Ascension triplet refractors can be used with the Ascension optical corrector to produce a flat field of vi...

Page 15: ... Opticstar Ltd Ascension 2007 2014 14 APPENDICES ...

Page 16: ...100 times per inch of aperture for very high quality apochromatic refractors Maximum useful magnification from a city with most telescopes is around x35 per inch of aperture this is due to light pollution thermal currents and other environmental factors Expect much higher magnifications from a dark site when using the same telescope Eyepieces and Magnification The actual magnification capability o...

Page 17: ...gher power lunar and planetary observation as well as high magnification imaging in general For example when imaging extended deep sky objects like nebulae and galaxies an f 4 telescope will capture four times the mount of light in the same time period when compared to a telescope with an f 8 focal ratio The same does not apply to single point light sources like stars where aperture alone dictates...

Page 18: ...propellant which will stain the optics Stains on optics can be removed with optical cleaners used to clean photographic lenses Always use compressed air at very low pressure as contaminants that may have landed on the lens could scratch the glass surface never rush the cleaning process Condensation When temperature drops rapidly condensation may form on the objective lens of the telescope This hap...

Page 19: ...eed The focuser has been designed to be fine tuned externally by the user It is also possible to re adjust the internal clutch of the focuser mechanism to regulate the tension on the focuser drawtube for which the clutch will need to be removed for the adjustment to take place Please keep in mind that this is a rather difficult procedure to perform without experience and the right set of tools To ...

Page 20: ...ews A and B 2 Use a hex key to loosen the two larger centre locking screws D1 on the top of the focuser on either side 3 Adjust the two pairs of screws D2 and D3 on either side of the focuser in very small increments until you obtain the preferred focus knob tension 4 Use a hex key to tighten the two locking screws D1 5 Screw B back into place and adjust until you obtain the desired tension on the...

Page 21: ...tographic lens for the imaging camera necessary Guiding Telescope To accurately guide the mount during long exposures complementary Motorised Mount To mount the scope and guide scope if one is used necessary Imaging Camera To capture images of the Moon planets galaxies etc necessary Guiding Camera To track a selected star via the guide scope complementary Guide Controller To pass drive adjustment ...

Page 22: ...ed in 1mm intervals Support Dovetail OTA rings with carry handle dovetail Weight 2 75Kg 5Kg 7 5Kg Telescope size LxWxH 385x90x90mm 590x130x130mm 855x160x160mm Length extend dew shield 465mm 740mm 1050mm Focuser assembly width 15mm 15mm 15mm Frontal dew shield diameter 120mm 135mm 165mm Construction All metal construction steel aluminium brass Tube design Suitable for use with bino viewers Accessor...

Page 23: ... Opticstar Ltd Ascension 2007 2014 22 ...

Page 24: ... Opticstar Ltd Ascension 2007 2014 23 Opticstar Ltd 87 Washway Road Sale Greater Manchester M33 7TQ United Kingdom WEB www opticstar com EMAIL info opticstar com ...

Reviews: