background image

ASCO 4ATE, 4ACTE, 4ADTE, 4NTE, 4NCTE, 4NDTE 


Installation Manual 

Page 12 

ASCO Power Technologies 

381333-445 B 

Return to Operation 

This procedure explains how to return the automatic transfer 
switch (ATS) to operation after inspection and maintenance. 

1. 


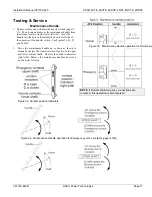
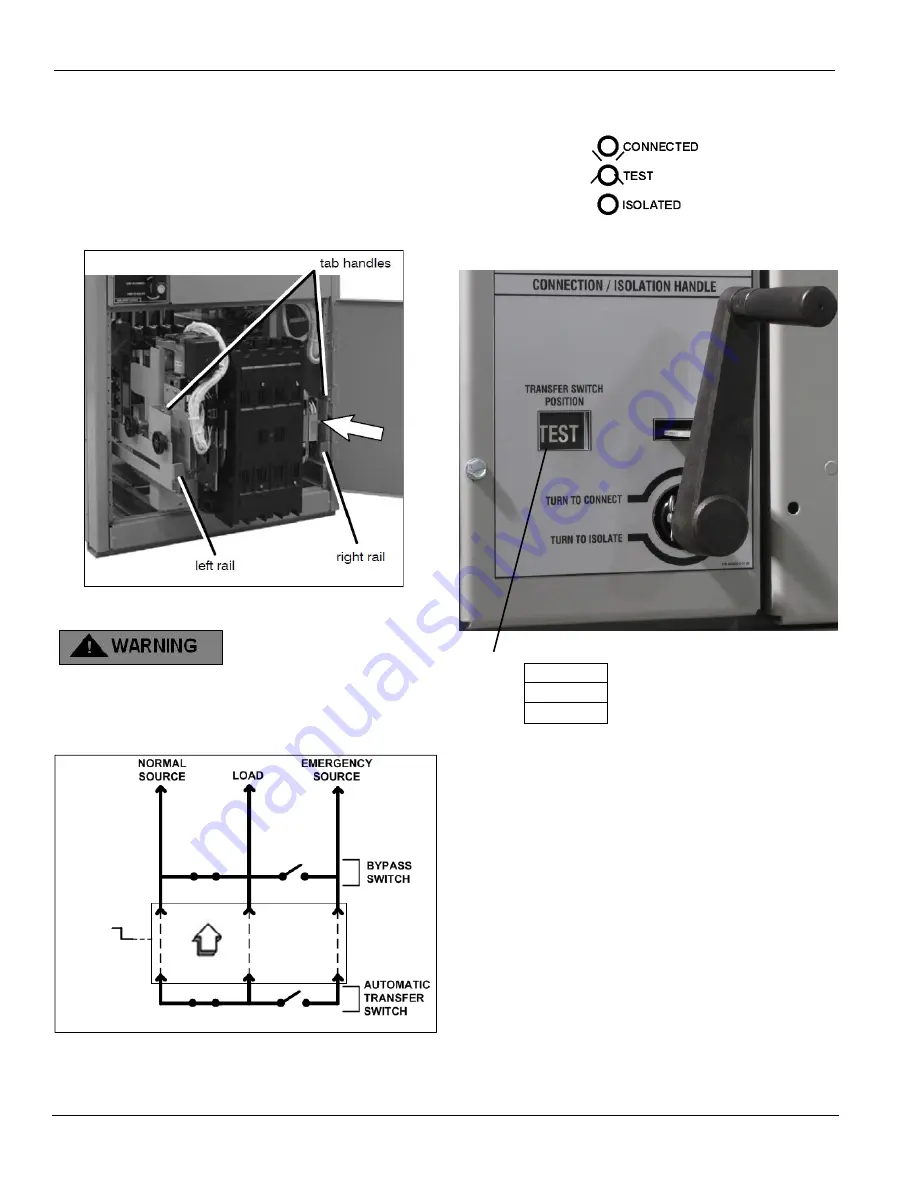
Use the two tab handles to roll the transfer switch into the 
enclosure (isolation contacts facing inward) until the crank 
bearings stop against the draw-in plates.  Then push in both 
side rails and close the enclosure door. 


Figure 19.  Push in the isolated transfer switch 


Close enclosure door to prevent personal injury 


2.


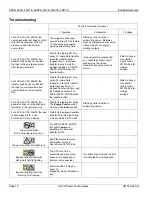
Turn the 

Connection / Isolation Handle

 clockwise 

(approx. 5 turns) until the window shows 

TEST.


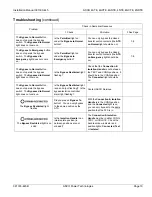
The 

TEST

 light comes on. 


Figure 20.  

ISOLATE

 to 

TEST

 position


Figure 21.  The 

TEST

 light will illuminate 


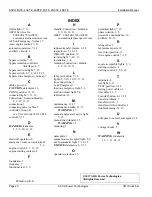
Figure 22.  Connection / Isolation Handle turned to the 

TEST

 position 


3.


The ATS can be tested now without load interruption  

(see page 6). 


continued on next page 


clockwise 

draws in the 

transfer switch


Turn crank 
clockwise 
until 
window 
shows 
TEST. 

CONN 

TEST 

ISOLATE 

Transfer 
Switch 
position 
window 
options 

Summary of Contents for J 4000 Series

Page 1: ...ickup and dropout settings and adjustments Rating Label Each transfer switch contains a rating label to define the loads and fault circuit withstand closing ratings Refer to the label on the transfer switch for specific values Do not exceed the values on the rating label Exceeding the rating can cause person injury or serious equipment damage An experienced licensed electrician must install the sw...

Page 2: ... secure P type 4X secure 304 stainless steel V type 4X secure 316 stainless steel Q type 12 secure Nameplate Catalog Number Identification The nameplate includes data for each specific 4000 Series transfer switch Use the switch only within the limits shown on this nameplate A typical Catalog Number is shown below with its elements explained Typical 4000 Series J4ATE catalog no for switched neutral...

Page 3: ...h the National Electrical Code and local codes De energize the cables before making any line or auxiliary circuit connections Be sure that the Normal and Emergency line connections are in proper phase rotation Place the engine generator starting control in the OFF position Make sure engine generator is not in operation Testing Power Cables Do not connect the power cables to the transfer switch unt...

Page 4: ...th this switch and connect the engine start wires to the appropriate terminal See Figure 1 and Table A Table A Engine Start Connections When normal source fails Terminals on terminal block TB contact closes TB1 and TB2 contact opens TB1 and TB3 NOTE To temporarily disable engine control from the automatic transfer switch you can unplug J3 from the small P3 receptacle at the bottom of the assembly ...

Page 5: ...plate Also see User s Guide 381333 444 for voltage settings in the Group H controller Use extreme caution when using a meter to measure voltages in the following steps Do not touch power terminals shock burns or death could result 1 Close the normal source circuit breaker The normal source accepted and the load on normal lights should come on 2 Use an accurate voltmeter to check phase to phase and...

Page 6: ...ed light is on 2 Press the transfer button The engine should start and run within 15 seconds For 4NTE 4NCTE 4NDTE the generator must be started manually at the generator The emergency source accepted light should come on 3 The transfer switch should transfer to the emergency position The load on emergency light should come on and the load on normal light should go off For 4NTE 4NCTE 4NDTE press th...

Page 7: ...turned to TEST CONN or ISO Alarm Blinks yellow when an alarm condition is present Not in Auto Blinks yellow when the ATS is not in an automatic operation mode bypassed or rack not connected Allowable Positions of the Bypass Switch in relation to Positions of the Transfer Switch If Transfer Switch is Connected and in this position Bypass Switch can be in either Normal open Normal Emergency open Eme...

Page 8: ...ass to the Normal Source When ATS is connected to Normal Source 1 Press and hold the Bypass to Normal button until the Bypassed to Normal light comes on Figure 5 Bypass to Normal button Figure 6 Bypass to Normal diagram Figure 7 Bypassed to Normal light Bypass to the Emergency Source When ATS is connected to Emergency Source 1 Press and hold the Bypass to Emergency button until the Bypassed to Eme...

Page 9: ...e ATS on pages 7 8 2 Turn the Connection Isolation Handle counter clockwise about 9 10 turns until the window shows TEST The TEST light comes on The ATS can be tested operated now without load interruption see page 6 Figure 11 CONNECTED to TEST position Figure 12 The TEST light will illuminate Figure 13 Connection Isolation Handle turned to the TEST position NOTE In the TEST position the transfer ...

Page 10: ...ls 3 Continue turning the Connection Isolation Handle counterclockwise approximately 5 6 turns until window shows ISOLATE The ISOLATED light comes on Figure 14 TEST to ISOLATE position Figure 15 The ISOLATED light will illuminate Figure 16 Connection Isolation Handle turned to the ISOLATE position continued on next page counterclockwise draws out the transfer switch Turn crank counter clockwise un...

Page 11: ...mended Contact Inspection Contact condition should be checked annually Discoloration is normal Do not file contacts Instead use light emery paper to clean up the contact surfaces The non replaceable main contacts are designed to last the life of the transfer switch To prevent the possibility of fatal electrical shocks and burns bypass isolate and withdraw the transfer switch before working on it 1...

Page 12: ... side rails and close the enclosure door Figure 19 Push in the isolated transfer switch Close enclosure door to prevent personal injury 2 Turn the Connection Isolation Handle clockwise approx 5 turns until the window shows TEST The TEST light comes on Figure 20 ISOLATE to TEST position Figure 21 The TEST light will illuminate Figure 22 Connection Isolation Handle turned to the TEST position 3 The ...

Page 13: ...ncy light should come on If Feature 2B time delay is used there will be a delay before transfer to Emergency NOTE With Normal available the ATS will not stay in the emergency position unless Feature 3A time delay is used at least 30 seconds Solenoid interlock prevents you from closing the isolation contacts until the ATS is in the same position as the Bypass Switch 6 When the transfer switch is in...

Page 14: ...t in Automatic light will turn off ATS is connected to Emergency Source 1 Press and hold the Unbypass button until the Bypassed to Emergency light goes off Figure 29 Unbypass to Emergency button Figure 30 Unbypass Emergency diagram Figure 31 Bypassed to Emergency light off The Not in Automatic light will turn off The Bypass Switch opens its normal contacts The Bypass Switch opens its emergency con...

Page 15: ... up according to manufacturer s guidelines Manual Engine Start Active light is on Emergency Available light comes on 2 Press and hold the Bypass to Emergency button You will hear the Bypass Switch operate twice first open then close on emergency source Bypassed to Normal light goes off Bypassed to Emergency light comes on To Transfer the Load to Normal Source Normal Available light is on Bypassed ...

Page 16: ...rts provide the Serial No Bill of Material No BOM and Catalog No from the transfer switch nameplate In the US call 800 800 2726 ASCO or contact customercare ascopower com Yearly Inspection Hazardous voltage capable of causing shock burns or death Deenergize both Normal Emergency power sources before performing inspections Clean the enclosure Deenergize all sources then brush and vacuum away any ex...

Page 17: ...e of the operator of the transfer switch See Figures 33 34 35 and Table C 2 Move the maintenance handle up or down as shown to manually operate the transfer switch Operate both upper and lower contact shafts Observe the window indicators right side Remove the maintenance handle and store it on the lower left side NOTE If Normal and Emergency connections are reversed this operation is also reversed...

Page 18: ...ansfer the load to normal source when normal returns or after transfer test Wait for the feature 3A time delay For immediate retransfer press the transfer button bypass timer If inphase transfer is active wait for inphase condition For 4NTE 4NCTE 4NDTE press the transfer button Refer to Group H controller User s Guide 381333 444 for voltage settings For 4ATE 4ACTE 4ADTE the generator does not stop...

Page 19: ...sed to Normal light does not come on Is the Bypass Restricted light flashing Check that the Connection Isolation Handle is not between the TEST and CONN positions It should be in the CONN position The Connected light should be on The Bypass to Normal button does not operate the bypass switch The Bypassed to Normal light does not come on Is the Bypass Restricted light is on solid not flashing Is th...

Page 20: ...0 12 13 HELP 800 800 2726 ASCO customercare ascopower com I inphase transfer feature 6 18 inspection 11 12 16 ISOLATE position 10 isolated light 7 10 15 installation 3 4 Isolation Connection Handle 2 9 10 12 13 L lamp test button 7 16 lights 5 7 10 12 15 17 18 line connections 3 Load Energized 7 load on emergency light 5 6 load on normal light 5 6 lubrication 16 M maintenance 11 17 maintenance han...

Reviews: