Installation Manual 381333-445
ASCO 4ATE, 4ACTE, 4ADTE, 4NTE, 4NCTE, 4NDTE
381333-445 B
ASCO Power Technologies
Page 13
4.
Observe which
Bypassed To
light is on (Normal or
Emergency). This indicates the source connected to the
load.
5.
Observe which
ATS On
light is on (Normal or
Emergency). This is the position of the Transfer Switch.
If it is not in the same position as the Bypass Switch,
change the position of the Transfer Switch as follows:
To change the position of the Transfer Switch
Operate to NORMAL
Operate to EMERGENCY
Press the transfer button
and follows prompts.
Press the transfer button
and follows prompts.*
Connected to Normal
light should come on.
Connected to Emergency
light should come on.
* If Feature 2B time delay is used, there will be a delay
before transfer to Emergency.
NOTE:
With Normal available, the ATS will not stay in
the emergency position unless Feature 3A time delay is
used (at least 30 seconds).
Solenoid interlock prevents you from closing the
isolation contacts until the ATS is in the same
position as the Bypass Switch.
6.
When the transfer switch is in the same position as the
Bypass Switch, continue turning the
Connection /
Isolation Handle
clockwise (about 10 turns) until the
window shows
CONN
(connected) . The
Connected
light comes on.
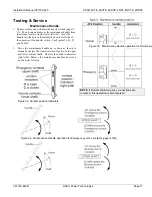
Figure 24. The
CONNECTED
light will illuminate
Figure 25. Connection / Isolation Handle turned to
CONN
position
Figure 23.
TEST
to
CONN
position
clockwise
draws in the
transfer switch
Turn crank
clockwise
until
window
shows
CONN.
CONN
TEST
ISOLATE
NOTICE
Transfer
Switch
position
window
options


