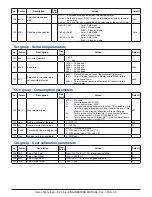
Ascon Tecnologic - KX Line - ENGINEERING MANUAL -Vr.4.0
PAG. 25
The letter will change from
A
to
o
and vice versa.
10. Select the second parameter that you want to add to the
assistance level and repeat step 6, 7 and 8.
11. Repeat step 5, 6, 7, 8 until the list has been completed.
12. When you need to exit from promotion procedure, push
button and maintain the pressure for more than 10 s.
The instrument will show the “standard display”.
Note:
When you set the some number to two parameter, the
instrument will use only the last programmed parameter.
Example:
In the previous example, I have set for SP2 a
promotion value equal to A3.
If now I set for SP3 a promotion value equal to
o3
, the
Limited Access list and the operator list becomes.
Parameter
Promotion
Limited Access
Operator
- OPEr -
o 1
OPEr
OPEr
- SP -
o 2
SP
SP
- SP3 -
o 3
SP3
SP3
- A.SP -
A 4
A.SP
- AL1 -
o 5
AL1
AL1
6. OPERATIVE MODES
As we said at paragraph 4.1, when the instrument is
powered, it starts immediately to work according to the
memorized parameter value.
In other words, the instrument has one status only, the “run
time” status.
During “run time” we can force the instrument to operate
in three different modes: Automatic mode, Manual mode or
Stand by mode:
–
In
Automatic mode
the instrument drives automatically
the control output according to the parameter value set
and the set point/measured value.
–
In
Manual mode
the the upper display shows the measured
value while the lower display shows the power output
alternately to the “oPLo” messages and the instrument
allows you to set manually the control output power.
No Automatic action will be made.
–
In
Stand by
mode the instrument operates as an indicator.
It will show on the upper display the measured value and
on the lower display the set point alternately to the “St.bY”
messages and forces the control outputs to zero.
As we have seen, it is always possible to modify the value
assigned to a parameter independently from the operative
modes selected.
6.1 MODIFy A PARAMETER DuRING
“OPERATOR LEVEL”
The instrument is showing the “standard display”.
1. Press the
button.
2. The upper display will show the acronym of the first
parameter promoted to this level while the lower display
will show its value.
3. By
and
button assign to this parameter the
desired value.
4. Press the
button in order to memorize the new value
and go to the next parameter.
5. When you want to come back to the “standard display”
push the
button for more than 5 seconds.
Note:
The parameter modification of the Operator level
is subject to a time out. If no button is pressed for
more than 10 seconds, the instrument goes back to
the “standard display” and the new value of the last
selected parameter will be lost.
6.2 ENTER ThE “LIMITED ACCESS LEVEL”
The instrument is showing the “standard display”.
1. Press the
button for more than 5 seconds;
2. The upper display will show
PASS
while the lower display
will show
0
;
3. By
and
buttons set the value assigned to
[117] PAS2 (Level 2 password).
Notes: 1.
The factory default password for configuration
parameters is equal to 20.
2.
All parameter modification are protected by a
time out. If no button is pressed for more than
10 second the instrument comes automatically
back to the Standard display, the new value of the
last selected parameter is lost and the parameter
modification procedure is closed.
When you desire to remove the time out (e.g.
for the first configuration of an instrument) you
can use a password equal to 1000 plus the
programmed password
(e.g. 1000 + 20 [default] = 1020).
It is always possible to manually End the
parameter configuration procedure (see below).
3.
During parameter modification the instrument
continues to perform the control.
In certain conditions (
e.g. when a parameter
change can produces a heavy bump to the
process)
it is advisable to temporarily stop the
controller from controlling during the programming
procedure (its control output will be Off).
A
password equal to 2000 + the programmed value
(e.g. 2000 + 20 = 2020) will switch the control out
off during configuration. The control will restart
automatically when the para-meter modification
procedure will be manually ended.
4.
Push
button.
5.
The instrument will show on the upper display the
acronym of the first parameter promoted to this
level and on the lower display its value.
6.
By
and
buttons assign to this parameter
the desired value.
7.
Press the
button in order to memorize the
new value and go to the next parameter.
8.
When you want to come back to the “standard
display” push the
button for more than 5 s.
6.3 hOw TO SEE buT NOT MODIFy ThE “LIMITED
ACCESS PARAMETERS”
Sometime it is necessary to give to the operator the possibility
to see the value assigned to the parameter promoted in the
Limited Access level but it is important that all changes are
made by authorized personnel only.

