Page 4
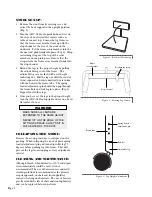
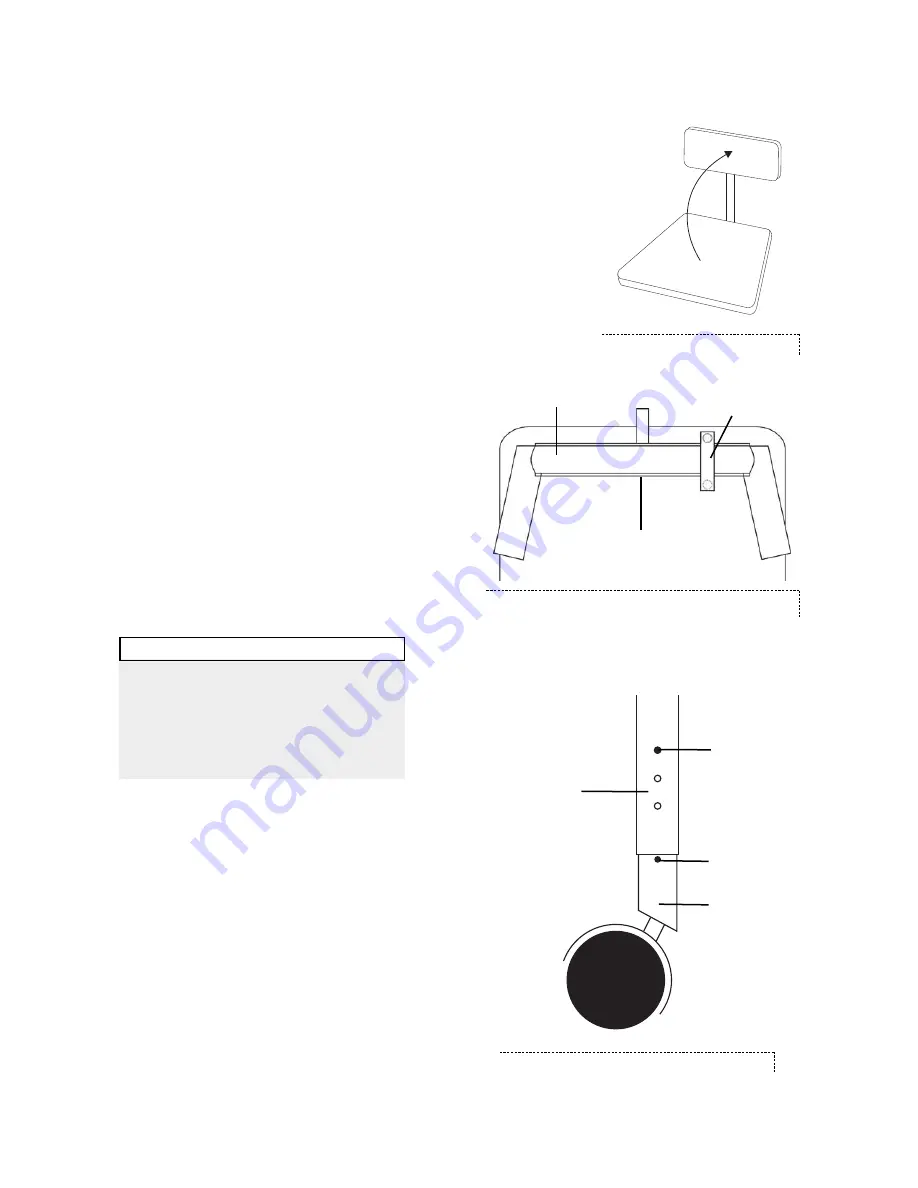
Figure 1 - Backrest Positioning
Figure 2 - Securing Leg Frame
Frame
cross member
Restraining strap
Stop channel
Figure 3 - Leg Height Adjustment
Spring loaded
adjustment pin
Red dot
Adjustable leg
Frame tube
STOOL SET-UP:
1. Remove the stool from its carrying case and
swivel the back support to the upright position.
(Fig. 1)
2. Turn the ADC-08 Stool upside down and set on
the edge of an elevated flat surface such as a
table or counter top. Scissor the leg frame so
that the frame cross member lines up with the
stop channel at the rear of the stool on the
underside. Fit the frame cross member into the
channel and push firmly into place (Fig. 2). Wrap
restraining strap over the top of the cross
member and snap into place. Ensure that the
strap retains the frame cross member firmly into
the stop channel.
3. Extend the legs to the proper height by pulling
the adjustable legs out of the frame. The
adjustable legs are marked with a red height
indicating dot. Pull the leg out until the red dot
is just exposed and rotate until red dot is in line
with the holes in the frame tube. The spring
loaded adjustment pin should then pop through
the frame hole and lock leg into place. (Fig. 3)
Repeat for all other legs.
4. Once you have set the legs to the proper height,
turn the ADC-08 Stool upright and set on a hard,
flat surface for use.
COLLAPSING THE STOOL:
Reverse the set-up procedure to collapse stool for
packing. When collapsing the stool, depress spring
loaded adjustment pin and turn adjustable leg 90
degrees before pushing leg into frame. This will
prevent the legs from stopping at every adjustment
interval.
CLEANING AND MAINTENANCE:
Although bleach, when diluted to <10% and wiped
clean immediately could be used, it is not
recommended. The use of barrier covers and mild
cleaning solutions is recommended as the primary
asepsis approach on chair and stool upholstery
instead of relying on chemicals. The use of barriers
greatly extends the life of chair and stool upholstery
and can be replaced between patients.
MAKE SURE ALL LEGS ARE
EXTENDED TO THE SAME HEIGHT.
NEVER SIT ON THE EDGE OF THE
SITTING SURFACE. ALWAYS SIT IN
THE CENTER OF THE SEAT.
WARNING
Summary of Contents for ADC-08
Page 5: ...Page 5 NOTES...


