background image

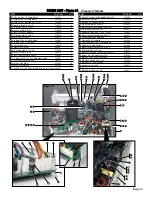
THREE-WAY SOLENOID - Fig. 2
Remove pump cover as previously described (refer to “Power

Supply”  disassembly  procedure  above).  Disconnect  tube

from pump to the valve at the valve. Remove screws from the

pump  and  move  the  pump  forward.  Remove  tube  to  valve

output at the valve. Disconnect wire from the power board

and remove the two screws and washers from the valve with

a 1/16-inch Allen wrench. 
Reassemble solenoid in the reverse order.

TWO-WAY SOLENOID - Fig. 2
Remove pump cover as previously described under “Power

Supply”  disassembly  procedure.  Remove  screws  from  the

pump and suspend the pump from the back of the chassis.

Remove the two screws and washers to the valve from the

bottom of the chassis with a 1/16-inch Allen wrench. Clip the

cable ties on the wiring harness on the chassis at the bottom

of the power board. Disconnect the connector with the two

blue wires and remove the tubes from the valve. 
Reassemble solenoid in the reverse order and re-tie cables

with cable ties.

PRESSURE SWITCH - Fig. 2
Remove  pump  cover  as  previously  described  under  “Power

Supply”  disassembly  procedure.  Disassemble  the  pump  as

described above under “Two-Way Solenoid”. Clip the cable ties

on the wire harness on the chassis at the bottom of the power

board. Remove the vehicle receptacle with a 1/4-inch wrench to

access  the  nuts  and  washers  on  the  pressure  sensor  bracket.

Remove  the  nuts  to  the  bracket  with  a  1/4-inch  wrench.

Disconnect  the  tube  to  the  pressure  sensor.  Remove  the

pressure sensor locknut with a 7/8-inch wrench. Remove 2-pin

connector with the black and green wires from the power board. 
Reassemble sensor in the reverse order. 
To set pressure on the pressure sensor, remove the rear access

screw with a 1/8-inch Allen wrench to expose the adjustment

setscrew within the sensor. Adjust the sensor by turning the

setscrew with a 1/8-inch Allen wrench until the pressure reads

approximately 22 PSI on the gauge (with chassis power turned

on).  Turning  the  setscrew  clockwise  increases  the  pressure

setting; counterclockwise decreases the pressure setting.

DISASSEMBLY

NOTE:  This  system  consists  of  two  main  assemblies:  the

chassis  assembly  and  the  battery  packs.  All  operating

functions of the system are encased in the chassis and can be

operated  outside  of  the  unit  case  if  proper  precautions

against electrical shock are taken.

CHASSIS REMOVAL
Stand the unit upright, into its operating position. Remove

the water bottle. Go to the rear of the case and remove the

two upper screws with a #2 Phillips head screwdriver. Go to

the  top  of  the  unit  and  remove  the  two  screws  while

supporting the chassis with your hand. Remove the chassis

from the case. 
Reassemble the chassis in the reverse order. Check the O-

rings on the screws to ensure they are not damaged. If the O-

rings are damaged, replace with new screws or RTV screws in

place.

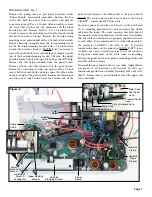
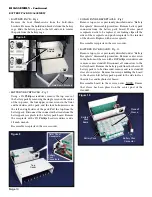
POWER SUPPLY - Fig. 1
Remove  the  connectors  to  the  power  supply  board  on  the

pump  cover.  Remove  the  three  flat  head  screws  from  the

front of the chassis cover with a #2 Phillips head screwdriver.

Remove the pump cover/power supply subassembly from the

chassis.  With  the  subassembly  removed,  disassemble  the

power supply from the pump cover by removing the four nuts

and lockwashers from the four corners of the power supply

with a 3/16-inch wrench. 
Reassemble  power  supply  in  the  reverse  order.  When

replacing the pump cover on the chassis, take care that the

wires and tubes are not pinched by the chassis, and that the

wires from the motor and solenoid are in the appropriate slot

in the rear of the pump cover.

COMPRESSOR PUMP - Fig. 2
Remove pump cover as previously described (refer to “Power

Supply” disassembly procedure above). Remove tubes from

the  air  filter  and  three-way  solenoid  at  the  components.

Remove air supply bottle and remove the two screws to the

pump from the bottom of the chassis with a 3/32-inch Allen

wrench. Remove connector from power board. 
Reassemble pump in the reverse order.

Page 5

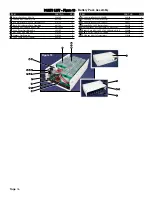
Figure 1

Pump

Cover

Power

Supply

Figure 2

Pump

Two

Way

Solenoid

Tubes

Air Bottle

Pressure

Switch

Access

Screw

Three

Way

Solenoid

Fuse

Holders

Connectors

Summary of Contents for AEU-14CF

Page 1: ...AEU 14CF Emergency Field Dental Unit SERVICE MANUAL PARTS LIST Expedition...

Page 2: ...Fig 4 9 Air Reservoir Cap Fig 6 9 Water Reservoir Cap Fig 6 9 Water Pick Up Tube Fig 6 9 Water Filter Fig 6 9 Air Water Seals Fig 6 9 Syringe Fig 7 9 BATTERY PACK DISASSEMBLY Battery Pack Fig 8 10 Bat...

Page 3: ...ion Manual It will help you better understand the operation of the AEU 14CF Expedition Emergency Field Dental Unit thereby reducing service time A Schematic Diagram Set includes part drawings and sche...

Page 4: ...ectrostatic controls must be used when working on this unit ESD Training and Standards Employees handling electronic sub assemblies and ESD sensitive components are expected to be trained Training sho...

Page 5: ...rning the setscrew clockwise increases the pressure setting counterclockwise decreases the pressure setting DISASSEMBLY NOTE This system consists of two main assemblies the chassis assembly and the ba...

Page 6: ...se order FOOT SWITCH RECEPTACLE Fig 3 Remove the two screws holding the power cord receptacle and pull the receptacle forward Push the power switch forward Remove the pump cover as previously describe...

Page 7: ...the bottom side of the power board Remove the ribbon cable at the power board NOTE The cable connector has been sealed at the factory with RTV remove the RTV from cable To replace power board with a...

Page 8: ...f the chassis and install the board using the two clamping bars Insert the ribbon cable into the display board and ensure that the cable is oriented and seated properly in the connector The socket req...

Page 9: ...ERLAY The chassis does not have to be removed to replace the overlay Peel a corner of the overlay away from the chassis console with an exacto knife or sharp edged tool and pull the overlay off the co...

Page 10: ...s Reassemble board in the reverse order NOTE Ensure that sleeve has been placed on the center post of the standoff BATTERY PACK DISASSEMBLY BATTERY PACK Fig 8 Remove the four thumbscrews from the hold...

Page 11: ...1 HPCE 1 5 Contra Increaser w Fiberoptics w water AHP 72MBFO XL 1 Syringe 3 Way Air Water TA 90D 1 1 ITEM PART NO QTY 2 3 4 5 6 7 8 14 2 7 8 3 10 11 13 12 13 Figure 11 1 9 4 Footswitch On Off 8 Pin A...

Page 12: ...4 2 Washer Split Stnls 4 510433 2 Conn Recpt Wall Mntg 8Pin 860165 1 Wire Set AEU 14 Foot Pedal Con 875042 1 Knob Gry Plastic 1 4D Style II 850012 1 Valve Needle Control w o Knob 730066 1 Guard Fan 54...

Page 13: ...Pressure 10 100 Modifid AEU 425 460905 1 Nut Lock 1 4 NPSL 730430 1 Brkt AEU 14 Pressure Switch 461282 1 C S SocHd Stnls 4 40 x 5 8 510610 1 Bracket Heat Sink Clamping AEU 14CF 461650 1 C S BtnSoc Bl...

Page 14: ...ls 4 510433 6 Guard Fan 540011 1 M S FlaPhl Stnls 4 40 x 1 1 4 510621 4 Fan 12 VDC 70mA 8 0 CFM 540010 1 Conn Recpt Wall Mntg 8Pin 860165 1 Washer Flat Stnls 4 510192 4 Holder AEU 14 Filter 461180 1 F...

Page 15: ...itchs 461293 1 ITEM PART NO QTY 9 10 5 7 10 2 9 8 Figure 18 PARTS LIST Figure 18 Case Battery Pack Case AEU 14 Expedition 410157 1 Not Shown Foot Case AEU 14 461290 2 M S Stnls PhdPhl 6 32x3 8 Self Se...

Page 16: ...her Flat Stnls 4 510192 4 Conn Crimp Socket 14AWG 860163 2 1 ITEM PART NO QTY 2 3 4 5 6 7 8 9 10 11 12 13 14 15 16 Conn Crimp Socket 22 20AWG 860169 2 Conn Hsng 2 Pin In Line Recept 860114 1 Conn Crim...

Page 17: ...red to the vehicle battery connector Check connections at the battery pack chassis and cable Check voltage of the battery pack Check the 5A fuse inside the chassis amber fuse wired to the battery pack...

Page 18: ...pack or vehicle battery power for operation Type of Protection Against Electric Shock Class I when system is powered by mains power source Class II when system is powered by Vehicle Battery power sou...

Page 19: ...ice will provide instructions usually directing that the product be returned for service Shipment to Aseptico and the cost thereof is always the responsibility of the purchaser Accidental misuse inapp...

Page 20: ...Woodinville WA 98072 1548 800 426 5913 425 487 3157 Fax 425 487 2608 www aseptico com info aseptico com For Further Service And Or Technical Assistance Contact P N 420417 Rev G ECO 13123 06 2013 PRINT...

Reviews: