21.
3-WAY AIR/WATER SYRINGE
:
Depress the right button for air operation,
and the left button for water operation.
Depressing both buttons will create a mist.
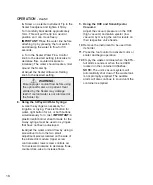
The syringe features quick-change
autoclavable tips: To remove a tip, press
on the locking collar surrounding the tip
socket and pull the used tip straight out of
the socket (Fig. 42). To insert a new tip,
press locking collar and push tip into
socket as far as it will go. Release ring
and gently tug on tip before using to
ensure that tip is securely locked into
socket.
Syringe Tip Sterilization:
1)
Remove contaminated syringe tip.
2)
Remove all visible signs of
contamination before autoclaving.
3)
Autoclave tip at 132° C (270° F) for ten
minutes.
4)
Sterilize between each patient use.
NOTE
: Since only the tips can be
autoclaved, it is recommended that the
air/water syringe be bagged with a
disposable, single-use plastic sleeve
between each patient use.
OPTIONAL ULTRASONIC SCALER
:
The optional scaler’s handpiece cover and
scaler tips are fully autoclavable. Disinfect
and clean the cover and tips before
autoclaving. Autoclave at a maximum
temperature of 135º C (275º F) for 10
minutes or 120º C (248º F) for 20 minutes.
Wipe off the scaler handpiece and its
silicone hose with a soft cloth. Use a 45%
isopropal and detergent solution.
DO NOT
IMMERSE
the handpiece in any fluid or
spray any fluid directly on the handpiece.
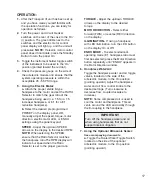
MOTOR/CORD RECEPTACLE O-RINGS
The O-rings (PN 520081) for the three
water/air ports in the motor/cord receptacle
should be replaced if damaged or worn. Use
the provided O-ring installer pin and sleeve to
replace the O-rings:
1. Remove old O-ring from water or air port
fitting.
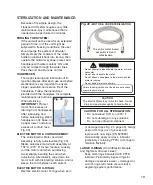
2. Slide new O-ring over pointed end of
installer pin, onto the pin’s shank (see
Figure 43).
3. Insert pointed end of installer pin into open
end of installer sleeve until O-ring stops
against end of tool.
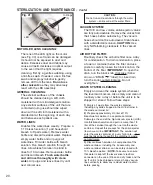
4. Position concave end of installer pin against
end of water/air port fitting (see Figure 44).
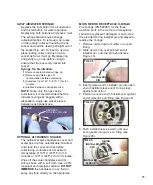
5. Push installer sleeve inward, until new
O-ring seats into groove on fitting (see
Figure 45)
.
FIG. 42
DEPRESS
LOCKING COLLAR
O-RING
INSTALLER
PIN
FIG. 43
O-RING
FIG. 44
WATER/AIR
FITTING
O-RING
INSTALLER
SLEEVE
FIG. 45
INSTALLER
PIN


