background image

3

7.

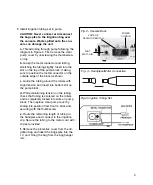
Install irrigation tubing set in pump.

CAUTION: Never connect or disconnect
the bag spike to the irrigation bag over
the console. Waste spilled onto the con-
sole can damage the unit.

a.

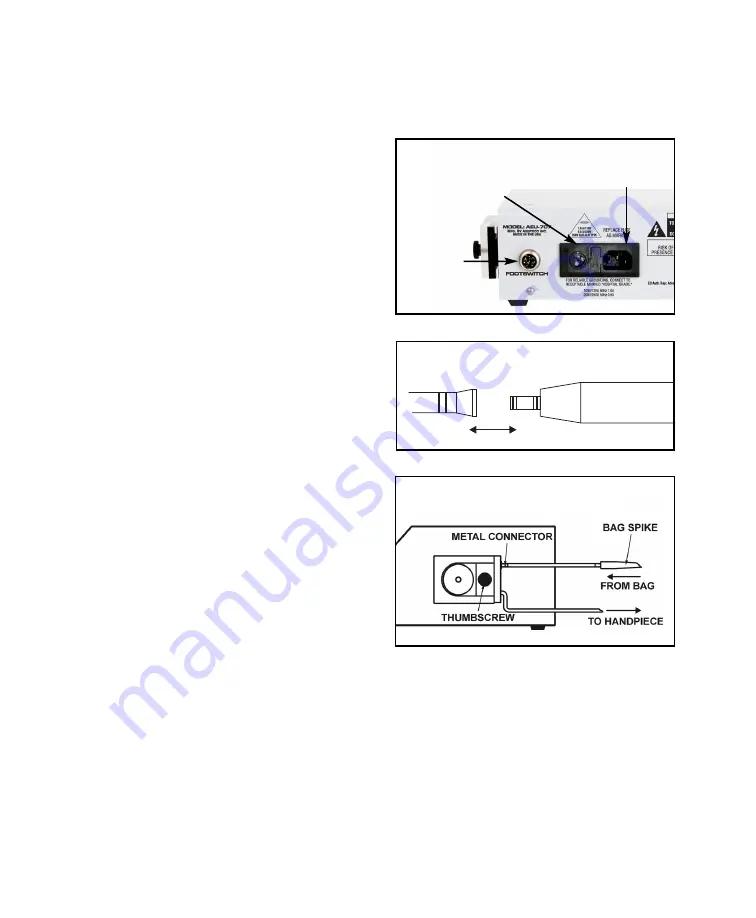
Thread tubing through pump following the

diagram in Figure 4. First remove the clear
pump cover by unscrewing the thumbscrew
on top.

b.

Grasp the metal connector and tubing,

stretching the tubing slightly. Insert into the
slot on the top of the pump block, making
sure to position the metal connector on the
outside edge of the block as shown.

c.

Guide the tubing around the rollers with

slight tension and insert into bottom slot on
the pump block.

d.

While maintaining tension on the tubing,

check that tubing is centered on the rollers
and is completely tucked into slots on pump
block. Then replace clear pump cover by
sliding into position from front to back and
securing with the thumbscrew.

e.

Route the remaining length of tubing to

the handpiece and connect to the irrigation
clip. Secure the tubing to the motor cord with
clip set provided.

f.

Remove the protective cover from the irri-

gation bag and insert the bag spike into the
I.V. port. Hang the bag from the bag hanger
rod.

Fig.4 Irrigation Tubing Set

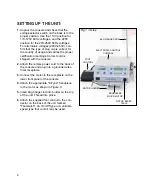
Fig.2 - Console Back

POWER

CORD IN

FOOT

SWITCH IN

VOLTAGE

SELECTOR SWITCH

Fig. 3 - Handpiece/Motor Connection

Summary of Contents for AEU-707A

Page 1: ...AEU 707A AEU 707AV2 Implant Surgery Systems OPERATION AND MAINTENANCE INSTRUCTION MANUAL ...

Page 2: ...LASSIFICATIONS Internally Powered Equipment Type B Equipment Ordinary Equipment degree of protection against ingress of water Not suitable for use in the presence of a flam mable anesthetic mixture with air or with oxy gen or nitrous oxide P O Box 1548 Woodinville WA 98072 8333 216th Street S E Woodinville WA 98072 425 487 3157 800 426 5913 www aseptico com info aseptico com WARNING This device ha...

Page 3: ...iable service Please read the instructions provided in this manual to receive the best and longest service from your Aseptico equipment Separate manuals may be provided to cover the operation and maintenance of hand held pieces or other accessories for your unit PACKAGE CONTENTS Electronic Control Console AE 4B 30 Autoclavable Brushless Micro Motor Autoclavable Motor Holder AE 7P On Off Foot Contr...

Page 4: ... is shipped with the console 2 Attach the remote power cord to the back of the console and plug into a grounded elec trical receptacle 3 Connect the motor to the receptacle on the lower front panel of the console 4 Attach the appropriate E Type handpiece to the motor as shown in Figure 3 5 Insert bag hanger rod into holder on the top of the unit Thread into place 6 Attach the supplied foot control...

Page 5: ...ound the rollers with slight tension and insert into bottom slot on the pump block d While maintaining tension on the tubing check that tubing is centered on the rollers and is completely tucked into slots on pump block Then replace clear pump cover by sliding into position from front to back and securing with the thumbscrew e Route the remaining length of tubing to the handpiece and connect to th...

Page 6: ...Up arrow to increase speed and the Down arrow to decrease speed A visual display shows actual RPM Ratio selector must match exactly the ratio of the hand piece being used for complete accura cy 5 Forward Reverse Determines the rotation of the motor and handpiece A red LED light displays the reverse rotation 6 Ratio Selector Calibrates the RPM display to read accurately for up to four different han...

Page 7: ...h the pump to the ON position The display will light Set the flow to the desired level Thorough cleaning and lubrication of hand pieces after each use and before steriliza tion is very important to ensure proper operation and service life of the handpiece Follow the instructions provided with the handpiece purchased for complete mainte nance instructions NOTE The RPM display indicates true bur spe...

Page 8: ...otor and cord Loosely coil the motor cord when auto claving Avoid sharply bending the cord when autoclaving NOTE Call Aseptico Inc at 1 800 426 5913 for any questions or clarifications on this sterilization procedure Always install the autoclaving plugs into motor and motor connector before autoclaving If the autoclaving plug for the motor becomes difficult to remove or install apply silicone grea...

Page 9: ... If blown replace with 1A 250V slo blo fuse for 110 volts 0 5A 250V slo blo fuse for 220 volts Check motor plug connection Check foot switch connection Depress foot switch Increase RPM Check that bur is properly seated in the handpiece and the collet is closed Check that pump is on and flow level is sufficient Check that water container seal is completely punctured Make sure the irrigation tubing ...

Page 10: ...8 NOTES ...

Page 11: ...NOTES ...

Page 12: ...tion In the event of alleged defect under warranty the purchaser is to notify Aseptico s Customer Service Department promptly Customer Service will provide instructions usually directing that the product be returned for service Shipment to Aseptico and the cost thereof is always the responsibility of the purchaser Accidental misuse inappropriate installation or failure to perform directed maintena...

Reviews: