5
After the ALU-40LED Lamp has been set up,
the unit is ready to operate:
1.
Ensure that the protective Lens Cover is
mounted onto the front of the Lamp Head
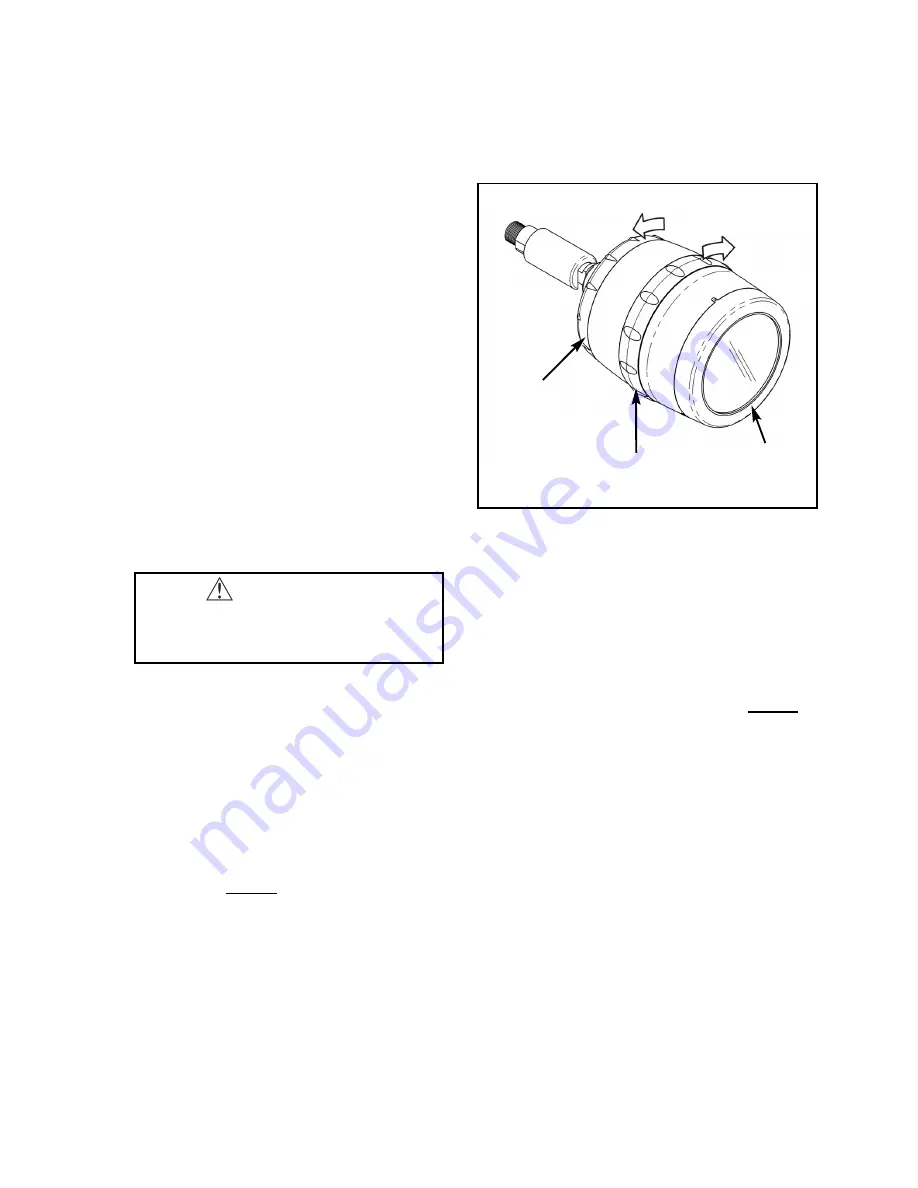
(see Figure 4).
IMPORTANT:
If applying light-activated
composites, it is recommended that the
supplied Color Filter, PN: 461974, be
used to filter the light from the ALU-40LED
Lamp. To install the Filter, remove the
Lens Cover and place the Filter against
the inside of the Cover (see Figure 5,
page 6). Center the Filter so that it
completely covers the transparent shield
on the Cover. Replace the Lens Cover.
2.
Turn On/Off switch located on bottom of
power supply housing to On (—) position
(see Figure 2, page 3).
3.
Adjust light intensity and spot size by
rotating the two adjustment rings on the
Lamp Head (see Figure 4):
a) LED Intensity Adjustment Ring:
Provides variable brightness control.
When viewed from the rear of the
Lamp Head, rotate Ring clockwise to
increase lamp intensity, or counter-
clockwise to decrease intensity. The
intensity adjustment range is from 0%
to 100%.
NOTE:
The total adjustment
range of the Intensity Ring covers
approximately 90° of rotation -- do not
OPERATION:
attempt to force the Ring past the
stops at each end of this range.
b) LED Aperture Adjustment Ring:
Allows user to select from seven
different beam aperture sizes. When
viewed from the rear of the Lamp
Head, rotate the Ring counterclock-
wise to increase beam width, and
clockwise to decrease width.
NOTE:
When the Aperture Ring is rotated
continuously in one direction, the
Lamp will repeatedly cycle through the
seven aperture sizes.
Fig. 4 - Illumination Controls
LED
INTENSITY
ADJUSTMENT
RING
LED
APERTURE SIZE
ADJUSTMENT RING
PROTECTIVE
LENS COVER
BRIGHTER
BEAM
WIDER
BEAM
WARNING:
Avoid looking directly into LED lamp. Protect
patient with darkened eyewear when directing
light near patient's eyes.

