Page 7
Reassemble the left venturi assembly in the reverse order.
VENTURI MUFFLER
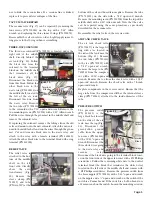
Grasp the venturi assembly and unscrew muffler (PN
330564) from venturi body, either by hand or with a pair of
channel locks.
Replace by screwing muffler on, hand tight.
COMPRESSOR MOTOR ASSEMBLY
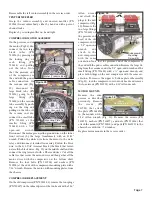
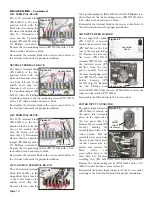
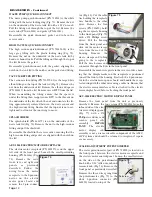
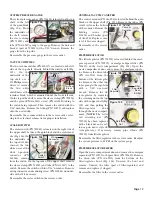
On the pressure end of
the motor (Fig.28), dis-
connect the two large
black
tubes
(PN
730256) by pressing on
the locking ring on
each
fitting
(PN
730638) and pulling
out the tubes. Note
that the pressure end
of the compressor is
the end with the power
cable connection. On
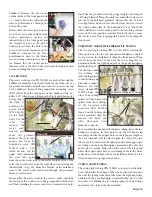
the vacuum end (Fig.
29), disconnect the
large black tube (PN
730256) going to the
large fitting (PN
730638) on the vacuum
tube assembly by push-
ing on the ring and
pulling on the tube. At
the vacuum end, dis-
connect the small tube
(PN 730130) at the
smaller fitting (PN
730638) with a 7/16"
open-end
wrench.
Disconnect the motor green/yellow ground wire on the lower
front vertical (by the large transformer) with an 11/32"
wrench. Follow the white wire from the motor to the waste
relay and disconnect terminal from relay. Follow the black
wire to the 110 VAC terminal block (the block that termi-
nates all the black wires - Fig. 19) on the middle shelf and dis-
connect the ring terminal with a #2 screwdriver. Cut all the
cable ties that secure the motor wires and then gather all the
motor wires with the compressor on the bottom shelf.
Remove the four bolts (PN 510704) and washers (PN
510508) at the ends of the compressor mounting plate with a
7/16" wrench. Remove the motor, with mounting plates, from
the chassis.
COMPRESSOR REPLACEMENT
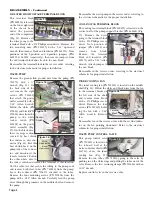
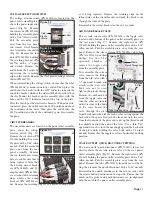
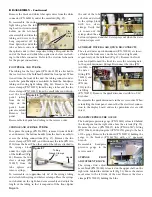
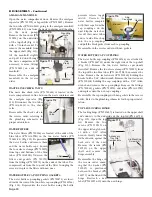
On the old compressor (PN 720024-01), remove the four plugs
(PN 730637) on the inboard ports of the two heads with a 5/16"
Allen wrench
and attach the
plugs to the new
compressor (Fig.
30). Remove the
two large fittings
(PN 730360) on
the pressure end
head of the old
compressor with
a 5/8" open-end
wrench
and
attach to the
new compressor
with the same
orientation. Note that the pressure end of the compressor is
the end with the power cable connection. Remove the large fit-
ting from the vacuum end with a 5/8" open-end wrench and the
small fitting (PN 730638) with a ½" open-end wrench, and
place both fittings on the new compressor with the same ori-
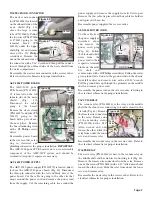
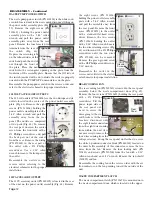
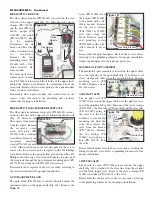
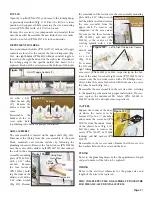
entation. To remove the upper & bottom plate subassembly
(Fig. 31), turn the compressor over onto its heads and remove
the four screws (PN 510503) with a 3/32" Allen wrench.
MOTOR MOUNTS
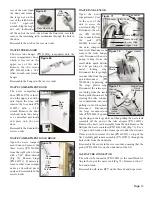
Remove the com-
pressor as described
previously. Remove
the
screws
(PN
510702) that attach
the plate (PN 461898)
to the mounts with a
3/16" Allen wrench (Fig. 32). Remove the screws (PN
510352), washers (PN 510107), and nuts (PN 510126) that
attach the mounts (PN 730314) and pads (PN 461929) to the
chassis base with two ½" wrenches.
Replace motor mounts in the reverse order.
Figure 30
Plugs
Vacuum
End
Pressure
End
Figure 28
Locking Ring
Motor Pressure End
Figure 29
Motor Vacuum End
Mounting Plate
Vacuum Tube Assy
Figure 31
Figure 32
Mounts
(Pads underneath)
Motor
Mounting Plate
Upper & Bottom
Plate
Subassembly
Subassembly
Mounting
Screws (4)

