background image

-14-

GASKETING

This unit’s door uses a 1” diameter rope gasket. It is recommended that you change the door gasket (which makes 

your stove door air tight) once a year, in order to ensure good control over the combustion, maximum efficiency 

and security. To change the door gasket, simply remove the damaged one. Carefully clean the available gasket 

groove, apply a high temperature silicone sold for this purpose, and install the new gasket. You may light up your 

stove again approximately 24 hours after having completed this operation.

WARNING:

NEVER OPERATE THE STOVE WITHOUT A GASKET OR WITH A BROKEN ONE. DAMAGE TO THE STOVE OR EVEN 

HOUSE FIRE MAY RESULT.

Maintenance

Your wood stove is a high-efficiency stove and therefore requires little maintenance. It is important to perform 

a visual inspection of the stove every time it is emptied, to ensure that no parts have been damaged, in which 

case repairs must be performed immediately. Inspect and clean the chimney and connector pipe periodically 

for creosote build-up or obstructions.

AIR TUBES

The air tubes assembled in this unit are designed to provide an accurate mix of secondary air to ensure the 

highest efficiency. Any damage or deterioration of these tubes may reduce the efficiency of combustion. The air 

tubes are held in position by screws or snap pins. Locate these to either side of the tube and remove it to allow 

the tube to be removed and replaced.

SECONDARY AIR TUBES

The secondary air tubes must be cleaned with a wire brush. If debris remains in holes lightly tap with a wooden 

stick to remove.

GLASS

• 

Inspect and clean the glass regularly to detect any cracks. If you spot one, turn the stove off immediately. Do 

not abuse the glass door by striking or slamming shut. Do not use the stove if the glass is broken.

• 

If the glass on your stove breaks, replace only with the glass supplied from your heater dealer. Never substitute 

other materials for the glass.

• 

To replace the glass, remove the screws retaining the glass moldings inside the door. Remove the moldings 

and replace the damaged piece with a new one. Perform the procedure backward after replacing it. When 

replacing the glass, you should change the glass gasket to make sure you keep it sealed.

• 

Never wash the glass with a product that may scratch. Use a specialized product, available in the stores where 

wood stoves are sold. The glass should be washed only when cold.

PAINT

Only clean your stove with a dry soft cloth that will not harm the paint finish. If the paint becomes scratched or 

damaged, it is possible to give your wood stove a brand new look, by repainting it with a 1200° F heat resistant 

paint. For this purpose, simply scrub the surface to be repainted with fine sandpaper, clean it properly, and apply 

thin coats (2) of paint successively.

SMOKE AND CO MONITORS

Burning  wood  naturally  produces  smoke  and  carbon  monoxide(CO)  emissions.  CO  is  a  poisonous  gas  when 

exposed  to  elevated  concentrations  for  extended  periods.  While  the  modern  combustion  systems  in  heaters 

drastically reduce the amount of CO emitted out the chimney, exposure to the gases in closed or confined areas 

can be dangerous. Make sure your stove gaskets and chimney joints are in good working order and sealing 

properly to ensure unintended exposure. It is recommended that you use both smoke and CO monitors in areas 

having the potential to generate CO.

BLOWER (IF EQUIPPED)

The blower needs to be removed and air-blown clean. Make sure the blades do not have build up.

FIREBRICK (IF EQUIPPED)

The firebrick should be cleaned and inspected as necessary. Replace any damaged or broken brick.

Summary of Contents for AW1120E

Page 1: ...ited States Stove Company PO Box 151 227 Industrial Park Rd South Pittsburg TN 37380 PH 800 750 2723 www usstove com Tested Per EPA Methods ALT 125 ASTM E2515 ASTM E3053 and CSA B415 Certified to UL 1482 2011 R2015 and ULC S627 00 R2016 Approved for mobile home installation in USA and Canada Report Number F19 473 R U S Environmental Protection Agency Certified to comply with 2020 particulate emiss...

Page 2: ...Height 12 3 7 m Maximum Log Length 18 458 mm Electrical 120VAC 0 55A 60Hz Dimensions Overall Depth x Width x Height AW1120E BL 21 3 x 24 6 x 30 9 542 mm x 625 mm x 785 mm AW1120E BP 21 x 22 5 x 31 7 534 mm x 572 mm x 806 mm Combustion Chamber Width x Depth 18 25 x 11 5 464 mm x 293 mm Firebox Volume Cubic Feet 1 31 cubic feet Door Opening Width x Height 16 x 9 407 mm x 229 mm Pyroceramic Glass Doo...

Page 3: ...BLY Mount the flue collar to the top of the unit as shown using the 3 5 16 18 x 1 1 2 bolts 3 washers and 3 weld tabs provided in the parts box FIREBRICK CONFIGURATION Replace the Firebrick as shown in the illustration Assembly 5 16 18 x 1 1 2 BOLT WASHER HEATER TOP GASKET WELD TAB UNPACK AND INSPECT Remove the packing from the appliance and inspect for any damage Your appliance is packed with the...

Page 4: ...ART OR FRESHEN UP A FIRE IN THIS HEATER KEEP ALL SUCH LIQUIDS WELL AWAY FROM THE HEATER WHILE IT IS IN USE IN THE EVENT OF A CHIMNEY FIRE PUSH THE AIR CONTROL FULL CLOSED TO DEPRIVE THE FIRE OF OXYGEN CALL THE FIRE DEPARTMENT DO NOT CONNECT TO ANY AIR DISTRIBUTION DUCT OR SYSTEM A SOURCE OF FRESH AIR INTO THE ROOM OR SPACE HEATED SHALL BE PROVIDED WHEN REQUIRED POSITIONING THE STOVE It is very imp...

Page 5: ... copper wire using a serrated or star washer to penetrate paint or protective coating to ensure grounding When moving your mobile home all exterior venting must be removed while the mobile home is being relocated After relocation all venting must be reinstalled and securely fastened Outside Air is mandatory for mobile home installation See your dealer for purchasing Check with your local building ...

Page 6: ...S NOT close by means of a flap or trap door You must purchase a style that allows a continuous in flow of air and that has a rodent screen This adapter can be purchased from your dealer 4FAK INSTALLATION Follow the manufacturer s installation instructions for attaching the dryer vent kit to the home Then attach it to the adapter on the combustion air inlet on the back of the pedestal as shown SECU...

Page 7: ...to the room through appliance and chimney connector joints An uncontrollable burn or excessive temperature indicates an excessive draft CHIMNEY Your wood stove may be hooked up with a 6 factory built or masonry chimney If you are using a factory built chimney it must comply with UL 103 or CSA B365 standard therefore it must be a Type HT 2100 F It must be installed according to the manufacturer s s...

Page 8: ... as recommended by the manufacturer The chimney must be the required height above the roof or other obstructions for safety and proper draft operation MASONRY CHIMNEY Ensure that a masonry chimney meets the minimum standards of the National Fire Protection Association NFPA by having it inspected by a professional Make sure there are no cracks loose mortar or other signs of deterioration and blocka...

Page 9: ...tor Use this as a pass through for a minimum 24 gauge single wall steel chimney connector Keep solid pak section concentric with and spaced 1 25 4 mm off the chimney connector by way of sheet metal support plates at both ends of chimney section Cover opening with and support chimney section on both sides with 24 gage minimum sheet metal supports See that the supports are fastened securely to wall ...

Page 10: ...m rain or snow also accelerates the drying time A good indicator of if the wood is ready to burn is to check the piece ends If cracks are radiating in all directions from the center then the wood should be dry enough to burn If your wood sizzles in the fire even though the surface is dry it may not be fully cured and should be seasoned longer Do not burn manufactured logs made of wax impregnated s...

Page 11: ...lling on it and close the door If the piece ignites within 90 seconds from the time it was placed into the stove your wood is correctly dried If ignition takes longer your wood is damp If your wood hisses and water or vapor escapes at the ends of the piece your wood is soaked or freshly cut Do not use this wood in your stove Large amounts of creosote could be deposited in your chimney creating pot...

Page 12: ...is heating value consider the heat going up the chimney as lost energy Therefore efficiency calculated using the lower heating value of wood will be higher than the efficiency calculated using the higher heating value In the United States all woodstove efficiencies should be calculated using the higher heating value The best way to achieve optimum efficiencies is to learn the burning characteristi...

Page 13: ... these gases is somewhere between 275 F and 500 F Below these temperatures the build up of creosote is promoted Above 500 F heat is wasted since a too large quantity is lost into the atmosphere TO PREVENT CREOSOTE BUILD UP Always burn dry wood This allows clean burns and higher chimney temperatures therefore less creosote deposit Leave the air control fully open for about 5 min every time you relo...

Page 14: ... glass door by striking or slamming shut Do not use the stove if the glass is broken If the glass on your stove breaks replace only with the glass supplied from your heater dealer Never substitute other materials for the glass To replace the glass remove the screws retaining the glass moldings inside the door Remove the moldings and replace the damaged piece with a new one Perform the procedure ba...

Page 15: ...BLACK NOIR Optional B36 Blower Wiring Diagram NOTICE DO NOT ALLOW THE POWER CORD TO TOUCH HOT SURFACES KEEP THE POWER CORD AT LEAST 12 30 5CM FROM THE STOVE OR PIPE SURFACES DANGER SHOCK HAZARD DISCONNECT POWER SOURCE BEFORE INSTALLATION AND WHENEVER SERVICING BLOWER ASSEMBLY CAUTION MOVING PARTS CAN CAUSE INJURY DO NOT OPERATE WITH COVER REMOVED NOTICE ANY REPLACEMENT WIRING MUST HAVE EQUIVALENT ...

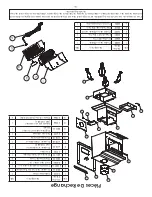
Page 16: ...th Trim 2 6 891137 Brushed Nickel Handle 1 7 29035 Ashpan 1 8 610923 Pedestal Weldment AW1120E BP 1 9 610928 Damper Weldment 1 10 610918 Access Panel 1 11 86709 Damper Rod 1 12 891331 Spring Handle Brushed Nickel 1 13 29034 Ashpan Housing AW1120E BL 1 14 40566 Cast Iron Leg AW1120E BL 4 In order to maintain warranty components must be replaced using original manufacturers parts purchased through y...

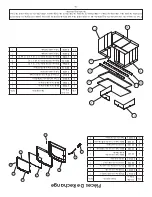
Page 17: ...Rope Gasket 1 5 893159 Clear Glass 1 6 29227 Top Glass Retainer 1 7 29229 Side Glass Retainer 2 8 29230 Gasket Clamp 1 9 29228 Bottom Glass Retainer 1 10 892294 Hinge Pin 2 3 1 2 4 5 6 7 8 9 10 Key Part No Description Qty 1 29039 Brick Retainer 1 2 29040 Brick Retainer 1 3 88315 Kao Wool Blanket 1 4 88147 Board Ceramic Fiber 1 5 86904 Secondary Tube 1 6 891414 Half Firebrick 4 7 89066 Firebrick 4 ...

Page 18: ...e 07 Date _____________________ Engineer Name ________________________________ License No ____________________________________ Company _____________________________________ Telephone No _________________________________ Stove Inspected Chimney Swept Items Replaced ________________________________ Service 02 Date _____________________ Engineer Name ________________________________ License No ______...

Page 19: ...ECHANGE VEUILLEZ CONSERVER CE GUIDE DANS UN ENDROIT SÛR À DES FINS DE RÉFÉRENCE LORSQUE VOUS NOUS ÉCRIVEZ VEUILLEZ INDIQUER LE NUMÉRO COMPLET DU MODÈLE QUI FIGURE SUR LA PLAQUE SIGNALÉTIQUE DE L APPAREIL DE CHAUFFAGE LORSQUE VOUS COMMANDEZ DES PIÈCES DE RECHANGE VEUILLEZ TOUJOURS FOURNIR LES RENSEIGNEMENTS SUIVANTS TELS QUE MONTRÉS DANS CETTE NOMENCLATURE 1 The PART NUMBER LE NUMÉRO DE PIÈCE______...

Page 20: ..._____________________________ Service de 07 Date _____________________ Nom de l ingénieur ____________________________ N de licence _________________________________ Compagnie ___________________________________ N de téléphone _______________________________ Poêle Inspecté Cheminée balayée Articles Remplacé _____________________________ Service de 02 Date _____________________ Nom de l ingénieur _...

Page 21: ... 5 893159 Verre propre 1 6 29227 Retenue de verre supérieure 1 7 29229 Retenue de verre latérale 2 8 29230 Joint de serrage 1 9 29228 Retenue en verre inférieure 1 10 892294 Axe de charnière 2 3 1 2 4 5 6 7 8 9 10 Clé No De Pièce Description Qté 1 29039 Retenue de brique 1 2 29040 Retenue de brique 1 3 88315 Couverture en laine Kao 1 4 88147 Conseil fibre de céramique 1 5 86904 Tube secondaire 1 6...

Page 22: ...nte avant 1 5 80109 Décharge de traction 1 6 80232 Cordon d alimentation 1 Clé No De Pièce Description Qté 1 29139 Déflecteur d air 1 2 891824 Soudure de bouclier thermique 1 3 40292A Collier de cheminée de 6 po 1 4 88042 Joint de corde 1 4 1 5 892292 Garniture de foyer 2 6 891137 Poignée en nickel brossé 1 7 29035 Cendrier 1 8 610923 Soudure sur piédestal AW1120E BP 1 9 610928 Soudure d amortisse...

Page 23: ... NE PERMETTEZ PAS AU CORDON D ALIMENTATION DE TOUCHER LES SURFACES CHAUDES GARDER LE CORDON D ALIMENTATION AU MOINS 12 po 30 5CM DES SURFACES DU POÊLE OU DU TUYAU DANGER RISQUE D ÉLECTROCUTION DÉBRANCHER LA SOURCE D ALIMENTATION AVANT L INSTALLATION ET LORS DE L ENTRETIEN DE L ASSEMBLAGE DE LA SOUFFLEUSE ATTENTION LES PIÈCES EN MOUVEMENT PEUVENT CAUSER BLESSURE NE PAS UTILISER AVEC LE COUVERCLE EN...

Page 24: ...s les magasins où les poêles à bois sont vendus Le verre ne doit être lavé que lorsqu il est froid JOINT D ÉTANCHÉITÉ Il est recommandé de remplacer le joint d étanchéité qui assure l étanchéité du poêle une fois par an afin d assurer un bon contrôle de la combustion ainsi qu un maximum d efficacité et de sécurité Pour remplacer le joint de porte il suffit d ôter le joint endommagé Nettoyez avec s...

Page 25: ...vous ajuster à un taux de combustion faible cela peut prendre 30 minutes ou plus selon votre bois Utilisez de plus petits morceaux de bois pendant l allumage et un taux de combustion élevé pour augmenter la température du poêle Pensez à l environnement et ne brûlez que du bois séché Allumez de feux petits et intenses au lieu de grands feux lents lorsque possible Apprenez les caractéristiques de fo...

Page 26: ...u maximum pendant quelques secondes avant d ouvrir les portes du poêle Ouvrez très lentement la porte en commençant par l entrebâiller de 3 à 5 cm pendant 5 à 10 secondes pour ensuite l ouvrir complètement afin d augmenter l entrée d air et ainsi évacuer verticalement la fumée qui stagnait dans le poêle en combustion lente Par la suite ramenez les braises vers l avant du poêle et rechargez l appar...

Page 27: ...pendant les premières heures d utilisation de votre poêle N ouvrez jamais le régulateur d air plus que nécessaire pour obtenir une vitesse de combustion moyenne Assurez vous qu il y ait une circulation d air suffisante lorsque vous traitez la peinture du poêle Des odeurs peuvent être senties au cours des 3 ou 4 premiers feux N allumez jamais votre poêle à l extérieur Vous ne serez pas en mesure de...

Page 28: ...nt être considéré comme sec à 66 Fendre et empiler le bois avant de l entreposer accélère son séchage Entreposez le bois sur une surface surélevée du sol et sous un espace abrité de la pluie ou de la neige accélèrera le temps de séchage Un bon indicateur pour savoir si le bois est prêt à brûler est de vérifier les extrémités du morceau Si elles sont fendues de toutes parts à partir du centre le bo...

Page 29: ...e D Dégagement de 50 8 mm 2 po par rapport à un composant de mur combustible commencez par une section de cheminée préfabriquée homologuée Solid Pak d au moins 304 mm 12 po de longueur avec isolation de 25 4 mm 1 po ou plus et d un diamètre interne de 8 po 2 po 51 mm plus grand que le conduit de raccordement de la cheminée de 6 po 152 4 mm Utilisez cette section en tant que passage pour un conduit...

Page 30: ...ves d installation du fabricant doit être observées lors de l installation d une cheminée préfabriquée en métal Vous devez aussi acheter auprès du même fabricant et installer la trousse de fixation au plafond ou une trousse de passage dans les murs ou section en T des coupe feu au besoin des écrans d isolation du solin de toit un couronnement pour la cheminée etc Respectez les dégagements appropri...

Page 31: ...e incontrôlable ou une température excessive indique un tirage excessif CHEMINÉE Votre poêle à bois peut être raccordé à une cheminée préfabriquée ou en maçonnerie de 6 pouces Si vous utilisez une cheminée préfabriquée elle doit être conforme à la norme UL 103 ou CSA B365 par conséquent elle doit être du type HT 2 100 F Il est extrêmement important qu elle soit installée selon les spécifications d...

Page 32: ...ANS UNE MAISON MOBILE REQUISE Votre poêle n effectue pas un tirage uniforme produit des retours de fumée ne brûle pas bien le combustible ou si des refoulements d air se produisent qu il y ait de la combustion ou non Des équipements à combustible se trouvent dans la maison tels que foyers ou autres appareils de chauffage en présence d odeurs de mauvais fonctionnement de retours de fumée lors de l ...

Page 33: ...ion doit alors se certifiér à CAN CSA B365 Le dégagement minimum d un tuyau de raccordement passant par un mur combustible est de 457 2 mm 18 po Communiquez avec le département local de sécurité si vous souhaitez réduire les dégagements entre les conduits de fumée et les matériaux combustibles pouces mm A Entre le mur arrière et le poêle 17 432 B Entre le mur adjacent et le poêle 21 534 C Entre le...

Page 34: ...POÊLE UNIQUEMENT LOSQUE LA PORTE EST FERMÉE L UTILISATION AVEC UNE PORTE OUVERTE PEUT ENTRAÎNER UNE COMBUSTION EXCESSIVE POSITIONNEMENT DU POÊLE Il est très important de choisir un emplacement le plus près possible de la cheminée dans une zone favorisant la meilleure distribution de chaleur possible à travers la maison Par conséquent le poêle doit être installé dans la pièce où les occupants de la...

Page 35: ...uyau de raccordement 6 po 153 mm Type du tuyau de raccordement À paroi simple ou à paroi double standard Acier noir ou bleui à 650 C 2100 F Hauteur minimale de la cheminée 12 pi 3 7 m Longueur maximale des bûches 18 po 458 mm Composants électriques 120VAC 0 55A 60Hz Dimensions Hors tout Soufflante Profondeur x largeur x hauteur AW1120E BL 21 3 po x 24 6 po x 30 9 po 542 mm x 625 mm x 785 mm AW1120...

Page 36: ...radiateur et à vous permettre de commander des pièces de réparation correcte Gardez dans un lieu sécurisé pour référence ultérieure Approuvé pour l installation de maisons mobiles aux États Unis et au Canada Testé conformément aux méthodes ALT 125 ASTM E2515 ASTM E3053 et CSA B415 de l EPA Certifié UL 1482 2011 R2015 et ULC S627 00 R2016 U S Environmental Protection Agency Certifié conforme aux no...

Reviews: