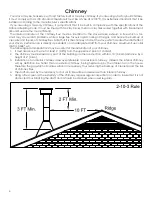
background image

5

CHIMNEY CONNECTION

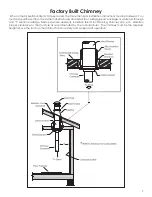
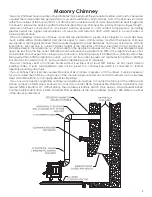
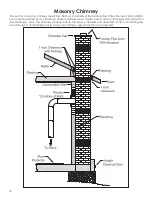
Two  basic  types  of  chimneys  are  approved  for  use  with  solid  fuel:  Factory-built  and  masonry.  Factory-built 

chimney must comply with UL 103 type “HT” standard.

Do not expect your stove or furnace to create draft. Draft is not a function of the appliance. It is purely a function 

of the chimney. Modern stoves and furnaces are much more air-tight and efficient than those of the past and, 

therefore require greater draft. A minimum of .05 w.c. (12.45Pa), is required for proper drafting to prevent back-

puffing, smoke spillage, and to maximize performance. Gauges to measure chimney draft are readily available 

at stove shops and are economical to purchase or rent.

Chimneys  perform  two  functions  -  one  of  which  is  apparent:  The  chimney  provides  a  means  for  exhausting 

smoke and flue gases resulting from combustion of the fuel. Secondarily, though, the chimney provides “Draft” 

which allows oxygen to be continuously introduced into the appliance, so that proper combustion is possible. 

IMPORTANT

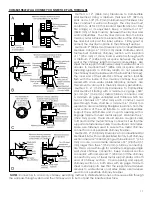
Your chimney connector and chimney must have the same diameter as the stove outlet (6”). If this is not the 

case, we recommend you contact your dealer in order to insure there will be no problem with the draft.

The stove pipe must be made of aluminized or cold roll steel with a minimum thickness of 0.021” or 0.53 mm. It is 

strictly forbidden to use galvanized steel.

Your smoke pipe should be assembled in such a way that the male section (crimped end) of the pipe faces 

down. This will allow condensation in the flue to run back into the heater. Attach each of the sections to one 

another with three equidistant metal screws and seal each joint with furnace cement.

The pipe must be short and straight. All sections installed horizontally must slope at least 1/4 inch per foot, with 

the upper end of the section toward the chimney.

To insure a good draft, the total length of the coupling pipe should never exceed 8’ to 10’ (2.4m to 3.04 m). 

(Except  for  cases  of  vertical  installation,  cathedral-roof  style  where  the  smoke  exhaust  system  can  be  much 

longer and connected without problem to the chimney at the ceiling of the room).

It is recommended that no more than two 90 degree bends be used because it may reduce the amount of 

natural draft. The use of corrugated (non-adjustable) elbows is preferred as they are much more airtight.

You must have at least 18 inches of clearance between any horizontal piping and the ceiling.

The pipe cannot extend into the chimney flue.

The chimney connector must not pass through an attic, roof space, closet, any concealed space, floor, ceiling, 

wall or combustible construction. Where passage through a wall or partition of combustible construction, the 

installation must conform to CAN/CSA-B365, Installation Code for Solid-Fuel-Burning Appliances & Equipment.

DO NOT CONNECT THIS UNIT TO A CHIMNEY FLUE SERVING ANOTHER APPLIANCE.

Summary of Contents for AWC11

Page 1: ...ited States Stove Company 227 Industrial Park Rd P O Box 151 South Pittsburg TN 37380 423 837 2100 www USSTOVE com CAUTION Please read this entire manual before you install and use your new room heater Failure to follow instructions may result in property damage bodily injury or even death DO NOT USE THIS HEATER IN A MOBILE HOME OR TRAILER ASSEMBLY INSTALLATION OPERATION REPAIR PARTS Conforms To U...

Page 2: ...and walls near the heater and chimney connector However there are limits to how close the heater and chimney connector can be installed to combustible surfaces protected by a clearance reduction system A correctly installed clearance reduction system protects the combustible surfaces well beyond the sides and above the top of the heater and beyond the sides and top of the chimney connector pipe Tw...

Page 3: ... and 8 beyond each side of the fuel loading and ash removal opening Have the floor protector with the specified dimensions The floor protector must extend under the product and two 2 inches on either side of the chimney connector 3 Check Figures 2 3 and 4 Be sure you have the clearances shown from the heater and the connector pipe to combustible surfaces If you have a solid brick or stone wall beh...

Page 4: ...l To Corner Of Unit 20 25in I Side Wall To Corner Of Unit 20 25in J Back Wall To Flue Pipe 20in K Side Wall To Flue Pipe 20in Corner Vented Out The Top L Back Wall To Corner Of Unit 18in M Side Wall To Corner Of Unit 18in N Back Wall To Flue Pipe 23in O Side Wall To Flue Pipe 23in G F Parallel Vented out the Back into a 90 Elbow Parallel Vented Out The Top F Back Wall To Heat Shield 20in G Back Wa...

Page 5: ...ictly forbidden to use galvanized steel Your smoke pipe should be assembled in such a way that the male section crimped end of the pipe faces down This will allow condensation in the flue to run back into the heater Attach each of the sections to one another with three equidistant metal screws and seal each joint with furnace cement The pipe must be short and straight All sections installed horizo...

Page 6: ...eates the draft effect your stove s performance is directly dependent on an adequate draft from your chimney Maximum flue collar draft is 0 048 w c The following recommendations may be useful for the installation of your chimney 1 It must rise above the roof at least 3 0 9m from the uppermost point of contact 2 The chimney must exceed any part of the building or other obstruction within a 10 3 04m...

Page 7: ...nstall the ceiling support package or wall pass through and T section package firestops where needed insulation shield roof flashing chimney cap etc Maintain proper clearance to the structure as recommended by the manufacturer The chimney must be the required height above the roof or other obstructions for safety and proper draft operation Factory Built Chimney ...

Page 8: ... into them Another method frequently used by some people is to vent the heater directly into the fireplace This does not meet code since the heater is being vented into another appliance the fireplace This method should not be attempted because combustion products will deposit and build up in the firebox or fireplace Be certain not to install a hazard in you house You will void your warranty with ...

Page 9: ... The inner diameter should never be less than the flue outlet diameter and should never be greater than 50 of the appliance flue outlet For example do not expect a burning stove or furnace to function properly if installed into a chimney with a flue liner greater than 50 the appliance outlet such as a 6 flue outlet requires a 6 diameter for optimum drafting but can function well with an 8 but beco...

Page 10: ...sociation NFPA by having it inspected by a professional Make sure there are no cracks loose mortar or other signs of deterioration and blockage Have the chimney cleaned before the stove is installed and operated When connecting the stove through a combustible wall to a masonry chimney special methods are needed ...

Page 11: ...4 mm metal chimney connector and a minimum 24 gage ventilated wall thimble which has two air channels of 1 25 4 mm each construct a wall pass through There shall be a minimum 6 152 4 mm separation area containing fiberglass insulation from the outer surface of the wall thimble to wall combustibles Support the wall thimble and cover its opening with a 24 gage minimum sheet metal support Maintain th...

Page 12: ...n burning coal 8 Adjust dampers and air shutters to obtain the burn you desire 9 Empty ash pan regularly Do not allow the ashes to build up to the grate as the grate will warp and burnout will occur Allowing ashes to build up may also result in ash spillage when removing the ash pan Dispose of hot ashes properly See Maintenance Operating Instructions CAUTION Hot while in operation Keep children cl...

Page 13: ... coal too soon will cut the air supply and smother the fire BURNING BITUMINOUS Once your kindling and wood fire has produced a bed of well established coals start adding coal in layers allowing each to ignite before adding more Bituminous has a high volatile content and as a result should be fired with the conical method with the highest portion of your fire bed in the center of the firebox The fi...

Page 14: ...s burned down to half its original depth it is time to add fresh coal When doing so open the stove pipe damper and turn the thermostat damper to high which will allow the fire to burn off any accumulated gases Open the feed door and with a small rake hoe or hooked poker pull the glowing coals to the front of the firebox Try not to disturb the fire too much Next add a fresh charge to the back being...

Page 15: ... any mechanical draft devices and or discharging a CO Carbon Dioxide or Halon fire extinguisher directly into the heater through an appropriately placed clean out If using a Halon extinguisher please note that it totally displaces oxygen and could become a hazard in itself if enough is discharged into the living space Wait for the heater to cool then inspect the chimney area for damage A chimney f...

Page 16: ...16 Repair Parts 12 2 1 18 17 16 15 14 13 3 8 9 11 10 4 12 2 1 18 17 16 15 14 13 3 5 6 8 9 7 11 10 4 6 5 4 3 2 1 ...

Page 17: ...5 Inner Right Side Brick 1 5 40794 Inner Back Brick 1 6 40796 Inner Left Side Brick 1 7 40798 Left Grate Support 1 8 4092 Grate Frame 1 9 40692 Grate 1 10 40798 Right Grate Support 1 11 610449 Grate Agitator 1 12 40800 Leg 4 13 27345 Heat Shield Bottom 1 14 610448 Door Assembly 1 15 27786 Ash Pan 1 16 40693 Log Retainer 1 17 40808 Air Wash Box 1 18 40791 Primary Air Slider 1 Key Part No Descriptio...

Page 18: ...tion or shipping costs LIMITATIONS AND EXCLUSIONS 1 United States Stove Company shall not be liable for incidental consequential special or contingent damages anyone might suffer as a result of their breach of this written warranty or any implied warranty 2 Should the heater be replaced by United States Stove Company free of charge all further warranty obligations are thereby met 3 Parts and or se...

Page 19: ...____ Company ________________________________________ Telephone No ______________________________________ Stove Inspected Chimney Swept Items Replaced ____________________________________ Service 05 Date ________________________ Engineer Name _____________________________________ Company __________________________________________ Telephone No ______________________________________ Stove Inspected ...

Page 20: ...er When ordering repair parts or options always give the following information as shown in this list 1 The Part Number_____________________________________ 2 The Part Description__________________________________ 3 The Model Number__________________________________ 4 The Serial Number___________________________________ Before installing your heater fill in the serial number of your heater in the s...

Reviews: