background image

-20-

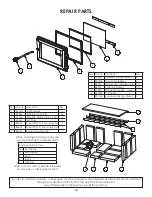
REPAIR PARTS

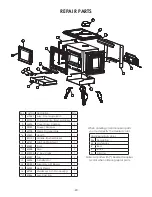
Key Part No. Description

Qty.

1

25465

Retainer, Bottom Glass

2

2

891813 Door Glass (40564)

1

3

88174

Gasket-Flat, Glass Retainer 4 ft

4

88057

1/2 Rope Gasket

5 ft

*5 40639

Door,Rectangular - Large

1

6

892228 7” Handle

1

7

891135  Handle, Spring (Lg-Nickel)  1

2

3

4

5

6

7

1

When ordering cast-iron repair parts 

you must specify the desired color.

Cast Repair Parts Color 
Key Description

M

Mahogany

R

Red

B

Black

A

Almond

Note: All parts with (*) beside it requires 

a color when ordering repair parts.

Key Part No. Description

Qty.

1

891414 Half Firebrick

2

2

89066

Firebrick (4-1/2 X 9)

14

3

24103

Firebrick, Half (4-1/2 X 4-1/2)

2

4

40561

Ash Plug

1

5

86643

Tube (Ø5/32) , Secondary Air

1

6

86645

Tube (Ø7/32), Secondary Air

2

7

88146

Board, Ceramic Fiber

1

4

3

3

1

6

7

5

In order to maintain warranty, components must be replaced using original manufacturers parts purchased 

through your dealer or directly from the appliance manufacturer. 

Use of third party components will void the warranty.

Summary of Contents for AWC31

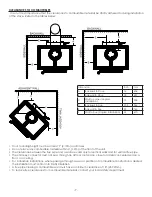
Page 1: ...tallation Could Void Your Warranty CONFORMS TO UL STD 1482 and CERTIFIED TO ULC STD S627 WASHINGTON STATE APPROVED MOBILE HOME APPROVED U S ONLY SAVE THESE INSTRUCTIONS THIS MANUAL WILL HELP YOU TO OBTAIN EFFICIENT DEPENDABLE SERVICE FROM THE HEATER AND ENABLE YOU TO ORDER REPAIR PARTS CORRECTLY KEEP IN A SAFE PLACE FOR FUTURE REFERENCE 852808B 0902G French version is available for download from t...

Page 2: ...s are based on the first hour of operation at high burn rate burning cordwood CAUTIONS Hot while in operation Keep children clothing and furniture away Contact may cause skin burns Do not use chemicals or fluids to ignite the fire Do not leave the stove unattended when the door is slightly opened Do not burn garbage flammable fluid such as gasoline naphtha or motor oil Do not connect to any air di...

Page 3: ...lation For mobile homes see page 13 Assembly Flue Collar Assembly 1 Mount the flue collar to the top of the unit as shown using the 3 5 16 18 x 1 1 2 bolts 3 washers and 3 weld tabs provided in the parts box Room Air Deflector Assembly 1 Locate the Room Air Deflector Using the three 3 1 2 Tek Screws provided mount the deflector to the unit as shown in the diagram Firebrick Configuration 1 Replace ...

Page 4: ... ROUTE THE SUPPLY CORD NEAR OR ACROSS HOT SURFACES Step 1 Fix the assembly to the back of the stove with the four screws provided ASH PAN ASSEMBLY Remove ash pan from firebox Under the firebox there are two brackets Slide the ash pan into these brackets LES EXTRÉMITÉS COUPÉES DU JOINT DE VERRE DOIVENT SE RENCONTRER AU BAS ET AU CENTRE DU VERRE CLES EXTRÉMITÉS COUPÉES DU JOINT DE VERRE DOIVENT SE R...

Page 5: ... air into the room or space heated shall be provided when required POSITIONING THE STOVE It is very important to position the wood stove as close as possible to the chimney and in an area that will favor the most efficient heat distribution possible throughout the house The stove must therefore be installed in the room where the most time is spent and in the most spacious room possible Recall that...

Page 6: ...section of chimney connector the floor protector should go under it and 2 inches beyond each side To calculate R Values for alternative methods see Alternate Floor Protector Calculations section in this manual The floor protector should exceed the stove as follows Dimension Inch mm H Front 16 635 J Left 6 153 K Right 6 153 L Back 1 25 M Total Width 46 1169 N Total Length 53 5 1359 Canadian install...

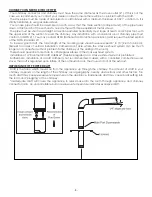
Page 7: ...nnector must not pass through an attic or roof space closet or similar concealed space a floor or a ceiling For Canadian installations where passage through a wall or partition of combustible construction is desired the installation must conform to CAN CSA B365 A flue pipe crossing a combustible wall must have a minimum clearance of 18 457 2mm To reduce flue clearances from combustible materials c...

Page 8: ...g pipe should never exceed 8 to 10 2 4m to 3 04 m Except for cases of vertical installation cathedral roof style where the smoke exhaust system can be much longer and connected without problem to the chimney at the ceiling of the room There should never be more than two 90 degrees elbows in the smoke exhaust system Installation of a barometric draft stabilizer fireplace register on a smoke exhaust...

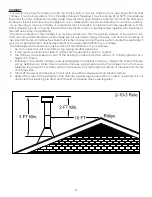
Page 9: ...himney fires Note that it is the chimney and not the stove which creates the draft effect your stove s performance is directly dependent on an adequate draft from your chimney The following recommendations may be useful for the installation of your chimney 1 Do not connect this unit to a chimney flue serving another appliance 2 It must rise above the roof at least 3 0 9m from the uppermost point o...

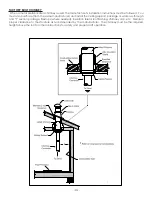
Page 10: ...same manufacturer and install the ceiling support package or wall pass through and T section package firestops where needed insulation shield roof flashing chimney cap etc Maintain proper clearance to the structure as recommended by the manufacturer The chimney must be the required height above the roof or other obstructions for safety and proper draft operation ...

Page 11: ...ssociation NFPA by having it inspected by a professional Make sure there are no cracks loose mortar or other signs of deterioration and blockage Have the chimney cleaned before the stove is installed and operated When connecting the stove through a combustible wall to a masonry chimney special methods are needed ...

Page 12: ...ch has two air channels of 1 25 4 mm each construct a wall pass through There shall be a minimum 6 152 4 mm separation area containing fiberglass insulation from the outer surface of the wall thimble to wall combustibles Support the wall thimble and cover its opening with a 24 gage minimum sheet metal support Maintain the 6 152 4 mm space There should also be a support sized to fit and hold the me...

Page 13: ...uffer smoke roll out when opened or back drafts occur whether or not there is combustion present 4 Opening a window slightly on a calm windless day alleviates any of the above symptoms 5 The house is equipped with a well sealed vapor barrier and tight fitting windows and or has any powered devices that exhaust house air 6 There is excessive condensation on windows in the winter 7 A ventilation sys...

Page 14: ...stacking wood before it is stored accelerates drying time Storing wood on an elevated surface from the ground and under a cover or covered area from rain or snow also accelerates drying time A good indicator if wood is ready to burn is to check the piece ends If there are cracks radiating in all directions from the center then the wood should be dry enough to burn If your wood sizzles in the fire ...

Page 15: ...ween Then a fourth layer of loose small kindling and twisted newspaper sheets tops off the pile Before igniting the paper and kindling wood it is recommended that you warm up the chimney This is done in order to avoid back draft problems often due to negative pressure in the house If such is the case open a window slightly near the stove and twist together a few sheets of newspaper into a torch Li...

Page 16: ...n rate this may take 30 minutes or more depending on your wood Use smaller pieces of wood during start up and a high burn rate to increase the stove temperature Be considerate of the environment and only burn dry wood Burn small intense fires instead of large slow burning fires when possible Learn your appliance s operating characteristics to obtain optimum performance Burning unseasoned wet wood ...

Page 17: ...to the gases in closed or confined areas can be dangerous Make sure you stove gaskets and chimney joints are in good working order and sealing properly to ensure unintended exposure It is recommended that you use both smoke and CO monitors in areas having the potential to generate CO CAUTIONS Ashes could contain hot embers even after two days without operating the stove The ash pan can become very...

Page 18: ...y be applied to a warm stove but the temperature of the section to be painted should be below the boiling temperature 2 200 F to achieve a smooth finish 3 The area should be built up with multiple thin coats Note Better results are obtained if the stove is brought up to operational temperatures between coats HIGH TEMPERATURE STOVE PAINT REPAIR If the painted portions of your stove need re coating ...

Page 19: ...rushed Nickel 1 8 69767 Ash Pan Weldment 1 9 40589 Front 1 10 40588 Side 2 11 40292A 6 Flue Collar 1 12 40587 Top 1 13 26934 Air Deflector 1 14 891841 Assembly AFS Blower 1 15 26335 Heat Shield 1 16 69768 Weldment Ash Pan Housing 1 17 40566 Leg Cast Iron 4 When ordering cast iron repair parts you must specify the desired color Cast Repair Parts Color Key Description M Mahogany R Red B Black A Almo...

Page 20: ...on M Mahogany R Red B Black A Almond Note All parts with beside it requires a color when ordering repair parts Key Part No Description Qty 1 891414 Half Firebrick 2 2 89066 Firebrick 4 1 2 X 9 14 3 24103 Firebrick Half 4 1 2 X 4 1 2 2 4 40561 Ash Plug 1 5 86643 Tube Ø5 32 Secondary Air 1 6 86645 Tube Ø7 32 Secondary Air 2 7 88146 Board Ceramic Fiber 1 4 3 3 1 6 7 5 In order to maintain warranty co...

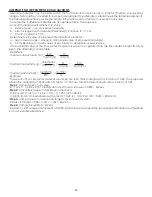
Page 21: ...protector system is equal to or greater than the floor protector specifications given the alternate is acceptable Definitions Thermal conductance C Thermal conductivity k Thermal resistance R Example The specs of floor protector material should be 3 4 inch thick material with a k factor of 0 84 The proposed alternative material is 4 brick with a C factor of 1 25 over 1 8 inch mineral board with a ...

Page 22: ...ompany ________________________________________ Telephone No ______________________________________ Stove Inspected Chimney Swept Items Replaced ____________________________________ Service 05 Date ________________________ Engineer Name _____________________________________ Company __________________________________________ Telephone No ______________________________________ Stove Inspected Chimne...

Page 23: ...tten warranty or any implied warranty 2 Should the heater be replaced by United States Stove Company free of charge all further warranty obligations are thereby met 3 Parts and or service replacements made under the terms of this warranty are warranted only for the remaining period of the original heater warranty 4 Without specific written exclusionary waivers no one has authority to add to or vary...

Page 24: ... 24 NOTES ...
Page 25: ...ans un endroit sûr à des fins de référence Lorsque vous nous écrivez veuillez indiquer le numéro complet du modèle qui figure sur la plaque signalétique de l appareil de chauffage Lorsque vous commandez des pièces de rechange veuillez toujours fournir les renseignements suivants tels que montrés dans cette nomenclature 1 The part number Le numéro de pièce___________________________________________...

Page 26: ... dommages éventuels que quiconque pourrait subir à la suite d une violation de cette garantie écrite ou de toute garantie implicite 2 Si l appareil de chauffage est remplacé gratuitement par United States Stove Company toutes les autres obligations de garantie sont ainsi satisfaites 3 Le remplacement des pièces et ou le service effectués en vertu des modalités de cette garantie sont garantis uniqu...
Page 27: ...______________ Company__________________________________________ N de téléphone ___________________________________ Poêle Inspecté Cheminée Swept Articles Remplacé __________________________________ Date________________________ Ingénieur Nom _____________________________________ Service de 06 Refustratuib No ____________________________________ Company__________________________________________ N d...

Page 28: ...r est égale ou supérieure aux spécifications de protection de plancher données les matériaux sont alors acceptables Définitions Conductance thermique C Conductivité thermique k Résistance thermique R Exemple Les spécifications de matériau du protecteur de plancher doivent être un matériau d une épaisseur de 3 4 po avec un facteur k de 0 84 Le matériau de remplacement proposé est une brique de 4 po...

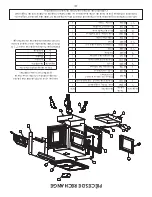
Page 29: ...1 5 86643 Tube Ø5 32 air secondaire 1 6 86645 Tube Ø7 32 air secondaire 2 7 88146 Panneau fibre céramique 1 Lorsque vous commandez des pièces de réparation en fonte vous devez spécifier la couleur désirée Pièces de réparation de fonte Légende Description M Acajou R Rouge B Noir A Amande Remarque Toutes les pièces avec à côté d elle nécessite une couleur lors de la commande de pièces de rechange 4 ...

Page 30: ...air 1 14 891841 Assemblée AFS Souffleur 1 15 26335 Bouclier thermique 1 16 69768 Soudure Cendrier 1 17 40566 Jambe fonte 4 Lorsque vous commandez des pièces de réparation en fonte vous devez spécifier la couleur désirée Pièces de réparation de fonte Légende Description M Acajou R Rouge B Noir A Amande Remarque Toutes les pièces avec à côté d elle nécessite une couleur lors de la commande de pièces...

Page 31: ...peinture de retouche brillante spécialement formulée peut être utilisée Communiquez avec votre dépositaire de poêle pour obtenir une petite bouteille de cette peinture de retouche 1 Assurez vous que le poêle est frais Remarque La peinture peut être appliquée sur un poêle chaud mais la température de la partie à peindre doit être inférieure à la température d ébullition 200 F pour obtenir un fini u...

Page 32: ... doivent être conservées dans le récipient fermé jusqu à ce qu elles aient pu complètement refroidir DÉTECTEURS DE FUMÉE ET DE CO Le brûlage du bois produit naturellement des émissions de fumée et du monoxyde de carbone CO Le CO est un gaz poison lorsque l exposition se fait à des concentrations élevées pour une période de temps prolongée Bien que les systèmes de combustion modernes des chauffages...

Page 33: ...e Apprenez comment ajuster les réglages d air de votre unité afin de produire la plus petite quantité de fumée visible Le bois incorrectement séché a une teneur élevée en humidité et produira un excès de fumée visible et un mauvais brûlage CONSEILS DE FONCTIONNEMENT POUR UNE COMBUSTION DE QUALITÉ EFFICACE ET PROPRE Attendez que l appareil soit chaud et qu il y ait un bon lit de braises avant de ré...

Page 34: ...alité Une fois la charge en combustible dûment allumée ne faites brûler que de petits feux pendant les premières heures d utilisation de votre poêle N ouvrez jamais le régulateur d air plus que nécessaire pour obtenir une vitesse de combustion moyenne Assurez vous qu il y ait une circulation d air suffisante lorsque vous traitez la peinture du poêle Des odeurs peuvent être senties au cours des 3 o...

Page 35: ...ra le temps de séchage Un bon indicateur pour savoir si le bois est prêt à brûler est de vérifier les extrémités du morceau Si elles sont fendues de toutes parts à partir du centre le bois devrait donc être suffisamment sec Si votre bois grésille quand il brûle même si la surface est sèche il pourrait ne pas être entièrement sec et devrait être laissé à sécher plus longtemps Votre appareil de chau...

Page 36: ...fonctionnement de retours de fumée lors de l ouverture du poêle ou de refoulements d air qu il y ait de la combustion ou pas Ouvrez légèrement une fenêtre lors d une journée sans vent atténue tous ces symptômes La maison est dotée d une barrière à vapeur bien scellée et des fenêtres hermétiques et ou des dispositifs électriques qui évacuent l air de la maison Une concentration excessive de condens...

Page 37: ...ment de 50 8 mm 2 po par rapport à un composant de mur combustible commencez par une section de cheminée préfabriquée homologuée Solid Pak d au moins 304 mm 12 po de longueur avec isolation de 25 4 mm 1 po ou plus et d un diamètre interne de 8 po 2 po 51 mm plus grand que le conduit de raccordement de la cheminée de 6 po 152 4 mm Utilisez cette section en tant que passage pour un conduit de raccor...

Page 38: ...on et d obstruction Faites nettoyer la cheminée avant l installation ou l utilisation du poêle Des méthodes spéciales sont requises lors du raccordement du poêle par un mur combustible à une cheminée en maçonnerie Chapeau en béton Dégagement de 1 po avec le coupe feu Chevron Solin Boisseau en argile réfractaire avec espace d air Solin Dégagement de 25 mm 1 po Revêtement Porte de nettoyage étanche ...

Page 39: ...agements appropriés par rapport à la structure tel que recommandé par le fabricant La cheminée doit être à la hauteur exigée au dessus du toit ou de toute obstruction afin d assurer un fonctionnement sécuritaire et approprié du tirage Écran d isolation du grenier Dégagement spécifié Support de plafond Vers le poêle Vers le poêle Conduit de raccordement de cheminée Support de plafond Cheminée homol...

Page 40: ...ie de cheminée Veuillez prendre note que c est la cheminée et non le poêle qui crée l effet de tirage Le rendement de votre cheminée est donc directement dépendant d un tirage adéquat de la cheminée Les recommandations suivantes peuvent s avérer utiles lors de l installation de la cheminée 1 Ne reliez pas cet appareil à un conduit de fumée utilisé pour un autre appareil 2 Elle doit dépasser le toi...

Page 41: ...erticales de style toit cathédrale où le système d évacuation de la fumée peut être plus long et raccordé sans problème à la cheminée au niveau du plafond de la pièce L installation du système d évacuation de la fumée ne doit pas comporter plus de deux coudes de 90 degrés Il est interdit d installer un stabilisateur de tirage barométrique registre de cheminée sur un système d évacuation de la fumé...

Page 42: ...plancher et un plafond Pour les installations au Canada lorsqu on souhaite passer un tuyau dans un mur ou une cloison de construction combustible l installation doit alors se conformer à CAN CSA B365 Le dégagement minimum d un tuyau de raccordement passant par un mur combustible est de 457 2 mm 18 po Communiquez avec le département local de sécurité si vous souhaitez réduire les dégagements entre ...

Page 43: ...cteur de plancher doit passer sous la section horizontale et au delà de 5 cm 2 po chaque côté Pour calculer les valeurs R pour d autres méthodes consultez la section CALCULS POUR D AUTRES PROTECTEURS DE PLANCHER dans ce manuel Le protecteur de plancher doit excéder le poêle comme suit Dimensions En pouces En mm H Avant 16 635 J Gauche 6 153 K Droite 6 153 L Arrière 1 25 M Largeur totale 46 1169 N ...

Page 44: ...tribution d air Au besoin fournissez une source d air frais dans la pièce ou à un espace chauffé POSITIONNEMENT DU POÊLE Il est très important de choisir un emplacement le plus près possible de la cheminée dans une zone favorisant la meilleure distribution de chaleur possible à travers la maison Par conséquent le poêle doit être installé dans la pièce où les occupants de la maison passent le plus ...

Page 45: ...tation près ou à travers des surfaces chaudes Étape 1 Fixez la soufflante à l arrière du poêle à l aide des quatre boulons fournis LES EXTRÉMITÉS COUPÉES DU JOINT DE VERRE DOIVENT SE RENCONTRER AU BAS ET AU CENTRE DU VERRE C LES EXTRÉMITÉS COUPÉES DU JOINT DE VERRE DOIVENT SE RENCONTRER ENTRE LES PATTES D ARTICULATION 8 4 9 6 5 Panier à braise Retirez le panier à braise du foyer Deux supports sont...

Page 46: ... la page 13 ASSEMBLAGE Buse 1 Installer la buse au haut de l appareil tel que montré en utilisant les 3 boulons 5 16 18 x 1 1 2 boulons 3 rondelles et 3 patte soudée fournis dans la boîte de pièces Déflecteur d air ambiant 1 Localiser le déflecteur d air ambiant À l aide des trois 3 boulons Tek de 1 2 po fournies installez le déflecteur sur l unité tel que montré sur le schéma Disposition de la br...

Page 47: ...n brûlant du bois de corde MISES EN GARDE Chaud lors du fonctionnement Gardez les enfants les vêtements et les meubles éloignés de l appareil Un contact peut causer des brûlures à la peau N utilisez pas de produits chimiques ou de fluides pour allumer le feu Ne laissez jamais le poêle sans surveillance lorsque la porte est ouverte même légèrement Ne brûlez pas de déchets ou de fluides inflammables...

Page 48: ...LC S627 POÊLE À BOIS CERTIFIÉ ENVIRONMENTAL PROTECTION AGENCY É U PHASE II INSTALLATION APPROUVÉE PAR L ÉTAT DE WASHINGTON INSTALLATION APPROUVÉE DANS LES MAISONS MOBILES É U SEUL United States Stove Co 227 Industrial Park Road P O Box 151 South Pittsburg TN 37380 800 750 2723 www usstove com CONSERVEZ CES INSTRUCTIONS CE MANUEL VOUS AIDERA À OBTENIR UN SERVICE EFFICACE ET FIABLE DE L APPAREIL DE ...

Reviews: