Operating Manual - Pema Protea Equipped Media Amplifier
10
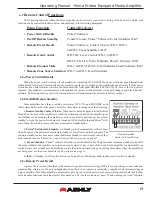
3.2 Device Options
1) Flash Reprogram Mode
- The amplifier firmware can be updated
by downloading a new firmware file to the amplifier over the network. Latest
firmware updates, if available, can be found on the Ashly website. When the
amplifier is put into flash reprogram mode, the power and standby LEDs
both turn on and all audio function is suspended until flash reprogram is
completed. Note that Flash Reprogram only appears in the device options
menu when a live Pema device is connected.
2) Link Group Configuration
- Link groups allow the controls for
multiple DSP functions to track each other across channels or even across
devices. For example - if two different channels or even different device
graphic equalizer blocks are linked, any change made to a control within
either of the equalizers will result in an identical change to the other. In other
words, DSP blocks may be linked within a single
device, or across multiple
devices (assuming all devices share the network).
Each device will support up to 16 Link Groups. DSP function blocks may be assigned to these groups in software. Once
assigned to a group, all LIKE functions within DSP blocks assigned to a group will track DSP parameter changes. Note that more
than one type of DSP function block can be assigned to the same link group. Each link group may be assigned a name by the
user, and also be assigned a color for easy identification. For further details about linking, see the online help in Protea
ne
software.
3) Power On Delay
- Use this feature to delay the amplifier turning on after power is provided, as well as after the amplifier is
turned back on from software standby mode*. Delay is measured in mS, with the limit at 655,350 mS, or about 11 minutes. The power
amplifier should always be the last device to power up, after other system components have turned on and stabilized. Note that the ampli-
fier must first be on for this change to take effect. *
Power On Delay does not work when standby mode is activated by contact closure.
4) Sample Rate and Master Clock Source Selection
- Changes to both of these settings can be made by clicking the
<Show Advanced Control> box in this menu item. Sample rate can be set to either 48kHz or 96kHz. Note that at 96kHz, the DSP
usage doubles, resulting in half the available processing power for filters, delay, limiting, etc. Also note that the Feedback Sup-
pressor cannot be used at 96kHz sample rate. Factory default settings are Auto Selection for clock source and 48kHz sample rate.
5) DVCA Control
- This feature is used in conjunction with the
DSP tab gain tool called <Gain w/VCA>. Use this feature to create up
to four gain subgroups as you would on a mixing console. Any input
or output channel can be added to one or more VCA subgroups for
group gain control. While no external hardware control is allowed for
this subgroup, a level fader control object can be added to the project
canvas and linked to this named VCA level control.
6) DSP Enable/Disable
- This removes from operation the input,
output, or matrix mixer DSP functions on any channel. When removed,
audio is passed directly through the stage that has been disabled.
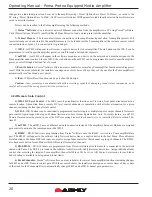
3.3 Preset Options
1) Preset Options
- The Preset Options menu in the main device
window allows setups to be named, saved to, and recalled from the
amplifier device as well as a computer on the network. Presets are a
snapshot of all current settings on a given device.
This device will store up to 31 named internal presets, each
preset storing control data for all channels and audio functions. Preset
names must be 20 characters or less. While working in Protea
ne
soft-
ware, changes to an individual preset can be saved to the device using
<Save Preset To Protea>, or saved to the PC using <Save To Disk>.
Individual preset files use the extension (*.pne).
3.2 - Pema Device Options
3.3 - Pema Preset Options


