background image

1408201627 Rev G

05 August 2015

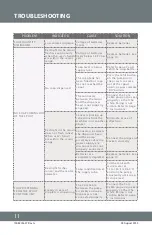
TROUBLESHOOTING

PROBLEM

INDICATOR

CAUSE

SOLUTION

SOAP QUANTITY 

DIMINISHED

Low volume dispense

Red light in the sensor 

flashes continuously 

when the user’s hands 

are within the sensor 

range.

No soap dispensed.

Red light in the sensor 

does not flash (once) 

When user’s hands 

are within the sensor 

range.

NO SOAP COMING OUT 

OF THE  SPOUT

Voltage of batteries 

likely below 1.47V per 

cell.

The soap tank has 

been filled but soap 

has not reached the 

spout.

SOAP DISPENSING 

FROM THE  SPOUT 

CONTINUOUSLY

Steady stream of 

droplets is dispensing.

The Com Cable 

between the pump 

assembly and soap 

dispenser is not 

connected properly.

Connect the Com 

Cable plug and socket 

properly so that the 

white 

O

-ring is not 

visible. Refer to page 

7 instructions.

Press the refill button 

on the pump until 

soap starts to come 

out of the spout 

again, or press remote 

“Fill” button.
Connect the Com 

Cable plug and socket 

properly so that the 

white 

O

-ring is not 

visible. Refer to page 

7 instructions.

The connector 

between the motor 

and the dispenser 

head is not properly 

engaged.

Red light flashes 

(once) and the motor 

operates.

Soap solidification at 

the supply tube.

Fill the tank with 

warm water at 

120~140°F (49-60°C) 

and run the pump 

constantly until soap 

is dispensed.

Connectors between 

the dispenser head 

and the pump 

assembly and/or the 

power supply are 

disconnected or not 

properly connected.

Connect the plugs and 

sockets correctly.

Replace batteries. See 

page 10.

Voltage of batteries 

is low

Soap level is below 

supply tube.

Batteries are 
completely depleted.

Replace batteries. See 

page 10.

Sensor is picking up 

reflections from the 

washbasin or another 

object.

Eliminate cause of 

reflection.

Refer to page 9 and 

refill the soap bottle.

Replace batteries

11

Summary of Contents for 0391-1A

Page 1: ...1408201627 Rev G 05 August 2015 EZFILL SOAP DISPENSER AUTOMATIC DECK MOUNTED SOAP DISPENSER FOR STANDALONE USE INSTALLATION AND MAINTENANCE GUIDE Model 0391 n ...

Page 2: ...CONTENTS 5 TECHNICAL DATA 6 8 INSTALLATION 9 FILLING THE BOTTLE AND PRIMING THE SOAP DISPENSER 10 BATTERY REPLACEMENT INSTRUCTIONS 10 MAINTENANCE 11 TROUBLESHOOTING 12 SPARE PARTS LIST 12 WARRANTY 14 15 EZ FILL REMOTE CONTROL Unit Install Date Unit Location in Facility Unit S N From Label Supplied By Original PO No ASI Order No ...

Page 3: ...attery Operation USA UK EU Interchangeable Plug Model AC Adapter Operation AU Model AC Adapter Operation Universal Model Battery Operation Six Pack USA UK EU Interchangeable Plug Model AC Adapter Operation Six Pack AU Model AC Adapter Operation Six Pack 1A 1AC 3AC 6 1A 6 1AC 6 3AC Schedule of Model Suffix Codes to replace n in Model and Application ...

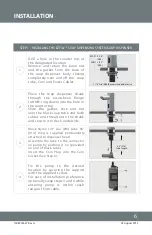
Page 4: ... Mounting Shank and Basin Nut in the desired location before drilling the hole in the counter top Ensure there is adequate space to place the Pump and Bottle Support Bracket within reach of the Com Cable from the SD Shank Keep in mind that the location of the user hands while using the faucet nearby should not interfere with the soap dispenser sensor detection area CAUTION Do not install the soap ...

Page 5: ...e socket connector soap supply tube and mounting hardware Escutcheon Flange w O Ring Gasket Basin Nut Soap Bottle Battery Box 6Dx1 5V 9V Transformer 12V from 100 240 VAC Power Supply Option One 1 ONLY either per model Plug Adapter configuration per model Power Plug Soap Supply Tube Connector Com Plug Com Socket Automatic SD Body and vanity mounting hardware with power cord Com Cable w inline plug ...

Page 6: ...y Com Socket Com Plug 2 61 64 75 1 1 2 Dia Ø38 4 3 32 104 0 2 1 16 0 52 3 1 4 83 12 1 4 311 Fill Prime Button 2 7 8 73 2 3 16 55 8 1 32 204 8 7 16 214 3 25 32 96 3 1 2 Dia Ø90 1 23 50 Dia Ø37 2 51 2 51 5 3 32 129 36 914 29 32 Dia Ø23 1 7 32 31 Model 0391 n EZFILL Soap Dispenser and Soap Pump for standalone operation with 33 8oz 1L bottle Soap Viscosity 100 3800cP mPa s Soap pH 5 5 8 5 Soap Type cl...

Page 7: ...ide the gasket disk and nut over the black soap tube and both cables and thread onto the shank and secure it to deck underside Fix the pump to the desired location by securing the support with the supplied screws For ease of installation preference optionally swap steps 3 and 4 while ensuring pump is within reach range of Com cable Black Nylon 1 4 dia Ø6 tube 36 914 long is supplied permanently at...

Page 8: ...l apply Important the 4 contacts connector should be inserted fully so that the white O ring is not visible and a clicking sound is heard NOTICE If the 4 contacts connectors are not connected properly the motor will run continuously Remove the protective sticker covering the sensor Keep away from the sensor range O RING VISIBLE IMPROPERLY CONNECTED ONLY THE GROOVES ARE VISIBLE CONNECTED PROPERLY 5...

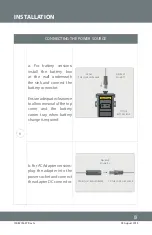
Page 9: ... connect the battery connector Ensureadequateclearance toallowremovalofthetop cover and the battery carrier tray when battery change is required FROM THE SOAP DISPENSER TO THE BATTERY BOX OBSERVE POLARITY OBSERVE POLARITY FROM THE TRANSFORMER TO THE SOAP DISPENSER b ForACAdapterversions plug the adapter into the powersocketandconnect the adapter DC connector ...

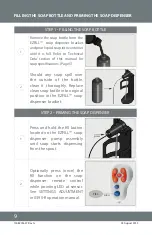
Page 10: ...e soap dispenser remote control while pointing LED at sensor See SETTINGS ADJUSTMENT in 0390 R operation manual 9 STEP 1 FILLING THE SOAP BOTTLE 1 Remove the soap bottle from the EZFILL soap dispenser bracket andpourliquidsoapintocontainer until it is full Refer to Technical Data section of this manual for soap specifications Page 5 Should any soap spill over the outside of the bottle clean it tho...

Page 11: ...sing agents containing alcohol acid abrasives or the like Use of any cleaning or maintenance products containing these substances could damage the surface of the soap dispenser For surface cleaning use ONLY soap and water then wipe dry with a clean cloth or towel When cleaning bathroom tiles or counters protect the soap dispenser from any splattering of harsh cleansers Careandcleaningofchromeandsp...

Page 12: ... refill button on the pump until soap starts to come out of the spout again or press remote Fill button Connect the Com Cable plug and socket properly so that the white O ring is not visible Refer to page 7 instructions The connector between the motor and the dispenser head is not properly engaged Red light flashes once and the motor operates Soap solidification at the supply tube Fill the tank wi...

Page 13: ...FDEFECTS IN MATERIAL OR WORKMANSHIP FOR A PERIOD BETWEEN FIVE 5 AND TEN 10 YEARS FROM DATE OF INVOICE PLEASE REFER TO INDIVIDUAL TECHNICAL DATA SHEET FOR DRYERWARRANTY EZ FILL SOAP DISPENSER WILL BE FREE OF DEFECTS IN MATERIAL AND WORKMANSHIP DURINGNORMALUSEFOR 2 TWOYEARSFROMTHEDATEOFINVOICE Should the product fail under this warranty the sole remedy at the seller s option will be to repair the de...

Page 14: ...1408201654 Rev C 27 July 2015 EZFILL REMOTE CONTROL REMOTE CONTROL FOR ALL MODELS 0390 n AND 0391 n AUTOMATIC VANITY MOUNTED SOAP DISPENSERS INSTALLATION AND MAINTENANCE GUIDE Model 0390 R ...

Page 15: ...nsor without operating the system for example cleaning The soap dispenser will remain off for one 1 minutewhenthisbuttonispressedonce To cancel this function and to return to normal operation presstheOn Offbuttonagainorwaitone 1 minute Confirmation OFF 2fastblinks ON 4fastblinks Once the soap tank has been filled re filled press the FILL button The pump will run for one 1 minute to allow the soap to ...

Page 16: ...1408201627 Rev G 05 August 2015 441 Saw Mill River Road Yonkers NY 10701 914 476 9000 Web americanspecialties com ...

Reviews: