USER
MANU
AL
61
Welding Procedures - 3
5 - Turn on the On/Off switch (8).
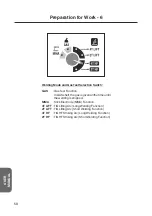
6 - Select the desired welding mode and trigger mode with “Welding Current and Parameter
Control Knob”. The welding machine can operate in the 2 trigger and 4 trigger TIG modes. In
the TIG welding mode, Lift-TIG and High Frequency TIG operations are available. In the Lift-TIG
mode, a low-current short circuit is made by touching the TIG torch to the work piece, then the
TIG arc is formed while lifting the torch. In the HF mode, the welding machine is ready for high
frequency welding, hence the arc forms without touching the TIG torch to the work piece.
7 - If in TIG 4T mode and the output pulse function is turned on, all parameters of TIG can be
adjusted. If in TIG 2T mode and the output pulse function is turned on, the start current and
crater current is 5A. If the pulse function is closed, the parameter of base current (L8), pulse
frequency (L15) and pulse width (L14) cannot be adjusted.
Note: In 4T mode, press and hold the trigger during the set crater time, the machine reaches the
set crater current. Otherwise, the welding current ends without reaching to the set crater
current.
8 - The welding current (L7) can be adjusted directly when the welder is tune on. Adjust the
“Welding Current and Parameter Control Knob”, the welding current LED (L7) is twinkling. It
means the welding current can be adjusted. If the adjustment is completed, confirm the
parameter by pressing the knob or the system will confirm the parameter automatically after 3
seconds.
9 - Output pulse selection is can be done by using “Welding Current and Parameter Control
Knob”. Press the knob. Adjust the control knob and select the pulse LED (L10 is on). Press the
control knob again, the pulse LED (L10) is twinkling. It means the output pulse function can be
turned on or turned off. If the display is “ON”, the output pulse function is turned on. If the
display is “OFF”, the output pulse function is turned off. When the pulse LED (L10) is twinkling,
press the control knob again, the output pulsed conditions transform by “ON” into “OFF” or
transform by “OFF” into “ON”. Complete the adjustment after 3 seconds, the operation panel
will return to original condition, welding current LED (L7) is on.
Note: If the welding mode is TIG and the output pulse function is turned on, the pulse selection
led (L10) is on. If the output pulse function is turned off, the pulse selection led (L10) is off.
In MMA mode, the pulse selection led (L10) is off. All preset parameters with hold
function.
Other parameters are set as follows:
Press the “Welding Current and Parameter Control Knob” and select the desidred parameter
by turning the knob. When the desired parameter is reached, the corresponding led is lighted.
Press the control knob again, parameter is twinkling. It means the parameter can be adjusted. If
the adjustment is completed, confirm the parameter by pressing the control knob or the
system will confirm the parameter automatically after 3 seconds.
Summary of Contents for 315-TIG Pulse
Page 2: ......
Page 16: ...Çalışmaya Hazırlık 2 ÖN PANEL KULLANIM KILAVUZU 14 1 7 4 5 6 2 3 ...
Page 17: ...Çalışmaya Hazırlık 3 ARKA PANEL 8 9 10 KULLANIM KILAVUZU 15 ...
Page 32: ...Yedek Parçalar 1 KULLANIM KILAVUZU 30 ...
Page 42: ...KULLANIM KILAVUZU ...
Page 56: ...Preparation for Work 2 USER MANUAL 54 FRONT PANEL 1 7 4 5 6 2 3 ...
Page 57: ...Preparation for Work 3 USER MANUAL 55 REAR PANEL 8 9 10 ...
Page 72: ...Spare Parts 1 USER MANUAL 70 ...
Page 76: ...USER MANUAL ...
Page 77: ......

