


EN 19
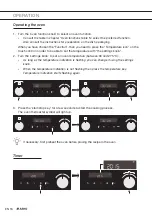
OPERATION
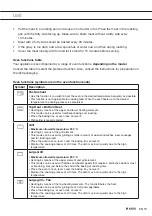
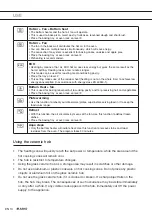
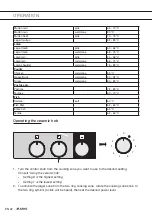
Selecting additional functions
Certain settings are not available for all programs; if this is the case you will be
alerted by a sound signal.
Child lock
With the oven’s childproof lock you can lock the control panel to prevent unintended use of the oven.
You can activate the child lock by pressing the ‘child lock key’ for a few seconds.
•
The display will show the ‘lock key’ symbol. This indicates that all functions are locked.
•
To deactivate the child lock, press the key again for a few seconds.
Once the child lock is activated and no timer function has been set (only the clock is
displayed), the oven will not work. If the child lock is activated after a timer function has
been set, the oven will work; however, the settings cannot be changed.
When the child lock is activated, oven functions or additional functions cannot be
changed. The cooking process can only be ended by turning the ‘Oven function knob’
to ‘0’. The child lock remains activated even after the oven has been switched Off.
The child lock needs to be deactivated before you can select a new programme.
Oven lamp
The oven lamp will light automatically if an oven function is selected and the ‘start/stop key’ is
pressed. The oven lamp can be switched On or Off by pressing the ‘light key’.
Sound signal
The volume of the sound signal can be set if no timer function has been activated (only the time
is displayed).
1. Press the temperature key and hold it for 5 seconds.
▷
Two fully lit bars will appear on the display.
•
Turn the settings knob to choose one of the three volume levels (one, two, or three bars).
After three seconds, the setting will be automatically stored and the time of day will appear.
Reduce display contrast
•
The ‘oven functions knob’ should be on the “0” position.
•
Press the ‘light key’ and hold it for 5 seconds.
▷
Two fully lit bars will appear on the display.
•
Turn the settings knob to adjust the display dimmer (one, two, or three bars).
After three seconds, the setting will be automatically saved.
789046_en_naslovnica_drug_papir.indd 19
789046_en_naslovnica_drug_papir.indd 19
8. 11. 2021 14:59:09
8. 11. 2021 14:59:09