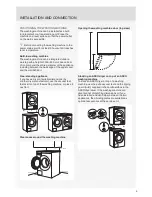
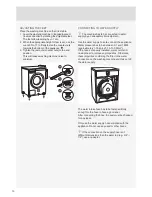
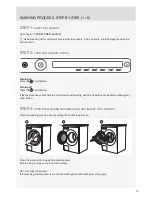
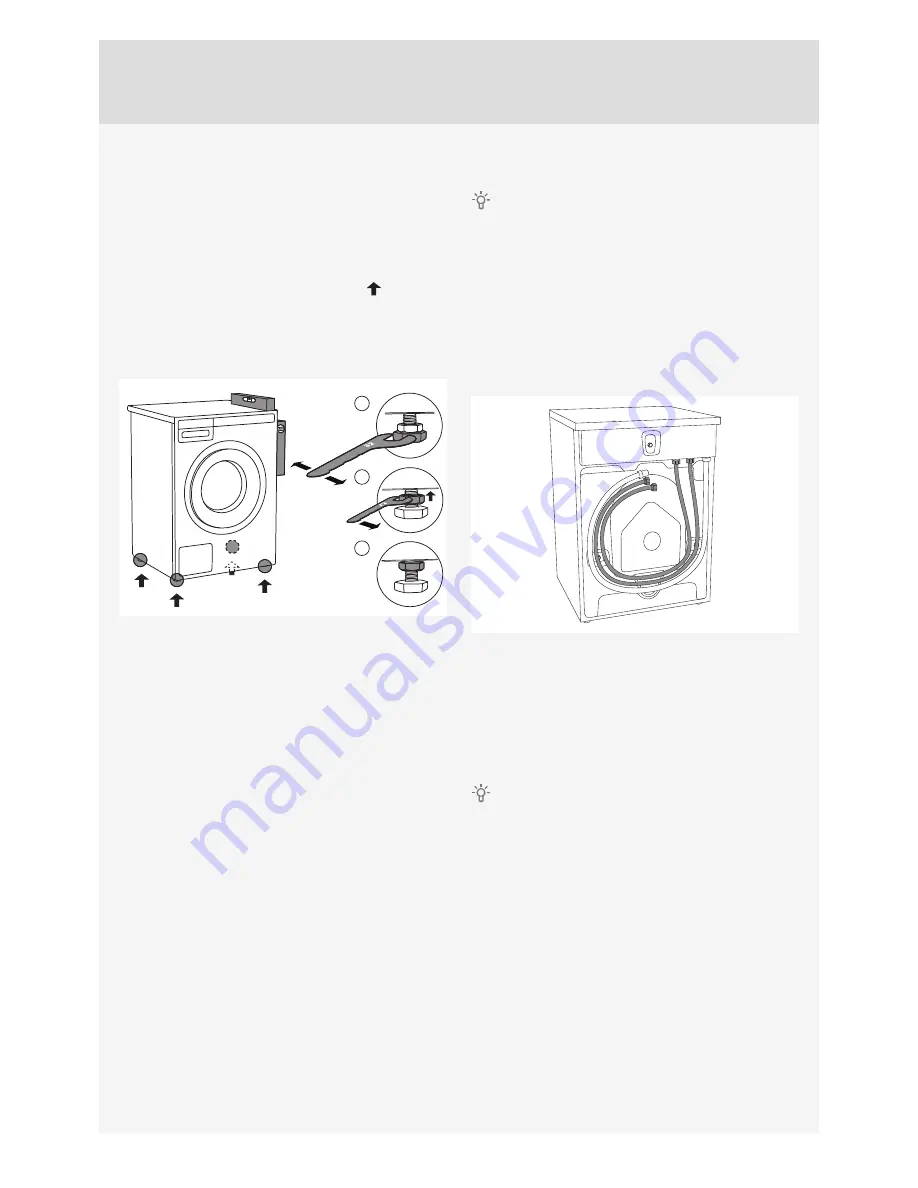
background image

10

ADJUSTING THE FEET

Place the washing machine so that it is stable.

1.  Level the washing machine in longitudinal and 

traverse direction by rotating the adjustable feet. 

The feet allow levelling by +/- 1 cm.

2.   When the appropriate height of feet is set, use the 

wrench No. 17 to 

fi

 rmly fasten the counter-nuts 

towards the bottom of the appliance  

.

3.   Tighten the jam nuts (counter nuts) to the end 

position.

This will reduce washing machine noise to 

minimum.

1

2

3

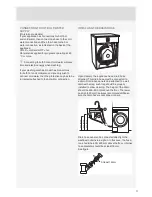
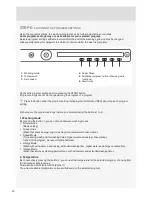
CONNECTING TO WATER SUPPLY

  The machine has to be connected to water 

supply by an adequately trained person.

Use the water supply hose to connect the appliance. 

Water pressure has to be between 0.1 and 1 MPa 

(approximately 1–10 kp/cm

2

, 10–100 N/cm

2

). 

If the hoses are newly installed, we recommend 

rinsing them to remove any impurities. Otherwise, 

these impurities could clog the 

fi

 lter in the water 

connection on the washing machine and thus cut o


the water supply.

The water intake hose has to be fastened 

fi

 rmly 

enough for the hose to have a good seal. 

After connecting the hose, the seal must be checked 

for any leaks.

Only use the water supply hose supplied with the 

appliance. Do not use any used or other hoses.

  If the connection on the supply hose is of 

di

 erent dimensions than the water tap (e.g. 3/4” 


1/2”), use an adapter.


Summary of Contents for W2084.W

Page 1: ...INSTRUCTIONS FOR USE WM75 1 Carefully read the instructions for use before using the washing machine Washing machine W4086C W4096P ...

Page 2: ...advice tip or recommendation Warning danger of hot surface Warning general danger Warning danger of fire Warning danger of electric shock See Quick guide on the last page Dear Customer We thank you for purchasing this quality ASKO product We hope it meets all your expectations Scandinavian design combines pure lines everyday functionality and high quality These are the key characteristics of all o...

Page 3: ... The washing machine may not be connected to the power mains using an extension cord Do not connect the washing machine to an electrical outlet intended for an electric shaver or hair dryer To connect the washing machine to water supply make sure to use the supplied water supply hose and gaskets Water pressure has to be between 0 1 and 1 MPa approximately 1 10 kp cm2 10 100 N cm2 Always use a new ...

Page 4: ...ing experience and knowledge These persons should be instructed about the use of the appliance by a person responsible for their safety Emergency door opening tool is located on the back side of the dispenser Maximum washing capacity in kg for the Cotton program is indicated on the rating plate CHILD SAFETY Do not allow small children to play with the washing machine Before closing the washing mac...

Page 5: ...upted see chapter ERRORS WHAT TO DO TRANSPORTING STORAGE DURING THE WINTER If you transport or store the appliance in vehicles or rooms that are not heated and where the temperature could drop to below freezing point please do the following Clean the drain pump filter See chapter CLEANING AND MAINTENANCE Close the water supply to the washing machine undo the water supply hose from the water supply...

Page 6: ...side of the washing machine door 9 Washing machine door 10 Drain filter cover 11 Water release hose 12 Drain filter pump installed behind the drain pump filter 1 Prewash compartment 2 Compartment for main wash liquid detergent Use the barrier 3 2 Compartment for main wash powder detergent Do not use the barrier 3 4 Softener conditioner compartment 5 Tab for dispenser tray removal WASHING MACHINE D...

Page 7: ...move the caps from the plastic plugs Push the caps over the three holes in which the plastic plugs were inserted Save the plastic plugs if you have to transport your washing machine in the future If you wish to transport the washing machine reinstall the bolts and plastic caps to lock the machine This will prevent any damage to the machine due to vibrations during transport If you have lost the tr...

Page 8: ...ction Press the button 2 or the program selector knob to scroll the list of languages Confirm your selection by pressing the OK button The amount of detergent depends on the hardness of water For details see the detergent packaging Please contact your local water supply company to check the water hardness in your area Before it dispatched from the factory every appliance is tested As a result ther...

Page 9: ...r cover and the wall behind it Free standing appliance If you have a dryer of suitable dimensions by another dryer manufacturer use the vacuum feet to stack it on top of the washing machine or place it next to it Clearances around the washing machine min 50 mm min 50 mm min 50 mm Opening the washing machine door top view 480 mm 978 mm 1 1 0 Stacking an ASKO dryer on top of an ASKO washing machine ...

Page 10: ...adequately trained person Use the water supply hose to connect the appliance Water pressure has to be between 0 1 and 1 MPa approximately 1 10 kp cm2 10 100 N cm2 If the hoses are newly installed we recommend rinsing them to remove any impurities Otherwise these impurities could clog the filter in the water connection on the washing machine and thus cut off the water supply The water intake hose ha...

Page 11: ...water then the protective cap has to be or remain attached to toe hot water connection INSTALLING THE DRAIN HOSE Upon delivery the appliance has a drain hose attached This drain hose must be connected to a drain Drain hose can also be attached to a wall drain with a trap such trap should be properly installed to allow cleaning The height of the drain should be 600 900 mm above the floor The lower ...

Page 12: ... XXXXXX XX Ser No XXXXXXXX MODEL XXXXXX X XXXX W XXA IPX4 X kg XXX XXX V XX Hz XX X MPa Information about your washing machine is indicated on the rating type plate Use the type A differential current protection switch We recommend using over voltage protection to protect the appliance in case of a lightning strike The washing machine may not be connected to the power mains using an extension cord ...

Page 13: ...UNDRY SYMBOLS Observe the laundry symbols Textile maintenance symbols Washing Normal Delicate Max washing temperature 90 C Max washing temperature 60 C Max washing temperature 40 C Max washing temperature 30 C Hand wash only Do not wash Bleaching c1 Bleaching in cool water Bleaching not allowed Dry cleaning A Dry cleaning with all agents P Perchloroethylene R11 R113 petroleum F Dry cleaning in ker...

Page 14: ...n Standard Cotton and often suffices for less soiled laundry ECONOMY AND EFFICIENCY You can save a lot of energy by not using the programs operating at higher temperatures Choose the Quick program if you wish to only refresh the laundry or use the Time program This will save water and power Selecting the maximum spinning speed will reduce power consumption if you dry the clothes in a dryer or a dryi...

Page 15: ...ff Press the on off button If the machine does not accept the on off command correctly wait for at least 8 seconds before pressing any other button STEP 3 OPEN THE WASHING MACHINE DOOR AND INSERT THE LAUNDRY Open the washing machine door by pulling the handle towards you 1 2 3 Place the laundry into the washing machine drum Before doing so make sure the drum is empty Do not overload the drum If th...

Page 16: ...hing process Liquid detergent When using a liquid detergent observe the detergent manufacturer s recommendations When using thick detergents we recommend always using the laundry balls Use the barrier 3 in the detergent compartment see figure in the chapter detergent tray Add the liquid detergent in the front part of the detergent compartment in the dispenser tray 2 Laundry ball or washing bag If ...

Page 17: ...worn directly on the skin Choose 40 C if the laundry is only lightly dirty Spinning speed can be set to your preference Default setting is maximum spinning speed Program duration and amount of water will be adjusted to the amount of laundry 3 MIX SYNTHETICS Program for delicate clothing made of synthetic and mixed fibres or viscose and for simple care of cotton The highest available temperature is...

Page 18: ...items as it uses a lot of water for the wash Carefully read the washing instructions If the outer layer has a membrane do not use a conditioner Washing temperature can be set up to 60 C and spinning speed can be set up to 1000 rpm 14 DRUM CLEANING This program is used to clean the drum and to remove detergent residues and bacteria The drum has to be empty Only add a small amount of powder detergen...

Page 19: ... with highly sensitive skin or skin allergies The program is also suitable for people sensitive to washing detergents We recommend turning the garments inside out as this will also thoroughly wash out the skin and other residues 21 QUICK PROFESSIONAL PROGRAM Quick Pro Program for smaller amounts of lightly soiled laundry The program washes with gentle tumbling and lower spin speed 4 kg 40 C 59 min...

Page 20: ...mation INFO about the each program setting Following are the program settings that may be selected using the buttons 1 to 6 1 Washing mode By pressing the button 1 you can choose between washing modes Normal mode Basic setting Green mode Wash that saves energy longer washing time lower water consumption Speed Mode Time saving wash shorter washing times higher water and energy consumption In the Co...

Page 21: ...ing will depend on the selected washing program 5 Choosing extra functions Additional program option Press the button 5 to confirm the extra functions Then use the Program selector knob to scroll the list of functions or options Confirm the function you wish to select by pressing the button 1 The following extra functions are available Prewash To use a prewash before the main wash choose the Prewa...

Page 22: ...and then from 6 hours to 24 hours in 1 hour steps Press the button 5 OK to confirm your selection Press the Start button to start When the countdown reaches zero the selected washing program will start automatically Delayed start paused 03 50 5 To cancel the delay and start the washing process immediately press the button 5 To change the start delay time press the Start Stop button and hold it for...

Page 23: ... it will not count down Once the laundry is evenly redistributed the washing time will continue and it will stop flashing Washing 2 20 Adding or removing laundry after the start of the program Paused Stop program Add clothes 5 To add or remove laundry during the progress of a washing program use the Start Pause Stop button to pause the program Then press the button 5 to select Add clothes The door...

Page 24: ...p program The program is canceled and the water is pumped out of the machine if necessary Only then will you be able to open the washing machine door Use the Program selector knob to select a new program If necessary add detergent and then press the Start Pause Stop button A washing program can be paused by pressing the ON OFF button The washing machine will switch off After the washing machine is ...

Page 25: ...er The display will light up again if you press the ON OFF button or open the washing machine door After the washing cycle close the water intake and pull out the washing machine plug from the power socket Favourite programs Cycle completed succsessfully new Start Add fav 6 After the end of the program you can use the button 6 to store the program including all extra settings as your favourite pro...

Page 26: ...te Confirm Back Fav list position 4 2 Use the button 2 to scroll through the list of Favourite programs Press the button 4 to confirm the program to be replaced No Yes 1 Fav Auto will be replaced 6 5 Confirm the replacement by pressing the button 5 The list of favourite programs will appear when you switch on the washing machine If you do not take any action for 5 minutes the display will switch t...

Page 27: ... button 6 BACK to return to System Settings or to the main menu Press the INFO button to display brief information about the setting CHILD LOCK Child lock Back Info 1 Child lock can be activated by pressing the button 1 This will prevent children from switching on the machine Child lock Back Info 1 Press the button 1 to deactivate the child lock When the child lock is activated no other function c...

Page 28: ...C F Temperature Back 1 6 2 Use button 1 to select C Use button 2 to select F Use the button 6 to return to System Settings PROGRAMS The main menu includes the entire set of programs that you can choose using the Program selector knob This setting allows only displaying the selected program in the main menu Sports wear Programs Back Info 1 3 6 Press the button 1 for the arrows to appear Use the Pro...

Page 29: ...ngs SOUNDS Choose whether audible signals are switched on or off Info Mid Sounds Back 1 6 4 Use the button 1 to switch acoustic signal on or off Use the button 4 to choose between the following settings low mid and high As you scroll through the options a sample audible signal will be sounded Use the button 6 to return to System Settings RESET This means that all settings will return to the default ...

Page 30: ...ase the water drain hose from the holder Before cleaning the filter drain the water from the washing machine by placing the end of the water drain hose over a large shallow container and opening the cap on the water drain hose 3Gradually rotate the filter in the counter clockwise direction and pull it out 4Clean the filter thoroughly under running water 5Remove all objects and impurities from the ...

Page 31: ... and tube Clean the dispenser tray B interior Replace the cap on the plug 3Use a brush to clean the nozzles on the upper side of the dispenser tray housing After a washing program nozzles that clean the interior of the dispenser are automatically switched on only with some models 4Replace the detergent dispenser into its housing Close the dispenser tank Do not wash the dispenser tank in the dishwa...

Page 32: ...ts Do not clean the washing machine with a jet of water Always disconnect the washing machine from the power mains before cleaning CLEANING THE WASHING MACHINE INTERIOR AGAINST ODOURS Modern detergents often allow washing clothes at low temperatures This means that residue may accumulate in the washing machine which in turn could cause odours To avoid such odorous we recommend running the self cle...

Page 33: ...e other hand and pull it towards you 3Lift the drum rib 4Remove any objects 5Place the rib into the installation slot indicated with F towards you Make sure all ribs are firmly in place in their respective slots in the drum Push the rib inwards as indicated by the arrow in the figure until it snaps If you are using hard water If you are washing with hard water causing limescale build up a greyish ...

Page 34: ...ne will not start Power supply failure Press the Start Pause Stop button to resume the program Washing program is not in progress Washing machine door is not properly closed Firmly press on the washing machine door until you hear two clicks when it is closed There is no voltage in the power outlet Check if the plug is connected to the power outlet and whether there is electric current or voltage i...

Page 35: ...Water pressure not high enough Clean the net on the water supply hose Some washing powders may stick strongly to the dispenser tray if it is empty Choose higher water level or extra rinse see Step 6 Choose program settings Wipe the dispenser tray before adding the powder detergent There is conditioner left in the conditioner compartment of the dispenser tray Plug cap is not positioned correctly or...

Page 36: ...rain pump in the chapter CLEANING AND MAINTENANCE B Make sure the main switch is off and that the plug is disconnected from the power outlet C Take the emergency door opening tool found at the back of the dispenser and insert it into the upper part of the slot on the right hand side of the washing machine door latch D Press the key key the emergency door opening tool downwards all the way until you...

Page 37: ...e error reoccurs call a service technician E7 DRAINING ERROR Water draining error Check the following is the pump filter clean is the drain hose clogged is the drain clogged is the drain hose fitted at the right height see chapter on drain hose installation in the instruction manual Then press the Start button again If the error reoccurs call a service technician E7 1 DRAIN SYSTEM ALERT Water drai...

Page 38: ...f cleaning program Use the self cleaning program DRUM CLEANING see STEP 5 Unevenly distributed laundry or lumps of laundry in the washing machine drum may cause problems such as vibration and noisy operation The washing machine will sense this and activate the UKS unbalance system Smaller loads e g one towel one sweater one bathrobe etc or clothes made of materials with special geometrical propert...

Page 39: ...pe 2 and serial number 3 of your washing machine Model type and serial number are indicated on the rating type plate located on the washing machine door casing In case of a failure only use approved spare parts by authorized manufacturers Repair or any warranty claim resulting from incorrect connection or use of the washing machine shall not be covered by the warranty In such cases the costs of re...

Page 40: ... ECO 60 C with half load Et 60 158 158 minutes Standard cotton ECO 40 C with half load Et 40 138 138 minutes Noise emissions Washing stage 52 56 dB A re 1 pW Spinning stage 77 77 dB A re 1 pW 1 Based on 220 standard washing cycles for Standard cotton ECO 60 C and 40 C for full and half load in energy saving modes Actual power consumption will depend on the way the appliance is used 2 Based on 220 ...

Page 41: ... 60 C 40 C 8 9 kg cotton depending on model Connection Cold water 15 C Noise testing method IEC 60704 2 4 TECHNICAL INFORMATION Height 850 mm Width 595 mm Depth 580 mm Weight 75 76 kg depending on model Drum volume 60 l Rated power See rating plate Heater power See rating plate Water pressure 0 1 1 MPa 1 10 kp cm2 10 100 N cm2 Material for the drum and dispenser Stainless steel Housing material Ho...

Page 42: ...Drum cleaning N 15 Jeans X 40 X S 1000 3 5 50 0 60 1 20 16 Shirts program X 40 X E 1000 3 5 45 0 45 1 50 17 Hygiene 60 I 1600 8 82 1 80 2 30 18 Bedding program 60 X N 1600 4 52 1 67 2 05 19 Allergy program cotton 60 I 1600 8 90 1 85 2 40 20 Allergy program synthetics 60 S 1000 4 70 1 10 2 20 21 Quick Pro 40 N 1000 4 40 0 50 0 59 ECO Green Mode Cold wash Half load Agitation level I Intensive rhythm...

Page 43: ...leaning N 15 Jeans X 40 X S 1000 3 5 50 0 60 1 20 16 Shirts program X 40 X E 1000 3 5 45 0 45 1 05 17 Hygiene 60 I 1600 9 87 1 80 2 40 18 Bedding program 60 X N 1600 4 52 1 67 2 05 19 Allergy program cotton 60 I 1600 9 95 1 85 2 50 20 Allergy program synthetics 60 S 1000 4 70 1 10 2 20 21 Quick Pro 40 N 1000 4 40 0 50 0 59 ECO Green Mode Cold wash Half load Agitation level I Intensive rhythm N Nor...

Page 44: ...tures washing time can be longer at higher temperatures it can be shorter Unevenly distributed laundry or lumps of laundry in the washing machine drum can cause problems such as vibration and noisy operation The appliance can sense such lumps and will try to redistribute the laundry Smaller loads e g one towel one sweater one bathrobe etc or clothes made of materials with special geometrical prope...

Page 45: ... centre for waste electric and electronic equipment processing When disposing of an appliance at the end of its useful life remove all power cords and destroy the door latch and switch to prevent the door from locking or latching child safety Correct disposal of the product will help prevent any negative effects on the environment and health of people which could occur in case of incorrect product ...

Page 46: ...46 NOTES ...

Page 47: ...ash loads use a smaller amount of detergent CHOOSE THE PROGRAM SETTING Choose the settings by pressing the relevant buttons CHOOSE THE WASHING PROGRAM Turn the program selector knob to the desired washing program Selected program will be indicated on the display unit CLOSE THE WASHING MACHINE DOOR AND PRESS THE START BUTTON Anticipated washing time in hours and minutes will be indicated on the dis...

Page 48: ...en 09 17 Gorenje Partizanska 12 3320 Velenje Slovenija www asko com WM75 1 ...

Reviews: