background image


21 

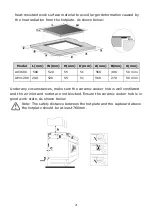
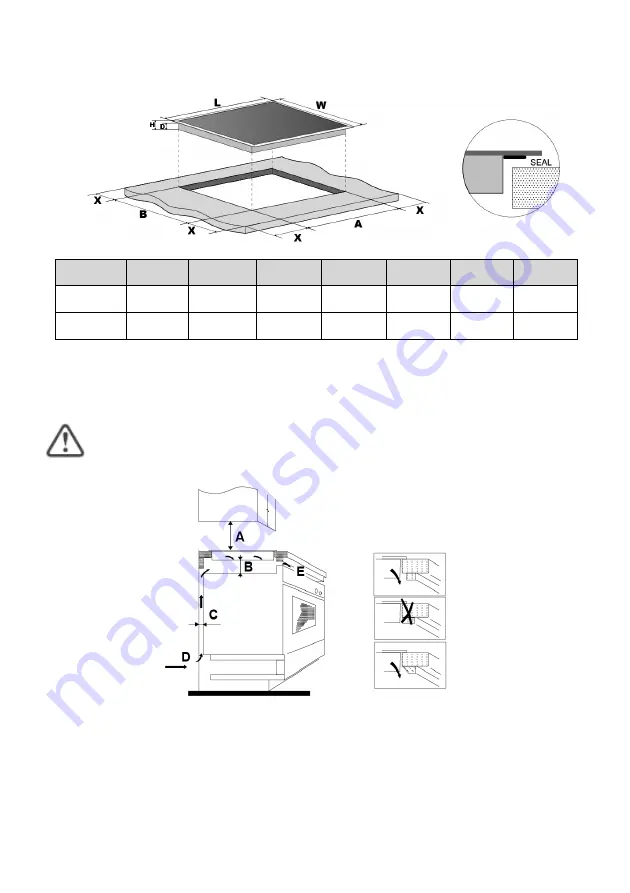
heat-resistant work surface material to avoid larger deformation caused by   
the heat radiation from the hotplate. As shown below: 


Under any circumstances, make sure the ceramic cooker hob is well ventilated 
and the air inlet and outlet are not blocked. Ensure the ceramic cooker hob is in 
good work state. As shown below 

Note: The safety distance between the hotplate and the cupboard above 
the hotplate should be at least 760mm. 


Model 

L(mm) 

W(mm) 

H(mm) 

D(mm) 

A(mm) 

B(mm) 

X(mm)

AV3600    590 

520 

55 

51 

560 

490 

50 mini

APV1200  290 

520 

55 

51 

560 

270 

50 mini

Summary of Contents for APV1200

Page 1: ...AV3600 APV1200 ...

Page 2: ...adas por un electricista calificado Si no sigue este consejo podría provocar una descarga eléctrica o la muerte Riesgo de cortes Tenga cuidado Los bordes del panel están afilados Si no tiene cuidado podría provocar lesiones o cortes Instrucciones de seguridad importantes Lea atentamente este manual de instrucciones antes del uso o instalación del aparato No deben ser colocados en ningún momento en...

Page 3: ...cionamiento y mantenimiento Peligro de descarga eléctrica No cocine sobre una encimera rota o agrietada Si la superficie de la placa se rompe o se agrieta apague el aparato inmediatamente en la alimentación de la red interruptor de pared y póngase en contacto con un técnico cualificado Desenchufar la encimera antes de la limpieza o mantenimiento Si no sigue este consejo podría provocar una descarg...

Page 4: ... que se encuentran en funcionamiento Mantenga los mangos fuera del alcance de los niños Si no sigue este consejo podría provocar quemaduras y escaldaduras Peligro frente al corte Cuando use un raspador para limpiar la placa puede tener la hoja afilada o áspera Úselo con extremo cuidado y siempre almacenar de forma segura y fuera del alcance de los niños Si no sigue este consejo podría causar daños...

Page 5: ...aparato Si los niños se suben a la superficie de la placa pueden sufrir lesiones graves No deje a los niños solos o sin vigilancia en el área donde el aparato está en uso Ese aparato no debe ser utilizado por personas incluyendo niños con discapacidades mentales o poca experiencia en el mantenimiento de estos aparatos a menos que tengan la instrucción adecuada de cómo hacerlo El instructor debe es...

Page 6: ...io o por personal cualificado con el fin de evitar situaciones de peligro Este aparato está destinado a ser utilizado en aplicaciones domésticas ADVERTENCIA El aparato y sus partes accesibles se calientan durante el uso Se debe tener cuidado para evitar tocar los elementos calefactores Los niños menores de 8 años de edad deberán mantenerse lejos menos que estén supervisados de forma continua Este ...

Page 7: ...o y luego cubrir la llama por ejemplo con una tapa o una manta de fuego ADVERTENCIA Peligro de incendio No almacene artículos sobre las superficies de cocción Advertencia Si se agrieta la superficie apagar el aparato para evitar la posibilidad de una descarga eléctrica para las superficies calientes de productos similares de cristal cerámica o que protegen las partes activas No use un limpiador de...

Page 8: ...eer este manual de instrucciones instalación con el fin de entender completamente cómo instalar correctamente y operarlo Para la instalación véase la sección de instalación Leer todas las instrucciones de seguridad antes de utilizar y mantener este Manual de Instrucciones instalación para referencia futura ...

Page 9: ...l AV3600 1 ON OFF 2 Regulador potencia mas Regulador potencia menos 3 Temporizador 4 Bloqueo 5 Controles de selección de zona 6 Zona de control Dual 1 zona max 1800 W 2 zona max 1200 W 3 Panel de control 1 Zona max 1800 W 2 Zona max 1200 W 3 Zona 1050 1950 2700 W 4 Panel de control ...

Page 10: ...rámica Lea esta guía tomando nota especial de la sección Avisos de Seguridad Retire la película protectora que aún pueden estar en su Placa de vitrocerámica Uso de los controles táctiles Los controles responden al tacto por lo que no es necesario aplicar ningún tipo de presión Utilice la yema del dedo no la punta Se oirá un pitido cada vez que se ha registrado un toque Asegúrese de que los control...

Page 11: ...la encimera de inducción No las arrastre o pueden rayar el cristal Uso de su placa de Vitrocerámica Para empezar a cocinar Una vez se ha encendido el zumbador suena una vez todos los indicadores se encienden durante 1 segundo y luego se apagan lo que indica que la vitrocerámica ha entrado en el estado de modo de espera 1 Apriete el botón ON OFF del control todos los indicadores mostrarán 2 Coloque...

Page 12: ...lquier Momento durante la cocción Cuando acabe de cocinar 1 Tocar la selección de la zona de calentamiento que se desea apagar 2 Tocar la zona de cocción desplazándose hacia abajo a 0 o tocar y a la vez Asegúrese que la pantalla muestra 0 3 Apague totalmente la placa presionando el botón ON OFF 4 Cuidado con las superficies calientes H mostrará qué zona de cocción está caliente al tacto Desaparece...

Page 13: ...icador de nivel de potencia parpadeará a continuación pulse después de 5 segundos indicador para de parpadear la función de doble zona se activa y el nivel de potencia muestra 6 y alternativamente Sipulsa dos veces lazonatripleseactiva elniveldepotenciamuestra 6 y alternativamente Desactivar el doble zona 1 Presione el control de selección de zona de calentamiento de la zona de calentamiento doble...

Page 14: ...cender la placa con el botón ON OFF en caso de emergencia pero en la siguiente operación deberá desbloquear en primer lugar Protección de sobre calentamiento Un sensor de temperatura equipado puede controlar la temperatura dentro de la Placa de inducción Cuando se controla una temperatura excesiva la Placa de inducción dejará de funcionar automáticamente Protección de cierre automático El cierre a...

Page 15: ...a seleccionado ninguna zona de cocción 2 Toca el control del temporizador el 00 se mostrará en la visualización del temporizador y los 0 parpadea 3 Establecer el tiempo tocando el control o del temporizador por ejemplo 5 4 Toque el control de atenuación de nuevo el 0 parpadeará 5 Establezca el tiempo tocando la tecla o control por ejemplo 9 el temporizador se establece en 95 minutos 6 Establezca e...

Page 16: ...jemplo 5 4 Toque el control de atenuación de nuevo el 0 parpadeará 5 Establezca el tiempo tocando la tecla o control por ejemplo 9 el temporizador se establece en 95 minutos 6 Cuando se ha ajustado el tiempo comenzará la cuenta atrás inmediatamente La pantalla mostrará el tiempo restante NOTA El punto rojo junto del indicador de nivel de potencia se iluminará indicando que se ha seleccionado la zo...

Page 17: ...r la zona correspondiente se apagará A continuación se mostrará de Nuevo los minutos del temporizador y el punto de la zona correspondiente parpadeará Toque el control de selección de zona de calentamiento el tiempo correspondiente se muestra en el indicador del temporizador Cancele el temporizador 1 Tocando el control de selección de zona de calenta miento donde desea cancelar el temporizador 2 A...

Page 18: ...areas incluyendo cocinar el arroz pueden requerir un ajuste más alto para asegurar que la comida es cocinada adecuadamente en el tiempo recomendado Cocinar un filete Cómo cocinar un sabroso filete 1 Coloque la carne a temperatura ambiente durante aproximadamente 20 minutos antes de cocinar 2 Calentar una sartén de fondo grueso 3 Unte de ambos lados de la carne con aceite Rocíe una pequeña cantidad...

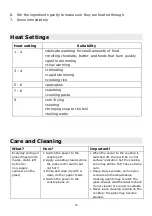
Page 19: ...e que estén bien calientes 7 Servir inmediatamente Ajustes de calor Ajuste de calor Idoneidad 1 2 Calentamiento delicado para pequeñas cantidades de alimentos Fundir chocolate mantequilla y alimentos que queman rápidamente Cocer a fuego lento suavemente El calentamiento lento 3 4 recalentamiento cocción rápida cocinar arroz 5 6 tortitas crepes 7 8 cocción con sartén cocinar pasta 9 Freir Cocer par...

Page 20: ... inducción pero cuidado con las superficies de las zonas de cocción calientes 1 Desenchufar la placa 2 Mantenga el raspador en un ángulo de 30 y raspe la suciedad o el derrame hacia una zona fresca de la placa 3 Limpiar la suciedad o el derrame con un paño de cocina o una toalla de papel 4 Siga los pasos 2 a 4 para Todos los días suciedad sobre el vidrio arriba Eliminar las manchas dejadas por el ...

Page 21: ...ta de su dedo al tocarlos Asegúrese de que el área de control táctil está seca y utilice la yema del dedo al tocar los controles El vidrio se está rayando Utensilios de cocina poco adecuados Se utilizan estropajos o productos de limpieza abrasivos Utilice recipientes con bases planas y lisas Ver La elección de los utensilios de cocina correcta Ver Cuidado y limpieza Algunas cazuelas hacen ruidos o...

Page 22: ...r de la encimera sea de un mínimo de 30mm Por favor seleccione un material de la encimera resistente al calor para evitar su deformación cuando la placa de inducción irradie calor Tal y como se muestra abajo Model L mm W mm H mm D mm A mm B mm X mm AV3600 590 520 55 51 560 490 50 mini APV1200 290 520 55 51 270 490 50 mini Asegúrese de que la placa de vitrocerámica está bien ventilada y la entrada ...

Page 23: ...La encimera vitrocerámica no se instalará encima de equipos de refrigeración lavaplatos y secadores rotatorios 3 La encimera vitrocerámica debe ser instalada de manera que se disipe el calor para mejorar su fiabilidad 4 La pared y la zona de calentamiento inducido por encima de la superficie de trabajo deberán soportar el calor 5 Para evitar cualquier daño la capa y el adhesivo deben ser resistent...

Page 24: ... se sustituye por una persona debidamente cualificada ELIMINACIÓN No deseche este producto con la basura municipal sin clasificar Estos desechos requieren un tratamiento especial Este aparato está conforme a la directiva europea 2002 96 CE de Residuos de aparatos eléctricos y electrónicos RAEE Al asegurarse de que este aparato se deseche correctamente usted ayudará a evitar posibles daños al medio...

Page 25: ...AV3600 APV1200 ...
Page 26: ...an Failure to follow this advice may result in electrical shock or death Cut Hazard Take care panel edges are sharp Failure to use caution could result in injury or cuts Important safety instructions Read these instructions carefully before installing or using this appliance No combustible material or products should be placed on this appliance at any time Please make this information available to...

Page 27: ...cooktop surface is break or crack switch the appliance off immediately at the mains power supply wall switch and contact a qualified technician Switch the cooktop off at the wall before cleaning or maintenance Failure to follow this advice may result in electrical shock or death Health Hazard This appliance complies with electromagnetic safety standards Hot Surface Hazard During use accessible par...

Page 28: ... safety cover is retracted Use with extreme care and always store safely and out of reach of children Failure to use caution could result in injury or cuts Important safety instructions Never leave the appliance unattended when in use Boilover causes smoking and greasy spillovers that may ignite Never use your appliance as a work or storage surface Never leave any objects or utensils on the applia...

Page 29: ...structor should be satisfied that they can use the appliance without danger to themselves or their surroundings Do not repair or replace any part of the appliance unless specifically recommended in the manual All other servicing should be done by a qualified technician Do not use a steam cleaner to clean your cooktop Do not place or drop heavy objects on your cooktop Do not stand on your cooktop D...

Page 30: ...educed physical sensory or mental capabilities or lack of experience and knowledge if they have been given supervision or instruction concerning use of the appliance in a safe way and understand the hazards involved Children shall not play with the appliance Cleaning and user maintenance shall not be made by children without supervision WARNING Unattended cooking on a hob with fat or oil can be da...

Page 31: ... external timer or separate remote control system Congratulations on the purchase of your new Ceramic Hob We recommend that you spend some time to read this Instruction Installation Manual in order to fully understand how to install correctly and operate it For installation please read the installation section Read all the safety instructions carefully before use and keep this Instruction Installa...

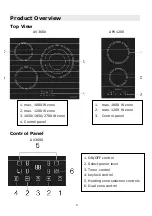
Page 32: ...V3600 1 ON OFF control 2 Select power level 3 Timer control 4 keylock control 5 Heating zone selection controls 6 Dual zone control 1 max 1800 W zone 2 max 1200 W zone 3 1050 1950 2700 W zone 4 Control panel 1 max 1800 W zone 2 max 1200 W zone 3 Control panel ...

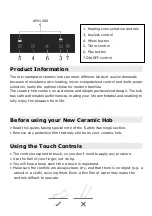
Page 33: ...sing your New Ceramic Hob Read this guide taking special note of the Safety Warnings section Remove any protective film that may still be on your ceramic hob Using the Touch Controls The controls respond to touch so you don t need to apply any pressure Use the ball of your finger not its tip You will hear a beep each time a touch is registered Make sure the controls are always clean dry and that t...

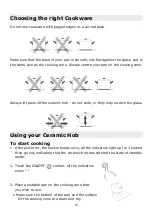
Page 34: ...off the ceramic hob do not slide or they may scratch the glass Using your Ceramic Hob To start cooking After power on the buzzer beeps once all the indicators light up for 1 second then go out indicating that the ceramic hob has entered the state of standby mode 1 Touch the ON OFF control all the indicators show 2 Place a suitable pan on the cooking zone that you wish to use Make sure the bottom o...

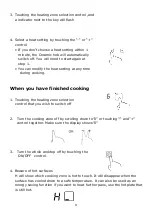
Page 35: ...When you have finished cooking 1 Touching the heating zone selection control that you wish to switch off 2 Turn the cooking zone off by scrolling down to 0 or touching and control together Make sure the display shows 0 3 Turn the whole cooktop off by touching the ON OFF control 4 Beware of hot surfaces H will show which cooking zone is hot to touch It will disappear when the surface has cooled dow...

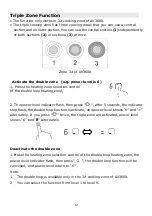
Page 36: ...ing zone 2 The power level indicator flash then press after 5 seconds the indicator stop flash the double loop function is activate and power level shows 6 and alternately If you press twice the triple zone are activated power level shows 6 and alternately Deactivate the double zone 1 Press the heating zone selection control of the double loop heating zone the power level indicator flash then pres...

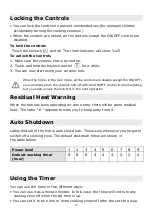
Page 37: ...amic hob off with the ON OFF control in an emergency but you shall unlock the hob first in the next operation Residual Heat Warning When the hob has been operating for some time there will be some residual heat The letter H appears to warn you to keep away from it Auto Shutdown safety feature of the hob is auto shut down This occurs whenever you forget to switch off a cooking zone The default shut...

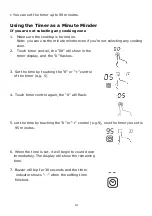
Page 38: ...ontrol the 00 will show in the timer display and the 0 flashes 3 Set the time by touching the 0 or control of the timer e g 5 4 Touch timer control again the 0 will flash 5 set the time by touching the 0 or control e g 9 now the timer you set is 95 minutes 6 When the time is set it will begin to count down immediately The display will show the remaining time 7 Buzzer will bip for 30 seconds and th...

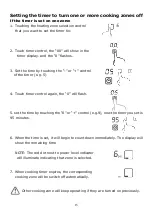
Page 39: ...er e g 5 4 Touch timer control again the 0 will flash 5 set the time by touching the 0 or control e g 9 now the timer you set is 95 minutes 6 When the time is set it will begin to count down immediately The display will show the remaining time NOTE The red dot next to power level indicator will illuminate indicating that zone is selected 7 When cooking timer expires the corresponding cooking zone ...

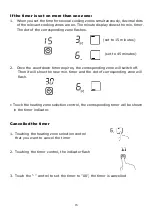
Page 40: ...tes 2 Once the countdown timer expires the corresponding zone will switch off Then it will show the new min timer and the dot of corresponding zone will flash Touch the heating zone selection control the corresponding timer will be shown in the timer indicator Cancelled the timer 1 Touching the heating zone selection control that you want to cancel the timer 2 Touching the timer control the indica...

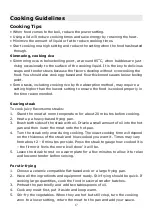
Page 41: ...t at room temperature for about 20 minutes before cooking 2 Heat up a heavy based frying pan 3 Brush both sides of the steak with oil Drizzle a small amount of oil into the hot pan and then lower the meat onto the hot pan 4 Turn the steak only once during cooking The exact cooking time will depend on the thickness of the steak and how cooked you want it Times may vary from about 2 8 minutes per si...

Page 42: ...ass fingerprints marks stains left by food or non sugary spillovers on the glass 1 Switch the power to the cooktop off 2 Apply a cooktop cleaner while the glass is still warm but not hot 3 Rinse and wipe dry with a clean cloth or paper towel 4 Switch the power to the cooktop back on When the power to the cooktop is switched off there will be no hot surface indication but the cooking zone may still...

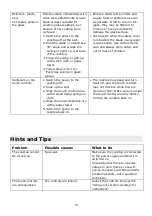
Page 43: ... with extreme care and always store safely and out of reach of children Spillovers on the touch controls 1 Switch the power to the cooktop off 2 Soak up the spill 3 Wipe the touch control area with a clean damp sponge or cloth 4 Wipe the area completely dry with a paper towel 5 Switch the power to the cooktop back on The cooktop may beep and turn itself off and the touch controls may not function ...

Page 44: ...f different metals vibrating differently This is normal for cookware and does not indicate a fault Technical Specification Cooking Hob AV3600 APV1200 Cooking Zones 3 Zones 2 Zones Supply Voltage 220 240V 220 240V Installed Electric Power 5700W 3000W Product Size L W H mm 590X520X55 290X520X55 Building in Dimensions A B mm 560X490 270X490 Weight and Dimensions are approximate Because we continually...

Page 45: ...eramic cooker hob is well ventilated and the air inlet and outlet are not blocked Ensure the ceramic cooker hob is in good work state As shown below Note The safety distance between the hotplate and the cupboard above the hotplate should be at least 760mm Model L mm W mm H mm D mm A mm B mm X mm AV3600 590 520 55 51 560 490 50 mini APV1200 290 520 55 51 560 270 50 mini ...

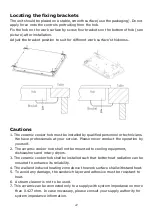
Page 46: ...s at your service Please never conduct the operation by yourself 2 The ceramic cooker hob shall not be mounted to cooling equipment dishwashers and rotary dryers 3 The ceramic cooker hob shall be installed such that better heat radiation can be ensured to enhance its reliability 4 The wall and induced heating zone above the work surface shall withstand heat 5 To avoid any damage the sandwich layer...

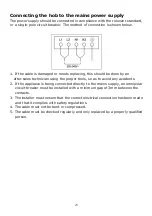
Page 47: ...s technician using the proper tools so as to avoid any accidents 2 If the appliance is being connected directly to the mains supply an omnipolar circuit breaker must be installed with a minimum gap of 3mm between the contacts 3 The installer must ensure that the correct electrical connection has been made and that it complies with safety regulations 4 The cable must not be bent or compressed 5 The...

Page 48: ... the product indicates that it may not be treated as normal household waste It should be taken to a collection point for the recycling of electrical and electronic goods This appliance requires specialist waste disposal For further information regarding the treatment recover and recycling of this product please contact your local council your household waste disposal service or the shop where you ...

Reviews: