background image


33


7.


Specification


MODEL


1KVA(S)


1.5KVA(S)


2KVA(S)


3KVA(S)


PHASE


Single phase with ground


Capacity (VA/Watts)


1000 VA /


1000 W


1500 VA /


1500 W


2000 VA / 

2000 W


3000 VA / 

3000W


INPUT


Nominal voltage


208/220/230/240VAC


Operating 


voltage range


(Ambient 
Temp. 
<40 °C)


Low line 
transfer


176 Vac ± 5 % @ 100 % - 50 % load;


110 Vac ± 5 % @ 50 % - 0 % load;


Low line 
comeback


186 Vac ± 5 % @ 100 % - 50 % load;


120 Vac ± 5 % @ 50 % - 0 % load;


High line 
transfer


264 Vac ± 5 % @ 100 % - 50 % load;


300 Vac ± 5 % @ 50 % - 0 % load;


High line 
comeback


254 Vac ±5 % @ 100 % - 50 % load;


290Vac ± 5 % @ 50 % - 0 % load;


Operating frequency 
range**


40 – 70 Hz


Power factor


0.99 @ 100 % load (Nominal Input Voltage)


Bypass voltage range


Bypass high voltage point


230-264

: setting the high voltage point in LCD from 

230 Vac to 264 Vac. (Default: 264 Vac)


Bypass low voltage point


170-220

: setting the low voltage point in LCD from 170 

Vac to 220 Vac. (Default: 170 Vac)


Generator input


Support


OUTPUT


Output voltage*


208/220/230/240 Vac


Power factor


1.0


Voltage regulation


±1 %


Frequency


Line Mode


(synchroni
zed range)


46-54 Hz or 56-64 Hz


Bat. Mode


(50/60±0.1) Hz


Crest factor


3:1


Harmonic distortion (THDv)


≤ 3 % THD with linear load 


≤ 5 % THD with non linear load


Summary of Contents for Digitus DN-170093

Page 1: ...ent single phase in single phase out high frequency online UPS designed by our R D team who is with years of designing experiences on UPS With excellent electrical performance perfect intelligent monitoring and network functions smart appearance complying with EMC and safety standards The UPS meets the world s advanced level Read this manual carefully before installation This manual provides techn...

Page 2: ...1 Unpack checking 5 2 2 Rear panel view 5 2 3 Installing the UPS 6 2 4 UPS startup and turn off 15 2 5 Configuring battery settings 15 2 6 Operation and display panel 16 3 Operations 19 3 1 Button operation 19 3 2 Setup the UPS 20 3 3 LCD display 21 3 4 UPS setting 23 3 5 Operational status and mode s 25 3 6 Alarm or fault reference code 26 4 Troubleshooting 27 5 Storage and Maintenance 30 6 Optio...

Page 3: ...ment The UPS system must be absolutely dry before being installed Please allow at least two hours for the UPS system to acclimate the environment Do not install the UPS system near water or in moist environments Do not install the UPS system where it would be exposed to direct sunlight or near heater Do not block ventilation holes in the UPS housing 1 3 Installation Do not connect appliances or de...

Page 4: ...eries and verify that no current is present and no hazardous voltage exists in the terminals of high capability capacitor such as BUS capacitors Only persons are adequately familiar with batteries and with the required precautionary measures may replace batteries and supervise operations Unauthorized persons must be kept well away from the batteries Caution risk of electric shock The battery circu...

Page 5: ...ecking 1 Don t lean the UPS when moving it out from the packaging 2 Check the appearance to see if the UPS is damaged or not during the transportation do not switch on the UPS if any damage found Please contact the dealer right away 3 Check the accessories according to the packing list and contact the dealer in case of missing parts It includes 1x UPS user s guide 1x UPS Quickstart Guide 1x Softwa...

Page 6: ...acle 7 Input circuit breaker 8 EPO 9 USB 10 Output receptacle 16 A 2 3 Installing the UPS Rackmount installation The UPS is supplied with 19 inch mounting brackets for installation in the server rack Mounting rails must be ordered separately part number DN 170109 The rails are adaptable for installation in 19 server racks with approx 70 76 cm 27 to 30 inch depth ...

Page 7: ... and right rails to the rear rails as shown in Figure 1 Do not tighten the screws Adjust each rail size for the depth of your rack Figure 1 Securing the rails b Select the proper size in the rack for positioning the UPS see Figure 2 The railoccupies four positions on the front and rear of the rack c Tighten four M5 Umbrella Nuts in the side of rail assembly see Figure 1 d Fix one rail assembly to ...

Page 8: ...optional cabinets into the rack l Secure the front of the UPS to the rack using one M5 12 pan head screws and one M5 cage nuts on each side see Figure 4 Install the bottom screw on each side through the bottom hole of mounting bracket and the bottom hole of the rail Repeat for any optional cabinets Figure 4 Securing the front of the cabinet m Continue to the following section Rackmount Wiring Inst...

Page 9: ... instead of the left one see Figure 5 Figure 5 Extract the UPS front cover CAUTION A small amount of arcing may occur when connecting the internal batteries This is normal and will not harm personnel Connect the cables quickly and firmly b Connect the internal battery connector see Figure 6 Connect red to red Press the connector tightly together to ensure a proper connection c If you are installin...

Page 10: ...ptional connectivity card For the communication ports usean appropriate cable f If your rack has conductors for grounding or bonding of ungrounded metal parts connect the ground cable not supplied to the groundbonding screw See Rear Covers for the location of the ground bonding screw for each model g If an emergency power off disconnect switch is required by localcodes see Remote Emergency Power o...

Page 11: ...EBP front cover See Figure 10 for the location of the EBP cable knockouts CAUTION A small amount of arcing may occur when connecting an EBP to the UPS This is normal and will not harm personnel Insert the EBP cable into the UPS battery connector quickly andfirmly e Plug the EBP cable s into the battery connector s as shown inFigure 10 Up to four EBPS may be connected to the UPS Connect black to bl...

Page 12: ...of the front cover Refer how to install the UPS h Verify that all wires connected between the UPS and EBP s are installedbehind the front covers and not accessible to users i Return to Step4 to continue the UPS installation Rackmount converted to tower installation 1 Rackmount converted to tower plasticbase installation Two plastic base brackets Flatten it after intercrossing Intercross as followi...

Page 13: ...13 Figure 12 Increase EBP plasticbase installation 2 Rackmount converted to Tower LCD Display plasticbase installation ...

Page 14: ...14 The installation between UPS and EBPS can be referred to Figure 14 Figure 14 The installation for UPS and battery boxes Figure 15 Long backup external battery connection ...

Page 15: ...ut mains power a When mains power is disconnected press and hold the ON key for more than half a second to start UPS b The operation of the UPS in the process of start is almost the same as that when mains power is in After finishing the self test the corresponding LED lights and the UPS is working in battery mode Turn off operation 1 Turn off the UPS in line mode a Press and hold the OFF key for ...

Page 16: ... each EBP contains two battery strings 2 6 Operation and display panel The operation and display panel shown in below chart is on the front panel of the inverter It includes three indicators four function keys and a LCD display indicating the operating status and input output power information LED from right to left alarm bypass battery inverter On Line UPS LCD display Function keys ...

Page 17: ...e UPS is operating normally Note When power on or startup these indicators will turn on and off sequentially Note On different operation modes these indicators will indicate differently Function Keys Function key Description ESC OFF To exit setting mode or turn off the UPS UP To go to previous selection or turn on the UPS DOWN To go to next selection ENTER ON To confirm the selection in setting mo...

Page 18: ...put frequency load percent load in VA load in Watt and discharging current Battery information Indicates battery level by 0 24 25 49 50 74 and 75 100 in battery mode and charging status in line mode In AC mode it will present battery charging status Status Battery capacity LCD displays Constant Current mode 0 24 4 bars will flash in turns 25 49 Bottom bar will be on and the other three bars will f...

Page 19: ...ld ON button for at least 2 seconds to turn on the UPS Confirm current settings When the UPS enters the setting mode must press this button to confirm the settings value what you want next press up down button to change settings information Out off bypass mode when the UPS enter to bypass mode press and hold this button it will switch to normal mode OFF ESC Turn off the UPS Press and hold this but...

Page 20: ...s For 208 220 230 240VAC models The power cord is supplied in the UPS package Step 2 UPS output connection For socket type outputs simply connect devices to the outlets For terminal type input or outputs please follow below steps for the wiring configuration a Remove the small cover of the terminal block b Suggest using AWG14 or 2 1mm2 power cords for 3KVA 208 220 230 240VAC models c Upon completi...

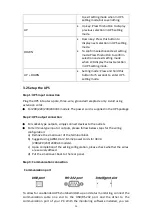
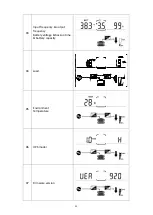
Page 21: ...wo seconds to power on the UPS Note The battery charges fully during the first five hours of normal operation Do not expect full battery run capability during this initial charge period Step 5 Install software For optimal computer system protection install UPS monitoring software to fully configure UPS shutdown You may insert provided CD into CD ROM to install the monitoring software 3 3 LCD displ...

Page 22: ...22 03 Input frequency output frequency Battery voltage backuo time battery capacity 04 Load 05 Environment Temperature 06 UPS model 07 Firmware version ...

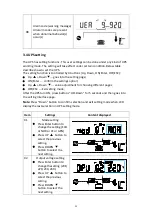
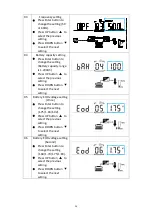
Page 23: ...tment for choosing different pages OFF ESC Exit setting mode After the UPS turn ON press buttons UP Down for 5 seconds and then goes into the setting interface page Note Press Down button to confirm selection and exit setting mode when LCD display the last selection in UPS setting mode Item Settings Content displayed 01 Mode setting Press Enter button to change the setting ECO or NOR or CF or GEN ...

Page 24: ...Ah Press UP button to select the previous setting Press DOWN button to select the next setting 05 Battery EOD voltage setting Once Press Enter button to change the setting 1 75 1 84 1 92 Press UP button to select the previous setting Press DOWN button to select the next setting 06 Battery EOD voltage setting Second Press Enter button to change the setting 1 60 1 70 1 75 1 80 Press UP button to sel...

Page 25: ...ge the setting The bypass voltage lower limit range is 170 220Vac Press UP button to select the previous setting Press DOWN button to select the next setting 09 Mute setting Press Enter button to change thesetting ON or OFF Press UP button to select the previous setting Press DOWN button to save and exit the setup 10 BYPASS enable disable setting Press Enter button to change thesetting ON or OFF P...

Page 26: ...lit 10 DC Bus Voltage Low output off Beep Continously Fault LED lit 11 DC Bus Voltage Low output off Beep Continously Fault LED lit 12 DC bus Delta line Beep Continously Fault LED lit 13 DC bus Delta on battery Beep Continously Fault LED lit 14 DC Bus soft start Fail Line Beep Continously Fault LED lit 15 DC Bus soft start Fail Line Beep Continously Fault LED lit 16 DC Bus soft start Fail Battery ...

Page 27: ...pass Overload Time Out Once per second 68 Fan Inoperative Beep Continously Fault LED lit 69 Heatsink over temp Beep Continously Fault LED lit 71 Ambient Over Temperature Once per second Fault LED lit 72 Ambient Low Temperature Once per second Fault LED lit 80 RAM Error Beep Continously Fault LED lit 86 BMS Communication Error Once per second Fault LED blinking 95 EPO ACTIVATED Beep Continously Fau...

Page 28: ... down automatically because short circuit occurs on the UPS output Check output wiring and if connected devices are in short circuit status Alarm code is shown as 68 and FAULT led light Fan fault Please check whether the fan is stuck by other objects shut down and restart ups Alarm code is shown as 21 22 23 34 48 A UPS internal fault has occurred Contact your dealer Battery backup time is shorter ...

Page 29: ...information Check UPS output voltage BUS voltage End Check sps 12V Bat voltage Replace power board Replace control panel No No Fan issue LCD issue Replace fan Replace control panel Yes Yes No Replace control panel UPS Fault no output Rfer to alarm Fault code reference No Replace power board No Yes Replace control panel No Replace control panel No Yes UPS No output Replace power board No Yes Replac...

Page 30: ... the 2 torquescrews on each side of the card Carefully insert the SNMP card and lock the screws The slot called SNMP supports the MEGAtec protocol We advise that NetAgentII 3 port is also a tool to remotely monitor and manage any UPS system NetAgentII 3 Ports support the ModemDialin PPP function to enable the remote control via the internet when the network is unavailable In addition to the featur...

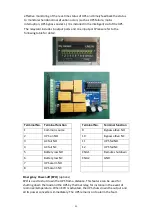
Page 31: ...o Terminal function 1 Common source 9 Bypass altive NO 2 UPS on NO 10 Bypass altive NC 3 AC fail NO 11 UPS fail NO 4 AC fail NC 12 UPS fail NC 5 Battery low NO CN4 1 Remote shutdown 6 Battery low NC CN4 2 GND 7 UPS alarm NO 8 UPS alarm NC Emergency Power off EPO options EPO is used to shut down the UPS from a distance This feature can be used for shutting down the load and the UPS by thermal relay...

Page 32: ...ort of the UPS even if the EPO function is not needed Load Segments options Load segments are sets of receptacles that can be controlled by power management software or through the display providing an orderly shutdown and startup of your equipment For example during a power outage you can keep critical equipment running while you turn off other equipment This feature allows you to save battery po...

Page 33: ... 254 Vac 5 100 50 load 290Vac 5 50 0 load Operating frequency range 40 70 Hz Power factor 0 99 100 load Nominal Input Voltage Bypass voltage range Bypass high voltage point 230 264 setting the high voltage point in LCD from 230 Vac to 264 Vac Default 264 Vac Bypass low voltage point 170 220 setting the low voltage point in LCD from 170 Vac to 220 Vac Default 170 Vac Generator input Support OUTPUT ...

Page 34: ...SYSTEM FEATURES Overload Line Mode 105 125 UPS transfer to bypass after 1minute when the utility is normal 125 130 UPS transfer to bypass after 30 seconds when the utility is normal 130 UPS transfer to bypass immediately when the utility is normal Short Circuit Hold Whole System Overheat Line Mode Switch to Bypass Backup Mode Shut down UPS immediately Low battery voltage Alarm and Switch off EPO o...

Page 35: ...capacity when the Input voltage frequency out of range 50 60 4 Hz Product specifications are subject to change without further notice This is a Class A product In home environment this product may cause radio interference In this case the user may be required to take appropriate measures Hereby Assmann Electronic GmbH declares that the Declaration of Conformity is part of the shipping content If t...

Reviews: