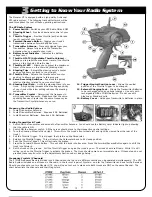
The Monster GT is equipped with a high quality 3-channel
XP3 radio system. The following transmitter terms will be
used throughout the rest of these operating instructions.
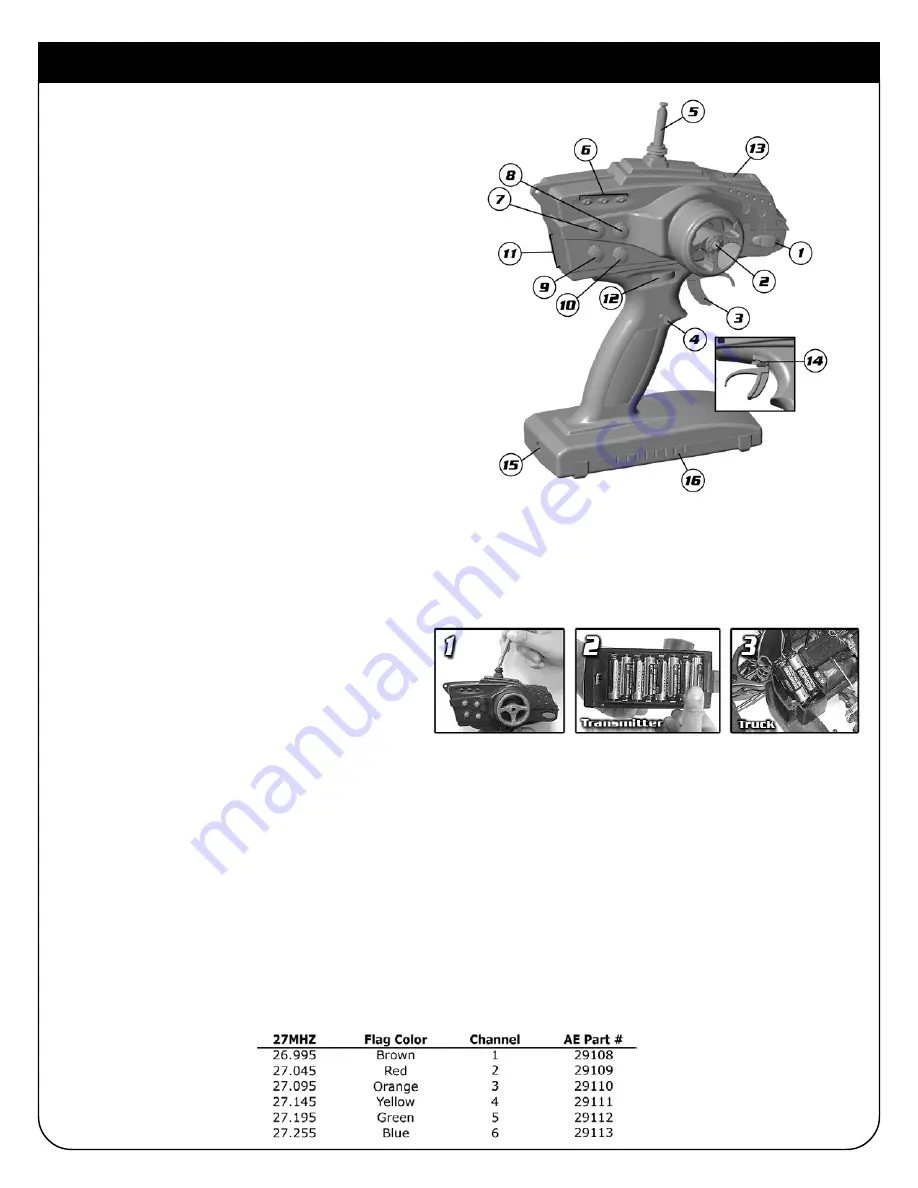
The XP Radio System
1. Power Switch
– Switches your XP3 Radio ON and OFF.
2. Steering Wheel
– Provides directional control of your
truck.
3. Throttle Trigger
– Provides throttle (pull) and brake
(push) control of your truck.
4. Forward/Reverse Button
– Toggles your truck’s
transmission between Forward and Reverse.
5. Transmitter Antenna
– Transmits signals from your
Transmitter. Always fully extend the Transmitter
Antenna when you operate your truck.
6. Battery Level Indicator
– Indicates the battery
voltage level.
7. Throttle HI ATV (Adjustable Throttle Volume)
–
Allows you to preset the maximum travel of the throttle
servo on the High side (throttle side)
8. Throttle LO ATV
– Allows you to preset the maximum
travel of the servo on the Low side (braking side).
9. Steering Trim
– Adjusts the steering servo’s center
position to allow your truck to run straight.
10. Throttle Trim
– Adjusts the throttle servo’s center
position to allow your engine to idle properly.
11. Servo Reversing Switches
– Reverses the servo’s
rotation direction relative to your control input.
12. Steering Dual Rate
– Limits the steering travel of your
truck. A high setting increases the steering sensitivity
of your truck while a low setting reduces the steering
sensitivity.
13. Transmitter Crystal
– Determines the frequency in
which your radio transmits. Make sure that the corre-
sponding Receiver Crystal has the same frequency as
the Transmitter Crystal whenever you run.
14. Trigger Neutral Position Lever
– Allows the neutral
position of the Throttle Trigger to be changed.
15. External Charging Jack
– Allows the Transmitter Batteries
to be recharged using an optional charger. Use only with
rechargeable NiCd or NiMH batteries. Do not use with
Alkaline or Standard cells.
15. Battery Cover
– Holds your Transmitter’s batteries in place.
Preparing Your Radio System
1.
Install Transmitter Antenna.
2.
Install Transmitter Batteries. Requires 8 AA Batteries.
3.
Install Receiver Batteries. Requires 4 AA Batteries.
Testing Transmitter & Truck
1.
Switch ON the Transmitter and extend the Transmitter Antenna. You should see the Battery Level Indicator light up showing
that the radio is ON.
2.
Switch ON the Receiver switch. All the servos should move to their respective neutral settings.
3.
Turn the Steering Wheel left and right. This will turn the truck’s front wheels left and right (as viewed from the rear of the
truck).
4.
Pull the Throttle Trigger. This will open the throttle on the Carburetor.
5.
Release the Throttle Trigger. This will return the Carburetor back to it’s closed position.
6.
Push the Throttle Trigger. This will activate the brakes.
7.
Press the Forward/Reverse Button. This will shift the truck into Reverse. Press the Forward/Reverse Button again to shift the
truck into Forward.
8.
Set the truck on the ground. Pull the Throttle Trigger and give the truck a push. The truck should roll freely. While it is still
rolling, push on the Throttle Trigger to activate the brakes. The truck should come to an immediate stop. If these steps do not
produce these results, refer to the Adjustments Section under Linkage Setup.
Frequency Crystals (Channels)
The 27MHZ Frequency Band is divided into 6 Channels so that up to six different vehicles can be operated simultaneously. The XP3
Radio System includes one of these six Channels, in the form of a pair of Crystals; one for the Transmitter and one for the Receiver.
Should you choose to run two Monster GT’s, you will need to check to make sure both trucks are NOT on the same Channel. The
chart below lists the channels and their flag colors.
Getting to Know Your Radio System
3
4


