background image

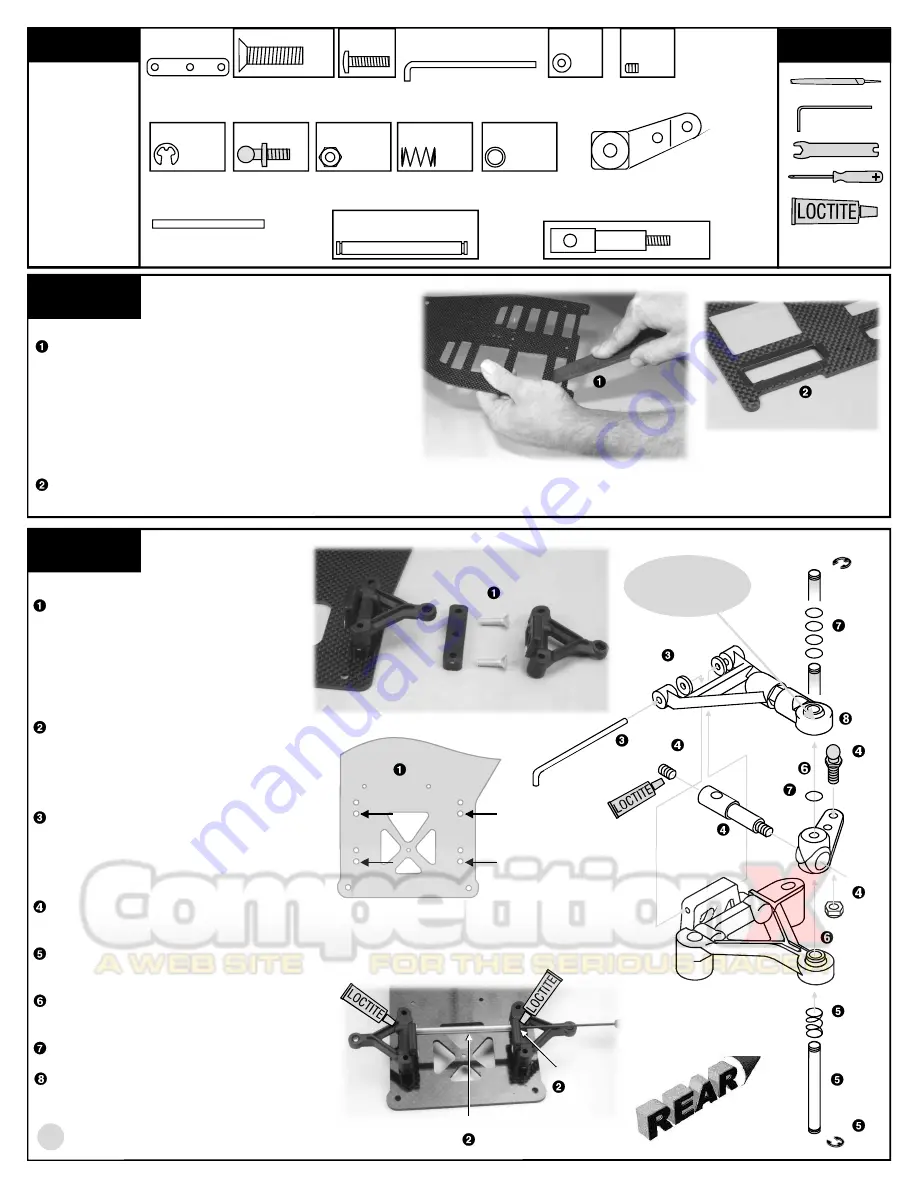
SUSPENSION ARMS TO CHASSIS

Slip the #8179 spacer between the 
suspension arm and the chassis, 

using 

the sets of holes farthest forward,

 then 

bolt on with two #8439 blue aluminum 
screws from underneath the chassis. Do 
the other side.

MOUNT THE CROSS BRACE

Mount the cross brace to the front 
suspension using two #6917 button head 
screws.

UPPER ARM TO THE SUSPENSION 
MOUNT

Assemble the upper arm assembly to the 
suspension mount as shown, using the 
#8413 hinge pin and shims.

FINAL FRONT SUSPENSION 
ASSEMBLY

Assemble the #8441 steering block as 
shown using parts #8443, 6951, 4448, 
and 4449. Install the ball end into the rear 
hole.
Place one #6299 E-clip on the bottom of 
the #8423 kingpin then slide the #8429 
spring over.
Slide the #8423 kingpin completely 
through the bottom of the suspension arm 
and up through the steering block.
Place one #8425 shim on top of the 
#8441 steering block. 
Now push the upper arm over the 
kingpin. Place four #8425 shims over the 
kingpin and secure with a #6299 E-clip.


8441, qty 2
inline steering
block

8413, qty 2
hinge pin

8179, qty 2
spacer

8439, qty 4
8-32 x 5/8
blue aluminum

6917, qty 2
4-40 x 3/8

step 3

LEFT SIDE

BAG A

REMOVE THESE 
PARTS FOR:

8018: steps 2-3

1:1

1:1

1:1

TOOLS USED

4

8413

8413

8413

8441

4449

4448

8443

6299

8423

8429

8425

6299

step 2

NOTE: The bottom of the chassis 
has the screw holes countersunk.

FILE THE CHASSIS

Use your file to bevel the slots on the top of the chassis 
so the edges won't cut through the battery cell wrap. 

WARNING! 

Graphite dust can be harmful to your 

health. File in a well ventilated area. Then wash the 
chassis with running water and dry with paper 
towels. Wash your hands afterward with cold water 
and soap. Deposit graphite filings in trash.

TAPE THE CHASSIS

Insulate the battery slots by wrapping the slots with 
electrical tape.

8413, qty 4
caster shim

6299, qty 4
E-clip

1:1

4448, qty 2
ball end
blue aluminum

1:1

4449, qty 2
4-40 locknut

1:1

8443, qty 2
inline axle

1:1

8423, qty 2
kingpin

8429, qty 2
spring, .020

1:1

8425, qty 10
kingpin shim

1:1

1:1

the side with 

the rounded corner

should face up

8403, qty 1
cross brace

8425

1/16", .050"

6917

8403

8439

8439

8179

9

1:1

6951, qty 2
set screw

6951

Summary of Contents for 8018

Page 1: ...SAVE THIS MANUAL Use with current catalog for future hassle free re ordering of parts 1998 Associated Electrics Inc ...

Page 2: ...quency radio system 2 Battery pack 6 cell 3 Battery charger we recommend a peak detection charger 4 Electronic speed control 5 R C electric motor 6 Pinion gear size to be determined by type and wind of motor you will be using 7 1 10 scale Lexan body and wing Available from Associated See your 10L catalog Wider battery placement slots Super strong all carbon graphite chassis Race proven front suspe...

Page 3: ... of each section indicates 1 Which bag to open BAG A 2 Which parts you will use for those steps Remove only the parts shown 1 1 indicates an actual size drawing place your part on top and compare it so it does not get confused with a similar part 3 Which tools you should have handy for that section 4 In some drawings the word REAR with an arrow indicates which direction is the rear of the car to h...

Page 4: ...99 E clip 8441 qty 2 inline steering block 8413 qty 2 hinge pin 8179 qty 2 spacer 8439 qty 4 8 32 x 5 8 blue aluminum 6917 qty 2 4 40 x 3 8 step 3 LEFT SIDE BAG A REMOVE THESE PARTS FOR 8018 steps 2 3 1 1 1 1 1 1 TOOLS USED 4 8413 8413 8413 8441 4449 4448 8443 6299 8423 8429 8425 6299 step 2 NOTE The bottom of the chassis has the screw holes countersunk FILE THE CHASSIS Use your file to bevel the ...

Page 5: ...T bar with two 4526 spacers two 6292 screws and two 4449 locknuts The spacer goes between the T bar and the pod plate The T bar is on top Be sure to use the set of mounting holes shown in the drawing 4536 qty 1 left rear bulkhead 4537 qty 1 motor bulkhead 8461 qty 1 lower pod plate 1 1 4526 qty 2 T bar spacer molded plastic 1 1 1 1 6292 qty 2 4 40 x 3 8 steel 050 1 16 4335 4335 4335 4335 4334 4334...

Page 6: ... bar to the chassis with the 6292 screw through the forwardmost hole of the bar Push the outside aluminum standoff through the rear hole of the nerf bar Insert the 6915 screw up through the chassis then into the rear pivot part of the T bar and screw it into the center chassis brace standoff tube Secure the outside aluminum standoffs to the chassis with two 7673 screws step 5 LEFT SIDE 6292 6915 7...

Page 7: ...F GEAR Add 6636 silicone grease to the 8282 diff gear ball holes and center hole Push the eight 6626 diff balls into the holes 897 8282 4355 897 qty 4 1 4 x 3 8 flanged bearing 4349 qty 2 ride height adjuster 1 UP 6626 qty 8 1 8 diff ball 1 1 8282 qty 1 diff gear 81 tooth 4355 qty 1 graphite axle 4185 qty 1 8 32 locknut 1 1 8213 qty 3 Belleville washer 1 1 1 1 8213 qty 1 diff thrust cone 1 1 8468 ...

Page 8: ...blue aluminum 1 1 8458 qty 1 macro shock body 6460 qty 1 shock shaft 8184 qty 1 shock antenna mount remove this part then put aside for later assembly 1 1 7230 qty 1 ball cup 1 16 6938 6938 2 5422 O I L Install the 6469 O ring over the threads of the 8458 shock body Install a 6299 E clip on either side of a 6464 1 piston Slide the assembled VC foam bobbin over the 6460 shaft and then two 5407 red ...

Page 9: ...body Fill The 6828 shock cap about halfway with oil and install onto the body Try to retain as much oil as possible during assembly The shaft will extend out as you tighten the cap down 5422 qty 1 30 wt silicone oil 6428 qty 1 shock cap 9 MOUNT THE SHOCK Pick up the small bushing you had removed from the antenna shock mount and insert it into the shock cap Install the shock cap and bushing into th...

Page 10: ... assembly tool to push all the parts down into the body until the clip snaps into the groove When you remove the tool the shaft will push out somewhat if everything snapped into place correctly Make sure the clip snaps into the groove completely step 9 step 10 4473 4473 4473 4473 1 1 1 1 1 1 1 1 1 1 1 1 1 1 1 1 1 1 VCS MICRO SHOCK Team Associated s VCSTM Volume Compensating System Micro Shock was ...

Page 11: ...ith the 6951 set screw Pop the 6274 ball cups on the ball ends of your kit Turn the spring adjusting nut to adjust spring tension Remove the assembly tool and screw on the ball cup where shown Screw the 4473 spring adjusting nut onto the shock body threads flange first as shown To remove the parts from inside the shock first loosen the 6951 set screw of the 4474 shock shaft end then slide off the ...

Page 12: ...902 qty 4 3 16 x 5 16 flanged ball bearing chassis 8166 6924 MOUNTING FRONT TIRES Put a 6902 flanged ball bearing into each side of the 8146 front wheels Slide the wheel on and secure it with a 6222 nut Install the other wheel the same way 6924 qty 8 4 40 x 3 8 8166 qty 2 rear wheel tire 8146 qty 2 front wheel tire SIDE VIEW SHOWN SIDE VIEW SHOWN TOP VIEW SHOWN TOP VIEW SHOWN 3 32 BAG E REMOVE THE...

Page 13: ...5 blue aluminum screws and four 7337 4 washers 4145 blue aluminum 7337 8445 4448 8445 8445 6934 ASSEMBLING THE SERVO SAVER Thread two 4448 ball ends into the front side of the 8445 servo saver Secure the ball ends with the 4449 locknuts MOUNTING THE SERVO ASSEMBLY Mount the servo saver to the servo with the 8445 screw Note If you have a metal gear servo use the stock mounting screw Mount the servo...

Page 14: ... locknuts on top FRONT BODY MOUNT POSTS Tighten the 8304 body posts to the bumper where the two gray arrows indicate with two 6942 blue screws from underneath Cut and trim the foam bumper with a sanding block to fit the body of your choice and slide it over the two body mounts Add 6332 body clips to the front posts and the rear 6274 6274 2 40 6274 qty 4 ball cup 14 1405 qty 2 blue titanium steerin...

Page 15: ...ERY BATTERY SPEED CONTROL MOTOR _ _ ELECTRICAL INSTALLATION Solder your single cell batteries together with battery braid or battery bars Solder plus to minus Hold the batteries to the chassis with strapping tape Wrap the tape over the batteries through the chassis slot underneath the chassis and up again through another slot several times Cut the 6726 servo tape to fit the bottom of the speed con...

Reviews: