8846, qty 1 ea.
spring preload
spacers, 1/4, 1/16
FINAL SHOCK ASSEMBLY
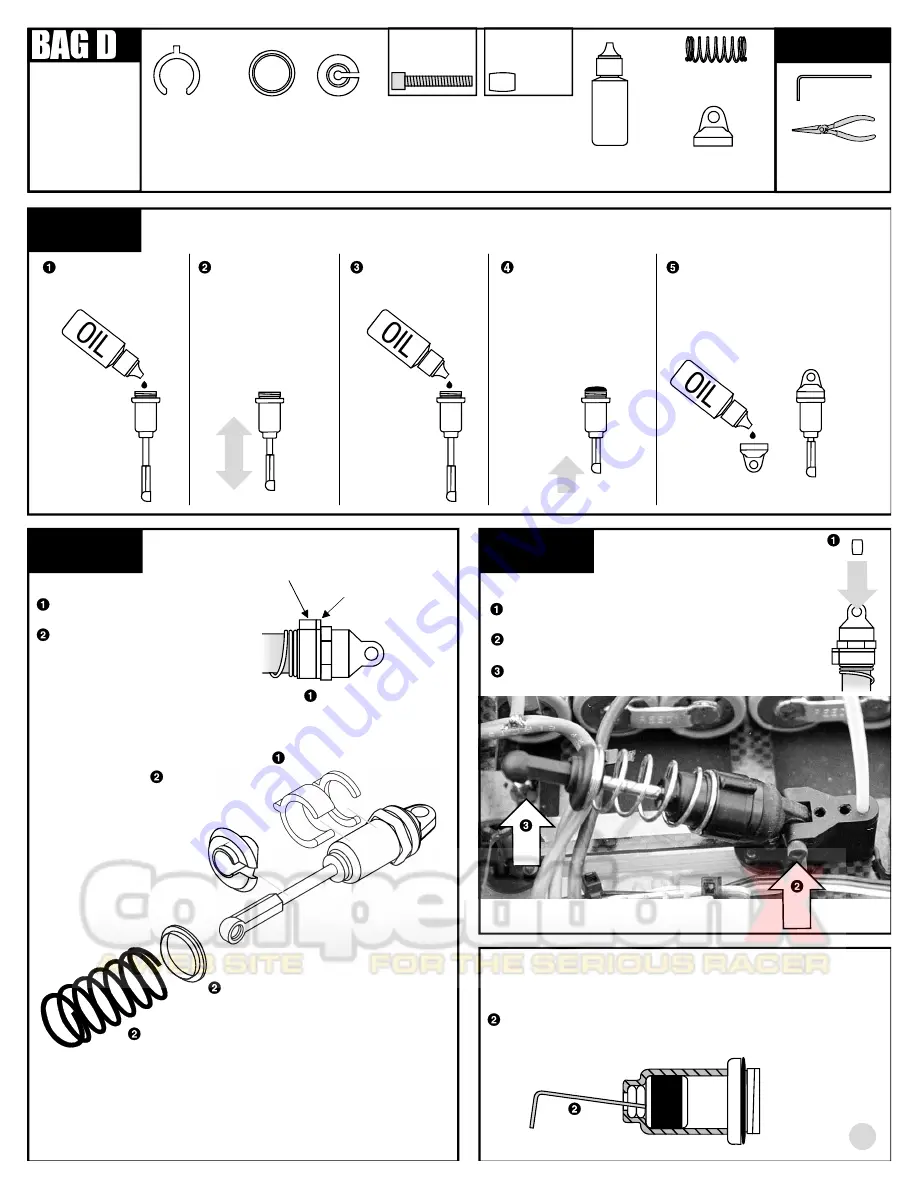
Slide the 1/16 and 1/4 preload
spacers onto the body.
Slide on the spring collar, then
spring, then compress the
spring to add the spring cup.
REMOVE THESE
PARTS FOR:
8018: steps 5-7
6474
spring collar
6474
spring cup
6474, qty 1
spring collar
6474, qty 1
spring cup
(install after spring)
6428
step 6
TOOLS USED
step 5
6496, qty 1
spring, silver
6496
3/32"
Holding the shock
upright, fill with oil
to the top of the body.
Slowly move the
shaft up and down
several times to
allow air bubbles
to escape to the top.
Refill with oil to the
top of the body.
Push the shaft up until
the piston is level with
the top of the body.
The oil will bulge up
above the shock body.
Fill The #6828 shock cap about
halfway with oil and install onto
the body. Try to retain as much
oil as possible during assembly.
The shaft will extend out as you
tighten the cap down.
5422, qty 1
30 wt
silicone oil
6428, qty 1
shock cap
9
MOUNT THE SHOCK
Pick up the small bushing you had removed from the
antenna/shock mount and insert it into the shock cap.
Install the shock cap and bushing into the antenna mount
and secure using a #7801 screw.
Snap the rear of the shock onto the ball end as shown.
step 7
8184
PHOTO DEPICTS FULLY-ASSEMBLED KIT
7801, qty 1
4-40 x 5/8
blue aluminum
1:1
8184, qty 1
shock cap
bushing
1:1
8846, 1/16 and 1/4"
1/16" preload spacer
1/4" preload spacer
DISASSEMBLY
To take out the VC foam/bobbin, unscrew the ball cup and
shock cap, and push the shock shaft out.
Push your Allen wrench tip into the shock bottom and push
the bobbin out, as shown. The O-rings should just fall out
by themselves.
1


