background image

28 

Premmia GL Series


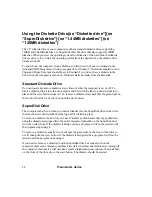
Using the Diskette Drive{xe “Diskette drive”}{xe 
“SuperDisk drive”}{xe “1.44MB diskettes”}{xe 
“120MB diskettes”} 

The 3.5” diskette drive in your computer is either a standard diskette drive, supporting 

720KB and 1.44MB diskettes or a SuperDisk (LS-120) drive that also supports 120MB 

diskettes. When you start the operating system from diskette or the hard disk, the diskette 

drive is drive A; if you start the operating system from the optical drive, the diskette drive 

becomes drive B. 
To start (boot) the computer from a diskette, you first need to check two settings in the 

Advanced CMOS Setup

 menu in Setup (see page 68 for details); 

1

st

 Boot Device

 should be set to 

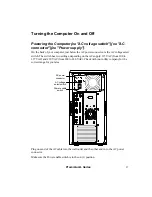
Floppy

 and 

Floppy Drive Seek

 should be set to 

Enabled

. If you do not have a diskette in the 

drive when the computer is turned on, Windows starts normally from the hard disk. 

Standard Diskette Drive 

You can insert and remove diskettes at any time, whether the computer is on or off. To 

insert a diskette, slide it into the drive shutter end first with the label up until it clicks into 

place and the eject button sticks out. To remove a diskette, first check that the green light on 

the front of the drive is not lit, then push the eject button. 

SuperDisk Drive 

The computer must be on when you insert a diskette into the SuperDisk drive; slide it into 

the drive shutter end first with the label up until it clicks into place. 
To remove a diskette, the best way is to use Windows as this ensures that any applications 

using the diskette are stopped first. Open 

My Computer

, right-click on the SuperDisk drive 

icon, then select 

Eject

. If the diskette is being used by a program, it will not be ejected until 

the program stops using it. 
To remove a diskette manually, first check that the green light on the front of the drive is 

not lit, then push the eject button. If the diskette is being used by a program, it will not be 

ejected until the program stops using it. 
If you need to remove a diskette from the SuperDisk drive but cannot turn on the 

computer, there is an emergency method. First wait for at least one minute after turning off 

the computer, then insert a stiff wire like a small, straightened paper clip into the small hole 

on the front of the drive above the eject button. The diskette should be ejected. 

Summary of Contents for PREMMIA GL Series

Page 1: ...Operator s Guide ...

Page 2: ...his guide and AST cannot be responsible for any inaccuracies or omissions Copyright 1999 AST Computers LLC Reproduction of this document or any parts of it without prior written approval is prohibited Acknowledgments AST is a registered trademark of AST Computers LLC Intel Pentium and Celeron are registered trademarks of Intel Corporation Other trademarks used in this manual are the property of th...

Page 3: ...Premmia GL Series 3 As an ENERGY STAR Partner AST Computer has determined that this product meets the ENERGY STAR guidelines for energy efficiency ...

Page 4: ...rical power supply Make sure the outlet is easily accessible 5 Unplug the computer from the wall outlet and refer servicing to qualified service personnel under the following conditions A When the power cord is damaged B If liquid has entered the computer C If the computer does not operate normally when the operating instructions are followed Adjust only those controls that are covered by the oper...

Page 5: ...rd or Mouse to Turn On the Computer 18 Using the Network to Turn On the Computer 19 Using the Modem to Turn On the Computer 19 Turning Off the Computer 20 Restarting the Computer 20 Shutting Down the Computer 21 Turning Off the Computer Manually 22 Power Management 23 ENERGY STAR ACPI and APM 23 Controlling Power Management 25 Windows Power Management 25 The Computer s Power Management 26 Using Au...

Page 6: ...Drive 39 Changing Your Computer 40 Before You Begin 40 Getting Inside the Computer 41 Removing the Front Bezel 41 Replacing the Front Bezel 41 Removing the System Cover 42 Replacing the System Cover 42 Motherboard Layout 43 Adding Memory 45 Removing a Memory Module 45 Installing a Memory Module 46 Changing Drives 47 Changing Drives in the 3 5 Drive Bays 48 Removing a 3 5 Drive 49 Installing a 3 5 ...

Page 7: ...t Hard Drives 65 Exiting Setup 65 Standard CMOS Setup Menu 66 Advanced CMOS Setup Menu 68 Advanced Chipset Setup Menu 69 Power Management Setup Menu 70 PCI Plug and Play Setup Menu 72 Peripheral Setup Menu 73 Startup Error Messages and Beep Codes 75 Start Up Error Messages 75 Start Up Beep Codes 77 Modem AT Commands 79 Basic AT Commands 79 Extended AT Commands 81 MNP v 42 and v 42bis AT Commands 8...

Page 8: ...email programs Getting the most out of your computer requires a good understanding of how the features of the computer work with the operating system and with applications You should spend a few moments to review this user guide to get an idea of what your computer can do as well as checking out the operating system and applications manuals to see how they work together The next few pages gives yo...

Page 9: ...py diskette t See Diskette drive xe CD ROM drive xe DVD drive xe CDR W drive xe Optical drive xe Reset button xe Front panel xe Drive bays xe Hard disk drive LED xe Device bays xe Suspend mode xe Power LED xe Power button xe LS 120 drive t See SuperDisk drive xe Zip drive ...

Page 10: ...10 Premmia GL Series A B C D G F E A B 5 25 device bays These bays may contain one or more optical drive CD ROM DVD or CD RW drive See page 31 for more details on optical drives and page 47 ...

Page 11: ...re see page 39 for more details on using a Zip drive See page 47 for details on installing a drive here E Power button Use this to turn the computer on turn it off and put it into power saving Standby mode see page 22 for more details F Power LED Lights when the computer is turned on flashes when the computer is in power saving Suspend mode G Hard drive LED Lights when the hard disk is being acces...

Page 12: ...tor xe PS 2 xe Mouse xe Keyboard xe USB xe Serial ports xe Parallel port xe Printer port xe Video port xe Graphics port xe Game port xe Audio xe Microphone xe Speaker port xe Option cards xe MIDI port xe Padlock xe Security Padlock xe MIDI port xe Modem xe Network card XE LAN card ...

Page 13: ...Premmia GL Series 13 B D E F G H I J K L M N P R A C Q O ...

Page 14: ...r more details J Video blue Connect your monitor here see page 38 for more details K Audio output lime Connect your speakers here see page 27 for more details L Audio input light blue Connect external audio sources such as a radio or VCR here see page 27 for more details M Microphone input pink Connect an external microphone here see page 27 for more details N MIDI Game port gold This port can be ...

Page 15: ...of injury If you do experience pain tenderness swelling burning cramping throbbing weakness soreness tingling and or numbness anywhere in your body please contact a doctor If you do have to work on your computer for long periods of time make sure you vary your tasks throughout the day and take frequent breaks get up and stretch walk around Arrange Your Work Environment Arrange your work environmen...

Page 16: ...wrists hands or fingers sideways if you have to press a hard to reach key move your entire arm Keep your shoulders arms wrists and hands relaxed Type gently don t bang the keys Viewing the Monitor Use the following guidelines to reduce eye shoulder and neck stress Position the screen so that it is at 90 to windows ceiling lights or other light sources Adjust the brightness and contrast to enhance ...

Page 17: ...lect switch The switch has two settings depending on the AC supply 115 VAC from 100 to 127 VAC and 230 VAC from 200 to 240 VAC Check with your utility company for the correct range for your area AC voltage select switch Power enable switch AC power connector Plug one end of the AC cable into the wall outlet and the other end in to the AC power connector Make sure the Power enable switch is in the ...

Page 18: ...the computer by pressing the Power button on the front panel by pressing a key or entering a password on the keyboard by pressing a mouse button using an optional network or modem card When the computer is turned on the green power LED on the front panel lights and the computer runs a series of Power On Self Tests or POST to make sure everything is OK After that the operating system is started xe ...

Page 19: ...43 for more details Resume on LAN Header in the Power Management menu of Setup must be enabled see page 70 for more details If you ordered your computer with an Ethernet card installed it is set up to support Wake on LAN Using the Modem to Turn On the Computer Your computer supports the Wake On Ring standard that allows it to wake up when an installed modem receives a phone call To use Wake on Rin...

Page 20: ...plications then restarts the computer It is very important to always try to restart Windows this way if you don t you risk damaging the files in use at the time and you may not be able to start Windows again If you do restart the computer without using the Restart feature the next time you turn it on you ll see some warning messages and Windows will want to start a program called ScanDisk to make ...

Page 21: ...mputer It is very important to always close Windows this way if you don t you risk damaging the files in use at the time and you may not be able to start Windows again If you do turn the computer off without shutting Windows down in this way the next time you turn it on you ll see some warning messages and Windows will want to start a program called ScanDisk to make sure there s nothing wrong with...

Page 22: ...run correctly To turn the computer off manually first wait until the hard disk LED on the front of the computer goes out then use the Power button on the front panel to turn off the computer The Power button can work in two different ways depending the Power Button Mode setting in the Power Management menu of Setup see page 70 for more details If Power Button Mode is set to Instant Off as soon as ...

Page 23: ...d with computers is wasted because they are often kept on while not in use We have followed the US government s Environmental Protection Agency s guidelines to ensure your computer meets the power usage guidelines in their ENERGY STAR program ENERGY STAR computers save you money in electricity bills may actually last longer than conventional products because they spend a large portion of time in a...

Page 24: ...one rings it should pick up the call Most of this happens without you doing anything but it is important that when you use your computer with other devices such as a modem or a printer that these devices are also ACPI compliant check with the manufacturer or in the user guide The Advanced Power Management APM specifications are older less comprehensive requirements for power management your comput...

Page 25: ...perties window that is displayed lets you set separate time outs for System standby the hard drive and the monitor If the computer is inactive for the time set here Windows puts the System into Standby mode or tells the hard drive or monitor to go into a low power mode You can also put the computer into Standby mode using the Shut Down option on the Start menu When the computer is in Standby mode ...

Page 26: ... been inactive for the time set in Setup see page 70 In Suspend mode all of the devices in the computer are put into low power states and a signal is sent to the monitor to put it into a low power state The computer wakes up from Suspend mode when you press a key on the keyboard or move the mouse an installed modem receives a call see page 19 for more details an installed network card receives a W...

Page 27: ...ys Windows has its own volume control double click on the speaker icon in the lower right corner to display it You ll see that there is a master volume control as well as individual controls for each input device the CD drive microphone etc There may also be a volume control in the applications you re using games usually have their own settings for audio volume The external speakers also have thei...

Page 28: ...til it clicks into place and the eject button sticks out To remove a diskette first check that the green light on the front of the drive is not lit then push the eject button SuperDisk Drive The computer must be on when you insert a diskette into the SuperDisk drive slide it into the drive shutter end first with the label up until it clicks into place To remove a diskette the best way is to use Wi...

Page 29: ...MIDI port xe Game port xe Joystick xe USB There are two ways to connect a joystick to your computer via the USB port USB joysticks can be connected and disconnected without turning off the computer and are automatically configured via the gold MIDI Game port on the back of the computer see page 12 for the location of the port If you use this port the joystick must be connected before the computer ...

Page 30: ...53kbps due to excessive power demands at higher speeds data modem connections up to 33 6kbps with error correction v 42 MNP 2 4 and data compression v 42bis MNP5 video phone connections using the v 80 standard digital simultaneous voice and data DSVD connections over a single telephone line using the v 70 standard up to 14 4kbps fax transmission and reception With the modem installed there are two...

Page 31: ...or maintaining a PC for example reviewing system and configuration information about DMI SMBIOS compliant hardware components backing up and restoring system files troubleshooting system errors Wake on LAN support that allows your network administrator to remotely start your computer for maintenance Using the Optical Drive xe Optical drive xe CD ROM drive xe DVD drive xe CDR W drive xe Music CDs x...

Page 32: ...ia GL Series DVD ROM disks can hold up to 18GB of data and are also read only Most DVD disks contain movies or instructional videos the video and audio data on DVD disks is compressed using the MPEG 2 standard ...

Page 33: ...ette or hard disk so that files and folders can be dragged from any source to the drive letter of the disk Files can even be saved directly from an application to this kind of disk since it behaves just like a diskette or hard disk When your computer was set up in the factory the optical drive is drive D To start boot the computer from a bootable CD in the optical drive you first need to check the...

Page 34: ...modes in which the parallel port can work standard bi directional extended capabilities port ECP and enhanced parallel port EPP Older printers use standard unidirectional mode but newer ones support bi directional and ECP modes Parallel port scanners can work in bi directional mode but are faster in ECP and EPP modes Most storage devices require bi directional mode but can also work in ECP or EPP ...

Page 35: ...ted When a Supervisor password is set up you can also set up a User password that you can require before the operating system is started However the User password cannot be used to enter Setup The password can be up to six characters long It is case sensitive so make sure you note the Caps Lock setting before setting a password To set a password 1 Turn on the computer and press Delete to run Setup...

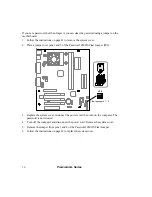
Page 36: ...r over pins 1 and 2 of the Password CMOS Clear Jumper JP9 JP9 Clear password 1 2 2 3 Replace the system cover reconnect the power cord then turn on the computer The password is now cleared 4 Turn off the computer and disconnect the power cord Remove the system cover 5 Remove the jumper from pins 1 and 2 of the Password CMOS Clear Jumper 6 Follow the instructions on page 42 to replace the system co...

Page 37: ... most serial devices such as mice and external modems to the serial port on the back panel Serial devices must be connected and disconnected when the computer is turned off in order to work correctly If you connect the device with the computer turned on you may damage both the computer and the device Once the device is connected and turned on you ll probably need to run a Setup program refer to th...

Page 38: ...onnector and you can connect USB devices with the computer on or off The first time you connect a device you may have to load some software but after that the device is configured automatically Using the Video Controller xe Video controller xe VGA card xe ATi video card Your computer uses a built in graphics controller with integrated full 2D hardware acceleration 3D hyper pipelined architecture a...

Page 39: ...s OFF No cartridge inserted Cartridge inserted but not spinning Cartridge inserted and spinning but media not being accessed Fast Blink Drive spinning up or down Irregular Blink Media being accessed Format in progress Slow Blink Drive or cartridge malfunction The best way to eject a cartridge is to use Windows as this ensures that the cartridge is not being used before removing it In My Computer r...

Page 40: ...age and current levels are present inside the computer Do not operate the computer with the cover removed always replace the cover before turning on the system Electrostatic discharge ESD can damage disk drives option cards or other system components You should use an anti static wrist strap attached to a ground when working inside the system Place system components or option cards on a conductive...

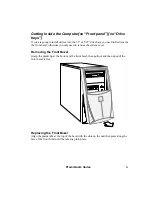
Page 41: ... front bezel otherwise you only need to remove the system cover Removing the Front Bezel Grasp the plastic lip at the bottom of the front bezel then pull out and then up until the front bezel is free Replacing the Front Bezel Align the plastic tabs at the top of the bezel with the slots on the unit then press along the face of the front bezel until the tabs snap into place ...

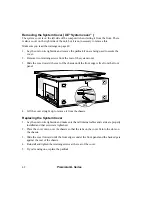
Page 42: ...over toward the rear of the chassis until the front edge is free from the front panel Tab Slot 4 Lift the cover straight up to remove it from the chassis Replacing the System Cover 1 Lay the unit on its right side and make sure that all internal cables and cards are properly installed and that screws are tightened 2 Place the cover down over the chassis so that the tabs on the cover fit into the s...

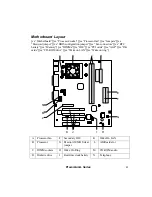
Page 43: ...onnectors xe RTC battery xe Memory xe DIMMs xe IDE xe PCI cards xe AGP xe ISA cards xe CD ROM drive xe Wake on LAN xe Wake on ring B A H I J K N M L D E F G C A Processor fan F Secondary IDE K Wake On LAN B Processor G Password CMOS clear jumper L AMR card slot C DIMM sockets H Wake On Ring M CD ROM audio D Diskette drive I Real time clock battery N Telephony ...

Page 44: ...44 Premmia GL Series E Primary IDE J PCI card slots ...

Page 45: ...z or faster unbuffered SDRAM modules with 32 64 128 or 256MB of memory The DIMM modules must be gold plated with 168 pins and use 3 3V Removing a Memory Module 1 Follow the instructions on page 41 to remove the system cover 2 If you unplug some of the cables that are attached to the motherboard and drives in order to get to the DIMM sockets label the cables so that you will be able to reinstall th...

Page 46: ...hat you will be able to reinstall them later 3 Holding the new DIMM only by the edges remove it from its anti static package 4 Align the notches in the bottom edge of the DIMM with the notches in the DIMM socket then insert the bottom edge of the DIMM into the socket making sure that it is seated firmly The retaining clips should snap into place 5 Reconnect any cables you had to unplug 6 Follow th...

Page 47: ...ower bay B is available for you to install your own drive The upper two 3 5 drive bays can be accessed from outside of the computer via openings in the front bezel The upper bay labeled C contains the diskette or SuperDisk drive the middle bay D will contain a Zip drive if you ordered one the lower bay E is not accessible from outside the computer and contains the hard disk You can change the inst...

Page 48: ...wo IDE drives to the same cable you need to make sure that one drive is configured as an IDE master and other as an IDE slave In general the hard disk that contains the operating system should be the master Slave and master are usually set by jumpers on the drive refer to the information that came with the drive for details The power supply in your computer has four power cables for drives three l...

Page 49: ...cables to assist you in reinstalling them later Data cables Power cables 3 The 3 5 drive mounting bracket is secured inside the computer with a screw that goes into the 5 25 mounting bracket Remove and save the screw 4 Slide the 3 5 drive mounting bracket toward the back of the unit until it disengages from the 5 25 drive mounting bracket Lift the mounting bracket out of the unit and lay it on one...

Page 50: ...t any drive jumpers or switches according to the manufacturer s instructions 4 With the connectors on the drive to the rear slide the drive into the front of the 3 5 mounting bracket If you are installing a hard drive this slides in from the back of the bracket Line up the holes on the bracket with the screw holes on the drive 5 Insert and tighten two screws on each side of the drive 6 If you are ...

Page 51: ...bracket 11 Follow the instructions on page 42 to replace the system cover Changing Drives in the 5 25 Drive Bays CAUTION While performing the following procedure be careful not to scrape the drive cables or the mounting bracket against the motherboard and any cards that are attached to it Removing a 5 25 Drive 1 Follow the instructions on page 41 to remove the front bezel 2 Follow the instructions...

Page 52: ...he computer 6 Remove and save the slide rail from the right side of the drive 7 If the device is a 3 5 device mounted in a 5 25 carrier remove the screws that hold the drive in place in the carrier Slide the drive from the carrier 8 Place the drive in an anti static wrapper 9 Follow the instructions on page 42 to replace the system cover 10 Follow the instructions on page 41 to replace the front b...

Page 53: ...the slide rail from the drive you removed If you are installing a drive in a bay that was empty use one of the slide rails included with your computer 7 If you are installing the drive into a bay that was empty you may need to remove the EMI filler on the front panel of the cabinet and the plastic bezel insert on the front bezel 8 Align the slide rail with the slots in the side of the bay then sli...

Page 54: ... ISA cards The motherboard in your computer has connectors for two types of option cards one Audio Modem Riser AMR card connector labeled AMR below three PCI card connectors PCI1 through 3 AMR PCI 1 PCI 2 PCI 3 If you ordered a modem with your computer it may be installed in the AMR connector or in one of the PCI slots If you ordered your computer with a network card it will be installed in one of...

Page 55: ...proper cooling Option cards can be extremely sensitive to ESD Electrostatic Discharge and always require careful handling Hold the card by the edges only and do not touch the electronic components or gold edge connectors After removing a card from its protective wrapper or from the system place it flat on a grounded static free surface component side up Do not slide the card across any surface You...

Page 56: ...em cover reconnect the power cord then turn on the computer The CMOS and PCI configuration data is now cleared 4 Turn off the computer and disconnect the power cord Remove the system cover 5 Remove the jumper from pins 2 and 3 of the Password CMOS Clear Jumper 6 Follow the instructions on page 42 to replace the system cover 7 Now install the PCI cards one at a time making sure everything is workin...

Page 57: ...slot cover retaining clip until it is clear of the expansion slots 4 Slide the slot cover away from the card rack and lift it out Save the slot cover in case you need to remove the card Retaining clip closed 5 Remove the option card from its wrapper and place it on a grounded static free surface component side up 6 Set any card jumpers or switches according to the manufacturer s instructions ...

Page 58: ... that the card s connectors line up through the open slot at the back of the cabinet 9 Rotate the slot cover retaining clip back to its normal position 10 Secure the retaining clip by reinstalling the retaining clip screw 11 Connect cables if needed to the installed card 12 Follow the instructions on page 42 to replace the system cover ...

Page 59: ... it is clear of the expansion slots 5 Hold the card at each end and gently rock it back and forth until the edge connectors pull free Be careful not to scrape the card against other components 6 Store the card in an anti static protective wrapper 7 Install an expansion slot cover over the vacant opening in the back panel 8 Rotate the slot retaining clip back to its original position and reinstall ...

Page 60: ... 128KB of on chip Level 2 cache memory The processor connects to the rest of the computer via a system or front side bus that runs at 66 or 100MHz Removing the Processor WARNING The processor module and heatsink will be hot if the computer has been running To avoid personal injury wait at least 10 minutes for the module and heatsink to cool after turning off the computer 1 Follow the instructions ...

Page 61: ... Heatsink fan Heatsink Retention Clip front end Plastic tab Socket lever Processor 4 Push the processor socket lever down slightly and then out and then rotate it up to the vertical open position 5 Lift the heatsink and processor assembly straight up and out of the computer Be careful not to touch or bend the pins on the underside of the processor 6 Separate the heatsink and fan assembly from the ...

Page 62: ...emove any old thermal tape still on the heatsink and apply new thermal tape to the top of the processor 6 With the extended lip of the heatsink toward the back of the socket center the heatsink fan assembly over the processor and lower it The edges of the heatsink extend beyond the edges of the processor and socket 7 Take care in this step to not scrape the motherboard or components with the reten...

Page 63: ... lifetime of five years When the battery reaches the end of its life the settings in the RTC memory may be lost and the date and time may become incorrect Replacing a battery with an incorrect type can cause an explosion the replacement battery must be a Sony CR2032 battery or equivalent this is a 3V Lithium Ion coin cell battery WARNING Do not expose batteries to excessive heat or fire Keep all b...

Page 64: ...tery 3 Remove the battery from its socket taking care to note the orientation of the and signs on it 4 Position the new battery in the socket so that its and signs are in the same orientation as the previous battery s 5 Press the new battery securely into the socket 6 Follow the instructions on page 42 to replace the system cover ...

Page 65: ... default values that give maximum system stability If you are having configuration problems choose Fail Safe Settings then change each setting individually for better performance checking each time that it does not affect stability In the following tables describing the Setup menus shows the default setting when it is the same for both auto configuration selections O shows the optimal settings def...

Page 66: ...d diskette drive set the correct type here xe diskette Pri Master Pri Slave Sec Master Sec Slave Auto CDROM FLOPTICAL Not Installed 1 46 User If you have run Auto Detect Hard Drives the detected values are displayed here Auto automatically detects the installed IDE drives each time the computer starts CDROM is also used for DVD and CD RW drives FLOPTICAL is used for Zip and SuperDisk drives When s...

Page 67: ...to 0 4 The higher the PIO mode the better the performance but only if the drive supports the mode 32Bit Mode On Off 32 bit data transfers improve performance but may cause instability Boot Sector Virus Protection Disabled Enabled When enabled this prevents the boot sector of the hard disk from being changed if you re format the hard disk set this to Disabled default setting O optimal default setti...

Page 68: ...ices are installed BootUp Num Lock On Off Sets the status of the NumLock key when the computer is turned on Floppy Drive Swap Disabled Enabled If you have two diskette drives installed this allows you to swap the drive letters Floppy Drive Seek Disabled Enabled If this is enabled the computer checks the diskette drive for a bootable diskette each time it is turned on Disabling this ignores the dis...

Page 69: ...setting Advanced Chipset Setup Menu xe Serial ports xe COM ports xe COM2 xe I O address xe Interrupts xe Parallel port xe Printer port t See Parallel port xe USB xe Bi directional xe ECP xe EPP xe Audio Feature Options Description USB Keyboard Legacy Support Disabled Enabled Controls support for older USB keyboards Display Cache Window Size 64MB 32MB Unless you install a different video card that ...

Page 70: ...e Suspend Time Out Minute Disabled 1 2 4 8 10 20 30 40 50 60 Sets the period of system inactivity before the computer enters Suspend mode Keyboard PS 2 Mouse Access Monitor Ignore When set to Monitor pressing a key or moving the mouse wakes the computer from Suspend mode FDC LPT COM Ports Access Monitor Ignore When set to Monitor using the diskette drive or a signal from a parallel or serial port ...

Page 71: ...he computer does when power is restored Resume On Ring Header Enabled Disabled Enable this to wake up the computer when the modem receives a call Resume on LAN Header Enabled Disabled Enable this to allow a network administrator to wake up the computer remotely PCI Slot PME Function Support Enabled Disabled If you install a PCI option card that requires this you can enable the function Otherwise l...

Page 72: ...ter OnBoard VGA Add on VGA Select Onboard VGA to use the built in video controller select Add on VGA if you have installed a PCI video card PCI VGA Palette Snoop Disabled Enabled Enable this if you install a PCI video card that requires it Allocate IRQ to PCI VGA Yes No If you install a PCI video card set this to Yes DMA Channel 0 1 3 5 6 7 PnP ISA EISA Leave these set to PnP IRQ3 4 5 7 9 10 11 14...

Page 73: ...d Primary Secondary Controls the built in IDE drive controller OnBoard FDC Auto Enabled Disabled Controls the built in diskette drive controller OnBoard Serial Port A Auto 3F8 COM1 2F8 COM2 3E8 COM3 2E8 COM4 Disabled Controls the built in serial port Onboard Parallel Port Auto 378 278 3BC Disabled Controls the built in parallel port Parallel Port Mode Normal Bi Dir EPP ECP Specifies the parallel p...

Page 74: ...game port when it is used to connect to a joystick Keyboard PowerOn Function Disabled Any Key Specific Key Selecting Any Key lets you press any key to turn on the computer Specific Key means that a password must be entered before the computer will turn on Specific Key for PowerOn N A Password When Keyboard PowerOn is set to Specific Key use this to set the PowerOn password Mouse PowerOn Function D...

Page 75: ...There is a problem with the keyboard controller If the keyboard is OK and correctly connected contact technical support Address Line Short Error in the address decoding circuitry on the motherboard Contact technical support C or D Drive Error C or D Drive Failure Make sure the hard disk is installed correctly and recognized correctly in Setup If it is contact technical support Cache Memory Bad Do ...

Page 76: ...correctly page 50 and is listed correctly in Setup pages 50 and 73 If the problem continues contact technical support HDD Controller Failure Make sure the hard disk is installed properly page 50 and that it is correctly identified in Setup page 66 If the problem continues contact technical support INTR 1 or 2 Error The motherboard may need to be replaced Contact technical support Invalid Boot Disk...

Page 77: ...emory failure Reseat or replace the memory modules page 46 4 Timer not operational Contact technical support 5 Processor error Make sure the processor is installed correctly page 62 6 8042 gate A20 failure Make sure the keyboard is connected correctly 7 Processor exception interrupt error Make sure the processor is installed correctly page 62 8 Display memory read write failure If you are using th...

Page 78: ...ing Make sure the power cord is connected correctly and the wall outlet has power Make sure the processor and other components on the motherboard are installed correctly Remove all option cards If the system then starts install the cards one at a time checking the system after each to determine which card is causing the problem ...

Page 79: ...h tone dialing M2 Turns speaker on during handshaking and receiving carrier off afterwards DW Wait for a second dial tone M3 Turn speaker off during handshaking and receiving carrier on afterwards D pause N0 Turn automode detection off D Wait for 5 seconds of silence N1 Turn automode detection on D flash O0 Go on line D Return to Command Mode after dialing O1 Go on line and initiate training D Bon...

Page 80: ... OK CONNECT RING NO CARRIER NO ANSWER CONNECT xxx BUSY and ERROR W2 Report DTE speed in EC mode X4 Report all call progress result codes OK CONNECT RING NO CARRIER NO ANSWER CONNECT xxx BUSY No DIAL TONE and ERROR X0 Report basic call progress result codes OK CONNECT RING NO CARRIER NO ANSWER and ERROR Y0 Modem does not send or respond to break signals X1 Report basic call progress result codes an...

Page 81: ...store factory configuration n T3 Initiate local digital loopback test G0 Disable guard tone V Display current configurations G1 Enable 550Hz guard tone W0 Store the active profile in NVRAM profile 0 G2 Enable 1800Hz guard tone Y0 Recall stored profile 0 on power up K0 Disable DTE DCE flow control Zn x Store dial string x to 34 in location n 0 to 3 K3 Enable RTS CTS DTE DCE flow control default set...

Page 82: ... Class 1 Commands xe Fax commands FCLASS n Service class FTH n Transmit data with HDLC framing FRH n Receive data with HDLC framing FTM n Transmit data FRM n Receive data FTS n Stop transmission and wait FRS n Receive silence ...

Page 83: ...0 non condensing 10 to 90 non condensing Altitude 0 to 10 000feet 0 to 3 000m 200 to 30 000feet 60 to 9 090m Processor xe Processor xe CPU xe Cache memory xe L1 cache memory xe L2 cache memory xe Pentium III processor xe SEP xe SECC xe SECC2 The processor is installed in a 370 pin Plastic Pin Grid Array PPGA socket known as a Socket 370 This socket supports Intel CeleronTM processors with 32KB of ...

Page 84: ...e Hub FWH that stores the system and video BIOS Memory xe Memory xe DIMMs xe SDRAM Two DlMM sockets that accept 66 or 100MHz unbuffered SDRAM modules with 32 64 128 or 256MB of memory The DIMM modules must be gold plated with 168 pins and use 3 3V Video The GMCH integrates a Direct AGP graphics controller with a 3D hyper pipelined architecture full 2D hardware acceleration and hardware motion comp...

Page 85: ...nal ECP and EPP modes Serial 9 pin mini DIN connector high speed 16550 compatible RS232C USB two connectors for USB devices Video 15 pin female D shell VGA connector Diskette Drive xe Diskette drive xe SuperDisk drive The computer has one of the following diskette drives 1 44MB 3 5 diskette drive accepts DD 720KB or HD 1 44MB diskettes LS 120 SuperDisk drive accepts DD 720KB HD 1 44MB or SD 120MB ...

Page 86: ...Photo CD enhanced CD CD R and CD RW Sony CRX100E CH 4x max write CD R 2x max write CD RW and 24x max read CD RW drive with ATAPI interface supports audio CD CD multisession CD i Photo CD enhanced CD CD R and CD RW Hitachi GD 2500 BX 3rd generation DVD ROM drive with ATAPI interface supports 24x max CD access including audio CD CD multisession CD i enhanced CD CD R and CD RW supports 6x max DVD acc...

Page 87: ...U T v 70 DSVD ITU T v 42 LAPM and MNP2 3 and 4 error correction ITU T v 42bis and MNP5 data compression Fax send and receive using ITU T v 17 14 400bps v 29 9600 2400bps v 27ter 4800 2400bps and v 21 channel 2 300bps protocols and the EIA 578 Class 1 AT command set Network Card option xe Network card xe Ethernet card XE LAN card PCI card SMC EZ Card SMC1211TX 10 100BaseT Fast Ethernet card with Wa...

Page 88: ...8 85 DMI 31 Doze mode 26 Drive bays 9 41 47 DSVD 30 DVD drive 9 31 86 ECP 34 69 Energy Star 23 EPP 34 69 Ergonomics 15 Error codes 75 Error messages 76 Ethernet card 31 87 External modem 37 External speakers 27 Fan connectors 43 Fax 30 Fax commands 82 Floppy diskette See Diskette drive Front panel 9 41 Game port 12 29 Graphics port 12 Hard disk drive 85 LED 9 Hubs 38 Humidity 83 I O address 69 IDE...

Page 89: ...0 RTC battery 43 63 S M A R T 85 ScanDisk 21 Scanner 34 SDRAM 45 84 SECC 83 SECC2 83 Security 35 Padlock 12 SEP 83 Serial ports 12 30 37 69 Setup 65 Shutting down 21 SMC Ethernet card 31 Speaker port 12 Standby mode 26 SuperDisk drive 28 85 Suspend mode 9 26 System controller 84 System cover 42 Temperature 83 Time 65 Troubleshooting 75 Turning off the computer 20 Turning on the computer 18 Unatten...

Page 90: ...ect the interference with one or more of the following measures Reorient the receiving antenna Increase the separation between the equipment and the receiver Connect the equipment into an outlet on a circuit different from that to which the receiver is connected Consult the an experienced radio TV technician for help Properly shielded and grounded cables and connectors must be used in order to mee...

Page 91: ...he telephone line any malfunctioning electronic communications equipment to avoid damage to the telephone system If your equipment causes harm to the telephone network the telephone company may discontinue your service temporarily If possible they will notify you first But if advance notice is not practical you will be notified as soon as possible You will be informed of your right to file a compl...

Page 92: ...the performance of procedures other than those specified may result in hazardous radiation exposure Class 1 laser products are not considered hazardous The optical drives have an internal Class 1 1 0 5 milliwatt aluminum gallium arsenide laser that operates at a wavelength of 760 to 810 nanometers The design of the laser system and the optical drives ensure that there is no exposure to laser radia...

Page 93: ...Premmia GL Series 93 ...

Page 94: ...Series Important Information Serial Number Date Purchased Processor Memory Hard Drive Optical Drive SuperDisk or Zip Drive Modem card Network card Option card System BIOS Date Operating System Other Software Printer ...

Page 95: ...Premmia GL Series 95 ...

Reviews: