background image

120V~60Hz

OUTPUT

L

L

SW

SW

S-VIDEO

VIDEO

R

Y

Pb

Pr

LINE OUT

AUX IN

R

L

L

COAXIAL

4

SPEAKERS  IMPEDANCE  6

SPEAKERS  IMPEDANCE  6

SW

SR

SR

SL

SL

CEN

CEN

FR

FR

FL

FL

11

18

1

2

3

4

5


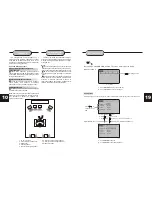
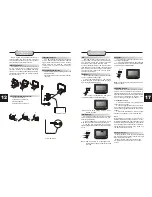
This well-designed DVD  receiver  provides 

optimum sound quality when the speakers used 
are within the range of their rated impedance. 

Important 

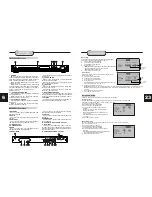
       The minimum impedance of the five speaker 
       terminals is 6 ohm;  for the  subwoofer,  it  is 
       4 ohm. 

       If you want to use only one speaker or listen
       to monophonic music, do not parallel connect 
       individual  speakers  to  the   left  and   right 
       channel terminals. See the figure on the left
       below.

Connecting Speaker Cables

      1.Peel off approximately

 1/ 2

 of cable 

         insulation 
      2.Tighten the wire end (#2 below)
      3.Open cable terminal by pressing back on 
         tab
      4.Insert wire end into terminal
      5.Release tab; make sure wire is in terminal 
         securely

Note: 

 To  prevent  damage  to the circuit, care 

should be taken to prevent short circuiting from 
occurring at the positive and negative poles of 
the speaker cord. 

"

CONNECTING 

SPEAKERS

FUNCTIONS

 MENU: MENU/PBC

        With the PBC function on, choosing a song 
on  a VCD can  only  be  done  when at the  main 
menu. With the PBC function off, song selections


can be made by entering  the  relevant  number 
keys. The  menu content of the disc will appear 
when the MENU button is  pressed while a DVD 
disc is playing.

AUDIO
SUBTITLES
PLAY

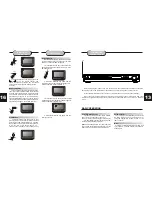
      2. Press the A-B button again while  the disc 
is playing to set point  B,  the ending  spot.  The 
section between A and B will replay. 


     3. Press the A-B button a third time to cancel.

 A-B Repeat 

       The   A-B   repeat   function   allows   you  to 
re-show  sections  between  two  specific points 
(A and B) on a disc.
      1. Press  the  A-B  button  while  the  disc  is 
playing to set point A, the beginning spot.

A-B

 REPEAT A

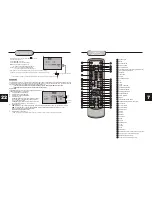
Zoom

      A picture may be enlarged  up  to  four times 
during either playback  or  slow  motion through 
the unit's zoom function.  Press  the ZOOM key 
once  and  it  enlarges  the  image   2x;   press a 
second  time  and  the   image   enlarges  3x;   A 
third  pressing  enlarges  the image 4x.   A  forth 
pressing  the  image  1/2x,  a  five  pressing  the  
image 1/3x, a sixth pressing the image 1/4x . To 
return to normal-size playback, press the ZOOM  
key  a seventh  time.  Enlargement  takes place  
in  the center of the picture.

CH.LEVEL

      When a DVD disc is played, press this key 
and Volume  key to adjust channel level. 

Volume and Mute

     The  volume  on  this  DVD receiver is  easily 
controlled  with  the remote control  by pressing 
either  the VOL 


 key  to  raise the volume

 or the 

VOL


  key to  lower  it. By  pressing   the MUTE 

key, no audio will be heard. To rein state

 the audio, 

press the MUTE key again.


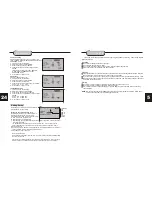
Program

     Allows  you  to  program  specific  tracks  in a 
desired order of play.  Press PROG key program
menu  well  appear  on  the  screen,   set up  the 
program play in number key.  The  scroll  to  the 
START, Press ENTER key to program play.   To  
exit   the   Programmed  play  mode,  press  the 
PROG  button again.

MENU

 REPEAT AB

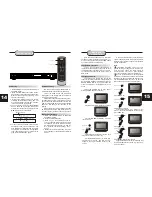
Repeat Play

      This DVD receiver allows repeated playback 
of  specific  titles,  chapters/tracks, or segment. 
It even allows switching between two items that 
are being repeated.
     1. Select the item to repeat.
     2. Press the REPEAT key.
 

REPEAT

REPEAT SINGLE

      The   repeat   mode   changes   each  time   the 
REPEAT  key  is  pressed  (i.e., from  title repeat to 
chapter repeat, all repeat , to repeat off.) 

      When playing CD or Mp3, press the REPEAT 
button to get the following display. Repeat Single,
Repeat ALL and Repeat off.
      When playing DVD, press REPEAT button to get 
the following player mode:  Repeat Chapter,Repeat 
Title and Repeat Off.

REPEAT

REPEAT

REPEAT ALL

 REPEAT OFF

AMPLIFIER

S

-v

id

e

o

V

ID

E

O

A

U

D

IO

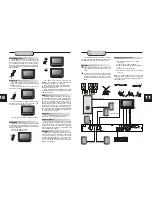
Subwoofer speaker

Surround speaker

Surround speaker

Center speaker

Main speaker

Main speaker

Y

U

V

Summary of Contents for HT-3300

Page 1: ...tem doubles service life Special DVD deck features fully dustproof and anti shock design as well as augmented error correction and better stability Fully functional DVD operating system offers many favorite functions and user friendly operation Integrated DVD and built in 6 channel Hi Fi amplifier DVD HOME THEATRE SYSTEM DVD HOME THEATRE SYSTEM ...

Page 2: ... a laser system To prevent direct exposure to the laser beam do not open the enclosure Visible laser radiation is present when enclo sure is open DO NOT STARE INTO BEAM Additionally the use of controls or adjustments or performance of procedures other than those specified herein may result in hazardous radia tion exposure To ensure proper use of this product please read this owner s manual careful...

Page 3: ...V 60Hz Do not turn off unit immediately after turning on wait at least 10 seconds Replacement Parts If replacement parts are required be sure the service technician has used approved replacement parts or have the same characteristics as the original part Unauthorized substitutions may result in fire electric shock or other hazards Safety Check Upon completion of any service or repairs to this prod...

Page 4: ...the tray 4 Check if parental lock function is on 5 Make sure disc is for use in region Remote does not work 1 Check batteries possibly replace 2 Check to ensure there isn t any obstacles between the remote sensor on the unit s front panel and the remote control 3 Be sure the remote is aimed at the remote sensor Divided picture 1 Check that disc is clean and has no scratches 2 The unit is controlle...

Page 5: ...annel AV amplifier and processor with built in Dolby Digital code with just one cord This enables you to conveniently enjoy different DVD CD and Mp3 discs ANALOG AUDIO OUTPUT Speaker system plug and play convenience through the built in six channel power amplifier eliminates the use of an external power amplifier LASER HEAD OVER CURRENT PROTECTION SYSTEM To extend the service life of the laser hea...

Page 6: ...rating from 1 most restrictive to 8 least restrictive If a password has already been set the lock icon will be closed You will not be able to select Rating until you SELECT the correct password using the 0 9 keys D Select Password E Use the 0 9 keys to SELECT a 4 digit password and press ENTER The lock icon will close to indicate that the rating and password are set F Press SETUP to save and exit ...

Page 7: ... C Select MP3 and press ENTER D Set Digital out to PCM default to output 2 channel digital from the optical coaxial digital audio outputs e g to a Minidisc recorder Off to disable MP3 digital output E Press SETUP to save and exit Language Video Audio More Aud Rating Digital Out PCM PCM PCM Analog Out 5 1 channel 5 1 channel 5 1 channel PCM Raw Off Ac3 MP3 WMA Others HT 3300A DVD HOME THEATRE SYSTE...

Page 8: ...orm the optical coaxial digital audio outputs e g to an external amplifier with a Dolby Digital decoder Off to disable Dolby Digital decoder F Press SETUP to save and exit AC3 MP3 WMA Others Digital Out PCM PCM PCM Analog Out 5 1 channel 5 1 channel 5 1 channel PCM Raw Off Language Video Audio More Aud Rating 5 1 channel 2 channel Off PCM stands for Pulse Code Modulation and is the standard 2 chan...

Page 9: ... then replace both batteries Always replace both batteries at the same time using new fully charged batteries Life expectancy of batteries may vary depending on amount of use Using the Remote Control Point the remote control at the remote sensor on the DVD receiver When the signal is received from the remote control the unit will function accordingly The remote will operate to approximately 16 fro...

Page 10: ... submenu Auto Off Language Video Audio More Aud Rating English OSD Menu Subtitle Audio DVD Menu English English English English Language Video Audio More Aud Rating English Subtitle Audio DVD Menu English English English 9 20 CONNECTING DEVICES SYSTEM SETUP RECORDER CD Connection terminals for this DVD receiver are found on the rear panel Read carefully and follow the manufacturers instructions of...

Page 11: ...D surround sound or rear speakers should be placed 3 higher than the height of listener s ears Subwoofer speaker may be placed anywhere within the room as its location produces little effect on a listener s sensation to sound To obtain the optimum bass effect a subwoofer is recommended in home theater systems 1 TV set or screen 2 Front or main left speaker 3 Subwoofer 4 Center speaker 5 Front or m...

Page 12: ...ot A B REPEAT A Zoom A picture may be enlarged up to four times during either playback or slow motion through the unit s zoom function Press the ZOOM key once and it enlarges the image 2x press a second time and the image enlarges 3x A third pressing enlarges the image 4x A forth pressing the image 1 2x a five pressing the image 1 3x a sixth pressing the image 1 4x To return to normal size playbac...

Page 13: ...being played must be multi subtitle encoded SUBTITLE OFF SUBTITLE 02 08 ENGLISH SUBTITLE Camera Angle The ability to change the camera angle allows viewer to play director and watch a movie from different perspectives 1 Press the ANGLE key on the remote control With each press the camera angle changes 2 The key may be pressed only when the flashing angle icon appears in the unit s display panel No...

Page 14: ...viewer to stop playback then later continue playback from that exact disc location Press the STOP key to halt playback The unit then will memorize the location where playback was stopped To resume watching press the RESUME or PLAY key and the unit will resume playback from the exact location where playback was stopped Exclude Mp3 DISC Slow Motion This DVD receiver has the ability to play discs in ...

Page 15: ... individual AM or 50 individual FM radio stations in its memory Memory number Wave band Station frequency BASIC DVD OPERATION If there is no disc NO DISC shown on screen OPEN CLOSE Once the unit is connected to a television set and any other accessory equipment you are ready to enjoy the excitement of DVD videos or your favorite CDs and MP3 files To play a DVD video disc Turn on the TV and select ...

Reviews: