background image

22

MAST ASSEMBLY 

INSTRUCTIONS

TIP!

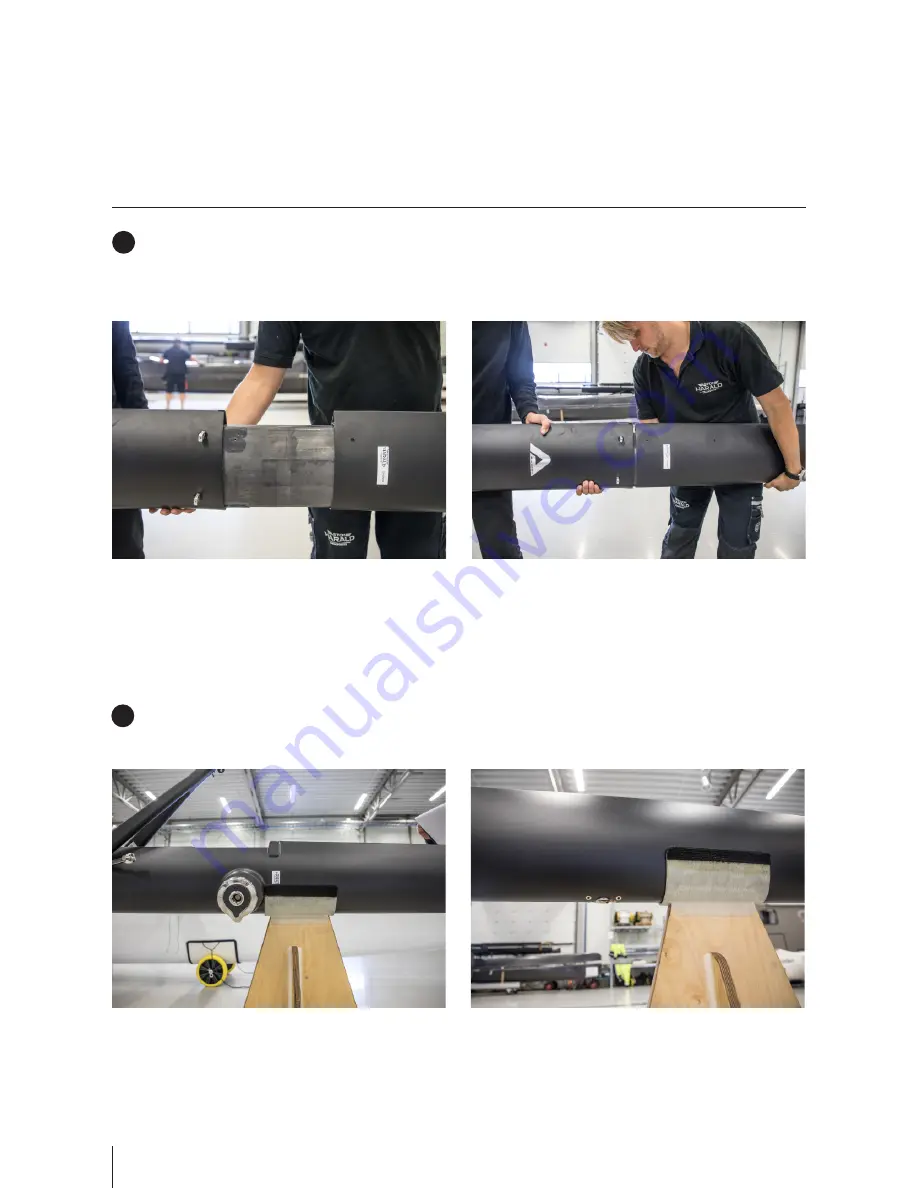
 Have one person at the bottom of the mast, one person holding the bottom section still 

at the stand closest to the joint and one person at the top of the mast. The person at the 
joint guides the person at the top to move the top of the mast so it slides on nicely.

Move the upper stand just above the stay fitting on the top sec-

tion and keep one stand at the mast winch on the bottom section. 

TIP! Have the mast leading edge pointing downwards and use the Cunningham line to tie the 

mast winch to the stand to keep the mast in this position. The mast will be easier to continue 

assemble in this position.

Take the top section and line it up with the bottom section. Lubri-

cate the joint and assemble the mast by sliding the top section onto 
the bottom section. 

1

2

Summary of Contents for M32 CATAMARAN

Page 1: ...1 M32 CATAMARAN ASSEMBLY MANUAL...

Page 2: ...PREPARATIONS RIG SETTINGS MAIN HALYARD LOCK This manual is a guide for assembling the boat and stepping the mast and AHC takes no responsibility for damages caused while assembling the boat If a prob...

Page 3: ...3...

Page 4: ...RT 10M 3 2 7 1mm with the base of the gauge in just above the mast winch is recommended to be in the interval 45 55 Spreader angle should be 190mm 5mm The soft rig setting is constantly changing due...

Page 5: ...e hoisted when the mainsail is fully up or at the first reef having the gennaker luff tightened when the mainsail is at the second reef is not allowed To have the gennaker up when sailing with two ree...

Page 6: ...6 UNLOAD TRAILER PARTS AND TOOLS 1 PARTS INCLUDED Trailer 1...

Page 7: ...7 1 2 TOOLS INCLUDED Ratchet spanner 1 19mm socket 2...

Page 8: ...8 UNLOAD TRAILER INSTRUCTIONS Make sure the handbrake his on Unlock the handles so that the hulls can be folded down 1 2...

Page 9: ...he starboard hull down Put on the trolleys They are labeled forward FWD and aft AFT 3 4 TIP Make sure bolts are in good condition and store the spanner and bolts in the storage box in the front of the...

Page 10: ...10 Use a 19 mm spanner to get the hull off the trailer arms 5 Take the port hull down Put on the trolleys They are labeled forward FWD and aft AFT 6 7...

Page 11: ...11 Use a 19 mm spanner to get the hull off the trailer arms Take off the cross beam to be able to open the hatch 8 9 TIP You do not need to take off the mast to be able to open the hatch...

Page 12: ...12 PLATFORM ASSEMBLY PARTS AND TOOLS 1 4 2 3 7 PARTS INCLUDED Main beam 1 4x Traveler bolts Incl washer 3 Furlingline 5 Override preventers 6 Trampoline 7 Aft beam 2 8x Beam bolts 4 5 6...

Page 13: ...13 1 2 3 4 5 6 TOOLS INCLUDED Brush 1 Grease 2 16mm socket 3 Ratchet spanner 5 19mm socket 4 Torque wrench 6...

Page 14: ...line up Place the main and aft beam in the beam beds 1 2 PLATFORM ASSEMBLY INSTRUCTIONS TIP Make sure to clean the surfaces from grease rests and or dirt For any bumps or irregu larities that are not...

Page 15: ...with a torque wrench 3 4 TIP It can sometimes be a bit tricky to get all the holes to line up To facilitate the assembly start to line up one of the inner holes and tighten the beam bolt leave it with...

Page 16: ...n beam and aft beam respectively 5 Slide all the trampoline sliders into the tracks on both sides To be able to get the front and back lashing into position untie the sliders on the sides so that ther...

Page 17: ...large gaps between hull and trampoline Fasten the trampoline by running the lashing as shown on the picture Start with the lashing on the main beam and start from the middle and work out towards the...

Page 18: ...every other slider Then go over a second turn and tension the ones not tighte ned Then all sliders can be tensioned equally hard Place the furling line around the mast knob and make sure it is not tw...

Page 19: ...19 Mount check override protectors Remember that with a loose tensioned trampoline the angle of the gennaker sheet going onto the winch will vary 12...

Page 20: ...Loop halyard small 3 Diamond stay upper 7 Cunningham 5 Diamond stay lower 8 Lower mast 9 Upper mast 10 Halyard lock mast car 11 Main halyard 2 Gennaker halyard 4 The diamond stays should be handled wi...

Page 21: ...21 1 2 3 4 5 6 7 8 9 10 TOOLS INCLUDED Loos Co gauge RT 10M 3 2 7 1mm 1 Ratchet spanner 3 19mm socket 4 Torx set 6 Shock cord 7 Brush 8 Grease 9 Lubricant 10 Folding ruler 2 Electrical tape 5...

Page 22: ...Move the upper stand just above the stay fitting on the top sec tion and keep one stand at the mast winch on the bottom section TIP Have the mast leading edge pointing downwards and use the Cunningha...

Page 23: ...decrease friction when hoisting the main sail Connect a mouse line to the gennaker halyard and run it through the gennaker halyard box and then guide the halyard down the luff track Run the halyard th...

Page 24: ...half hitch with the loop in between and then one half hitch at the end of the halyard Connect the main halyard loop by first doing one half hitch with the loop in between and then one half hitch at t...

Page 25: ...he way into the grooves and that the rings on the steel pin have a bit of play between them and the mast tube 8 Measure the distance of the spreader adjustments to make sure that they are the same len...

Page 26: ...and remove the bolt entirely do not remove the hanger from the mast Clean the bolt bronze nut and washer Put grease on the entire thread of the bolt and bronze nut and on the washer 11 Make sure that...

Page 27: ...tting caught Connect the top and bottom diamond stays to the spreaders and then finally connect the bottom diamond stays to the diamond turnbuckle Tension the diamond turnbuckle to 50 using a Loose Co...

Page 28: ...der tip This measurement should be 190 mm 5 mm If the spreader angle is NOT as required take the diamond tension off adjust the spreader adjustments and repeat procedure until required angle is achiev...

Page 29: ...29 Fasten cunningham Fasten rotation line 16 17...

Page 30: ...30 MAST STEPPING PARTS AND TOOLS 1 2 PARTS INCLUDED Stay set 1 Boom 2...

Page 31: ...31 1 2 3 4 5 6 TOOLS INCLUDED Stepping line 1 Rigging lines 2 Winch handle 3 Mast stepping block 5 Ruler 4 Brush 6 Grease 7 Padding 8 7 8...

Page 32: ...t connect to the mast yet Run the front stays which are the two middle ones on the T tang to starboard and port chainplate respectively 1 2 TIP It is a good routine to always start with checking that...

Page 33: ...tributed as shown in picture The lashing length is approx imately 400 mm measured from the stainless pin to the top of the friction ring on the stays 3 TIP Before de rigging the boat take measurements...

Page 34: ...are during the mast stepping procedure lashed to the main beam bolts on respective sides The length should be app roximately 250 mm from bolt to friction ring Apply grease on the mast knob and into t...

Page 35: ...on the main beam on the port side of the mast knob Then lift the mast and rest it on the padding with the rotation arm pointing to port Attach the boom to the mast and place it so that it rests on th...

Page 36: ...n line Run the hoisting block around the aft beam on the starboard side of the traveler adjustment plate approximately 150 mm from the plate TIP Make sure that the block will not scrape against the tr...

Page 37: ...e lower double boom loop with a bowline and put the other end through the override preventer and on the port deck winch and tie it off Have as a routine to always check that the winch screw is tighte...

Page 38: ...38 Attach the main halyard to the upper double boom loop with a bowline Tighten the halyard and tie it off around the gooseneck with a bowline 12 13...

Page 39: ...ect rigging line around the boom aft of the outhaul slider Important to connect these so that the support lines cannot slide inwards or off the boom when stepping the rig Tie the port one to the port...

Page 40: ...t the boom will point straight up when the mast foot will be put on the mast knob 16 Rotate the mast so that the rotation arm is pointing upwards Tie off the rotation line around the boom TIP Have one...

Page 41: ...he mast Before stepping the mast read point 19 to 24 Double check that all including parts and systems are properly prepared before stepping the mast Use below Checklist Is the main halyard properly t...

Page 42: ...art hoisting the mast by winching the stepping line The two persons that have lifted the mast on take one forestay each to be able to steer the mast during the hoist and at the end of the hoist when t...

Page 43: ...properly To not get an override That no one is standing directly under the mast To steer the mast using the forestays so that the mast goes straight up That the boom loops are not sliding off When the...

Page 44: ...sure that the shackles that connect the two main sheet blocks to the traveler car and double boom loop doesn t come off Move the side stays to the chain plate of the respective side lash them with fiv...

Page 45: ...45 Run the main halyard through the main halyard block on the starboard side of the mast foot Make sure the halyard runs on the outside of the rotation arm 26...

Page 46: ...46 BOWSPRIT ASSEMBLY PARTS AND TOOLS 1 4 2 3 5 PARTS INCLUDED Bowsprit 1 Locking pin strut 3 Struts 5 Connection pin bowsprit 2 Strut bolts Incl washers 4...

Page 47: ...47 1 2 TOOLS INCLUDED Brush 1 Grease 2 Allen key set 3 8mm allen socket 4 Torque wrench 5 3 4 5...

Page 48: ...the bow sprit connec tion pin and lock it off with the chock cord 1 Hoist the bowsprit using the gennaker halyard so that the end of the bowsprit is higher then where it will end up when connected to...

Page 49: ...49 Connect the struts to the bowsprit by lowering the bowsprit and guide the struts into it 3 Put the strut pins in to lock the struts to the bowsprit and lock the pins with the chock cord 4...

Page 50: ...50 Tighten the strut bolts to 20 Nm using a torque wrench 5 Attach the furling line to the furler It is recommended to have it crossed 6...

Page 51: ...51 Run the tack line through the clutch on the main beam and do a stop knot in the end 7 Attach top swivel to gennaker halyard 8...

Page 52: ...52 RUDDER ASSEMBLY PARTS AND TOOLS 1 4 2 3 5 PARTS INCLUDED Starboard rudder 1 Rudder pins Incl locking bolts 3 Tiller bar Incl extensions 5 Port rudder 2 Pins drop nose 4...

Page 53: ...53 1 2 TOOLS INCLUDED Torx 1 Adjustable spanner 2...

Page 54: ...54 Line up rudder heads so that the rudder pins can be inserted Put the rudder pins in and tight the locking bolts with the locking nuts 1 2 TIP Keep cover on blade RUDDER ASSEMBLY INSTRUCTIONS...

Page 55: ...55 Attach the rudder locking arms to the Dyneema locking loops Connect the rudders to the the tiller bar using the supplied drop nose pins 3 4...

Page 56: ...56 RACK ASSEMBLY PARTS AND TOOLS 1 2 3 PARTS INCLUDED Port rack 1 Rack bolts Incl Washers Locking nuts 3 Starboard rack 2...

Page 57: ...57 1 2 3 TOOLS INCLUDED Wrench 1 Ratchet spanner 2 19mm socket 3...

Page 58: ...are diffe rent The way to tell is that the two Dyneema lines running between the inner tube and the footrest should be on the forward end of the rack 1 Attach the racks to the respective side of the p...

Page 59: ...59 Remember to tie the racks to the side stays if racks are left upright 4 Attach the tightening line to the main beam tension the line in the aft beam and tie off 3...

Page 60: ...EPARATIONS PARTS 1 4 2 3 7 PARTS INCLUDED 2x paddles 1 Main sail loop 3 2x Safety knifes 5 2x Capsize lines 6 2x Daggerboard stop line system 7 Towline 8 4x Fenders 9 2x mooring lines 2 3x Winch handl...

Page 61: ...from each side so that one always can be reached in case of a capsize They should be connected so they are easy to use 1 Attach tow line around the main beam on the port side of the mast Make sure the...

Page 62: ...er the bowsprit and second on the trampoline on the back side of the aft beam as shown I picture Attach daggerboard stop line system with the loose ends tied off at the eye bolt on each side and the c...

Page 63: ...The gennaker luff length should be 15 630 meter measured bearing to bearing with a tension of 40 Kg on the luff Equip M32 with 3x winch handles Main sail loop 2x mooring line 4x fenders 2x paddles 5...

Page 64: ...64 RIG SETTINGS TOOLS 1 2 PARTS INCLUDED Ruler 1 Spinlock Rig Sense RGS 0508 2...

Page 65: ...the main halyard parallel to the joint between the mast tube and the mast foot When this is lined up tie off the halyard around the mast winch Mark measuring point 70 mm above the joint on the backsi...

Page 66: ...he tension should be 300 Kg The black sheave on the gauge should be 1550 mm above the chain plate pin for accurate tuning 4 Measuring the distance from the measuring mark on the aft beam to the top of...

Page 67: ...ck the halyard off with the clutch and measure the distance between the stainless pin and a reference point on the halyard Make sure that the distance is the same for both starboard and port Setting t...

Page 68: ...ff until desired tension is achieved If the side stay tension is lower than 300 Kg tension the lashing using the winch 3 4 TIP To prevent damage to deck and lashing use a soft shackle with friction ri...

Page 69: ...n both side stays Making changes to one side effects the other so it usually takes a couple of turns tensioning easing off to get it right Check rake as described in Check the rig If correct the rig i...

Page 70: ...e sure that the distance is the same for both starbo ard and port Setting the rig if the rake is too far aft 1 Tension the front stays so that the rig ends up centred If the side stay tension is above...

Page 71: ...aking changes to one side effects the other so it usually takes a couple of turns tensioning easing off to get it right Check rake as described in Check the rig If correct the rig is set for sailing a...

Page 72: ...readed Then move the loop so that both sides are in between the plates Put the main sail on the port side of the mast and leave the luff end on the main beam This will facilitate hoisting the sail Run...

Page 73: ...the main halyard 3 Release the main halyard completely meaning that it is complete ly slack 4 Rotate the mast back shake gently and slowly pull the sail down until it goes into the groove 5 The sail...

Page 74: ...he main sail clew of the boom Make sure that the halyard lock mast car is not damaged and that the spring is strong enough Take the Cunningham tension off but leave in sail Check that the groove is in...

Page 75: ...75...

Page 76: ...76 NOTES...

Page 77: ...77 NOTES...

Page 78: ...78 GET ASSEMBLY VIDEO INSTRUCTIONS AT M32WORLD COM...

Reviews: