background image

ENGLISH 


IMPORTANT: The instruction manual you are holding includes essential information on the safety measures to be 
implemented for installation and start-up. Therefore, the installer as well as the user must read the instructions before 
beginning installation and start-up. Therefore, the installer as well as the user must read the instructions before 
beginning installation and start-up. 

To achieve optimum performance of the Flat Floodlamp, follow the instructions indicated below: 


1.   VERIFY THE CONTENTS OF THE PACKING: 

The following accessories are included inside the box: 
 

Floodlamp unit 


Crosshead mount                         
Bag of screws 
Clamp (projectors: 24765; 33123; 35668; 43452; 43454) 
2 adhesive joints (projectors: 24765; 33123; 35668; 43452; 43454) 
Adhesive template (projectors: 24765; 33123; 35668; 43452; 43454) 
Installation manual 
 

2. GENERAL CHARACTERISTICS: 

This floodlamp has been designed to be used fully submerged underwater in fresh water swimming pools. It is a Class III 
electric apparatus with very low safety voltage (12V with alternating current). 
The floodlamp compiles with IPX8 degree of protection (resistance to penetration of dust, solid bodies and humidity) at a 
nominal immersion depth of 2 m. 
This floodlamp complies with international safety standards for lights, especially the EN 60598-2-18 standard: LIGHTS 
PART 2: SPECIFIC REQUIREMENTS SECTION 18 LIGHTS FOR SWIMMING POOLS AND SIMILAR APPLICATIONS. 
The mains supply to the light should have 30 mA overload protection. The electricity supply to these lights should be via an 
independent isolating safety transformer with separated windings. 
The manufacturer is not responsible in any circumstances for assembly, installation or start-up of any electric components 
which have been inserted or handled at locations other than its own premises. 
 

3. INSTALLATION: 


In order to clearly light a pool it is recommended lo install a 100W floodlamp every 25m² or 35 m² of water surface. In 
swimming pools which are especially deep, a 100 W floodlamp is required for every 30 or 40 m³ of water volume. 


In order to prevent glare, the floodlamps should be installed so that they face away from the residence or usual view of 
the swimming pool. 


In the event that lighting is used in training or competition pools, the floodlamps should be installed on the sides to 
prevent glare on the swimmers. 


To avoid the need to empty the pool to change the lamp, we recommend that the floodlamp be installed in areas which 
are accessible from the upper edge of the pool.  

Prior to installation verify that the gland seal has been fully tightened. 
The floodlamp should be placed on the wall of the pool at approximately 700 mm from the water surface (Fig. 1). 
The method of fastening the crosshead mount to the pool wall varies depending on whether it is a floodlamp for concrete 
pools or prefabricated pools. 
 

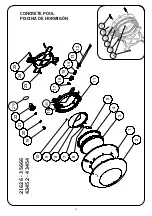
Concrete pool (MODEL 21626 - 35666) Page 14 

Place the crosshead mount of the flat floodlamp (No. 24) in the designated place. Mark the holes. Drill with a 6 

 bit and 

insert the 4 fastening blocks (No. 25). 
Position the crosshead mount so that the word “TOP” is located on the upper part. 
Use four 4.8 x 25 screws (No. 23) to secure the crosshead mount to the wall (Fig. 2). 
Place the conduit body (No. 22) in the upper left quadrant of the crosshead mount, in accordance with the measurements 
shown in Fig. 3.  
 

Concrete pool with liner (MODEL 43452 – 43454) Fig. 11 

Put the adhesive template on the concrete (No. 1) and drill in the designated points. Then, insert the fastening blocks  
(No. 2). 
Use the 4 4.8 x 25 screws (No. 3) to secure the clamp (No. 4), then stick one of the adhesive joints (No. 6) to the clamp 
(No. 4). 
Place the liner (No. 5) and stick the other adhesive joint (No. 6) to the liner. Remember to cut back the liner for the 
housing of the cable duct hose.  
Place the flat joint (No. 7) and screw in the cable duct body (No. 8) and finally screw on the mounting bracket (No. 9) with 
the 4.8x25 screws (No. 3). 
 

Summary of Contents for 21626-21627

Page 1: ...RFER FARO SUBACQUEO Model 21626 21627 24765 33110 33123 35666 35667 35668 43452 43454 INSTALLATION AND MAINTENANCE MANUAL MANUEL D INSTALLATION ET D ENTRETIEN MANUAL DE INSTALACIÓN Y MANTENIMIENTO MANUALE DI INSTALAZIONE E MANUTENZIONE EINBAU UND BETRIEBSANLEITUNG MANUAL DE INSTRUÇÕES E MANUTENÇÃO ...

Page 2: ...t is recommended lo install a 100W floodlamp every 25m or 35 m of water surface In swimming pools which are especially deep a 100 W floodlamp is required for every 30 or 40 m of water volume In order to prevent glare the floodlamps should be installed so that they face away from the residence or usual view of the swimming pool In the event that lighting is used in training or competition pools the...

Page 3: ...ing pool Fig 1 insert a screwdriver through the upper hole of the ornament and press on the spline of the mount until the floodlamp is released Fig 7 8 Pull up on the floodlamp until it is released from the lower groove and can be removed from the swimming pool Dismount the floodlamp by turning the screen in counter clockwise direction Fig 9 If this can not be done with your hands use a screwdrive...

Page 4: ...ON Pour assurer un bon éclairage à une piscine il est recommandé d installer un projecteur de 100W tous les 25 ou 35 m de surface d eau Dans les piscines particulièrement profondes il faudra employer un projecteur de 100 W tous les 30 ou 40 m de volume d eau Pour éviter d être aveuglé par la lumière il faut que 1 orientation des projecteurs soit contraire à la direction de l habitation ou de la vu...

Page 5: ...oliveur sur la languette du support jusqu à ce que celle ci libère le projecteur Fig 7 8 Tirer vers le haut le projecteur pour le libérer de l encastrement inférieur et le retirer de la piscine Démonter le projecteur en faisant tourner l écran Fig 9 dans le sens contraire des aiguilles d une montre En cas de difficulté utiliser un tournevis en tant que levier se servir des rainures se trouvant sur...

Page 6: ...ctricos que no se hayan llevado a cabo en sus instalaciones 3 INSTALACIÓN Para iluminar claramente una piscina se recomienda instalar un proyector de 100W cada 25 o 35 m de superficie de agua En piscinas especialmente profundas será necesario un proyector de 100 W cada 30 o 40 m de volumen de agua A fin de evitar deslumbramientos los proyectores deben instalarse orientados en sentido contrario de ...

Page 7: ...un destornillador la lengüeta del soporte hasta que ésta libere el proyector Fig 7 8 Tirar hacia arriba del proyector hasta liberarlo del encaje inferior y poderlo extraer de la piscina Desmontar el proyector haciendo girar en sentido antihorario la pantalla Fig 9 Si no puede con las manos puede ayudarse de un destornillador para hacer palanca utilizando las ranuras dispuestas a ambos lados del em...

Page 8: ...menti 3 INSTALLAZIONE Per ben iIluminare una piscina si raccomanda d installare un proiettore da 100W per ogni 25 o 35 m di superficie d acqua Nelle piscine particolarmente profonde sarà necessario un proiettore da 100W ogni 30 o 40 m di volume d acqua Per evitare abbagliamenti i proiettori dovranno essere installati orientati nel senso contrario della casa o della vista abituale della piscina Nel...

Page 9: ... il proiettore Fig 7 8 Tirare verso l alto il proiettore fino a liberarlo dall incastro inferiore e poterlo estrarre dalla piscina Smontare il proiettore facendo girare in senso antiorario lo schermo Fig 9 Se non si riese con le mani ci si può aiutare con un cacciavite per fare leva Per rompiere quest operazione utilizzare le fessure disposte in entrambi i lati del cerchio ornamentale Fig 9 Tirare...

Page 10: ...n von einem 100 W Strahler alle 25 bis 35 m Wasseroberfläche Bei besonders tiefen Swimmingpools wird ein 100 W Strahler für jeweils 30 oder 40 m Wasservolumen benötigt Um ein Blenden zu vermeiden müssen die Strahler so eingebaut werden daß sie in Gegenrichtung der Wohnung oder dem üblichen Blickfeld zum Swimmingpool strahlen Bei Verwendung einer Beleuchtung für Wettkampfswimmingpools oder Pools zu...

Page 11: ...estells drücken bis der Strahler frei ist Abb 7 8 Der Strahler wird nach oben gezogen um ihn aus dem unteren Pfalz befreien und aus dem Pool herausziehen zu können Der Strahler wird demontiert indem der Lampenschirm entgegen dem Uhrzeigersinn gedreht wird Abb 9 Sollten Sie dies nicht mit den Händen bewerkstelligen können nehmen Sie einen Schraubenzieher zu Hilfe der als Hebel dient Dafür können di...

Page 12: ...m sido realizadas nas suas instalações 3 INSTALAÇÃO Para iluminar claramente uma piscina recomenda se a instalação de um projetor de 100W a cada 25 ou 35 m de superfície de água Em piscinas especialmente profundas será necessário um projetor de 100 W a cada 30 ou 40 m de volume de água A fim de evitar deslumbramentos os projetores devem ser instalados orientados em sentido contrário à vivenda ou v...

Page 13: ...o decorativo a lingüeta do suporte com uma chave de fenda até soltar o projetor Fig 7 8 Puxe o projetor para cima até soltá lo do encaixe inferior e poder extraí lo da piscina Desmonte o projetor rodando o quebra luz Fig 9 no sentido anti horário Se não puder desmontá lo com as mãos utilize uma chave de fenda para fazer alavanca encaixando a nas ranhuras dispostas em ambos os lados do friso decora...

Page 14: ...14 CONCRETE POOL PISCINA DE HORMIGÓN 21626 35666 43452 43454 23 24 26 27 28 25 2 1 3 4 5 11 12 19 20 21 22 24 25 23 10 9 8 7 6 17 15 16 13 14 18 29 35 ...

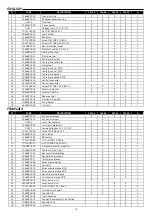
Page 15: ...t support X X 1 28 10892R0404 M 25 Socket X X 1 29 23042R0004 Flat joint X X 1 FRANÇAIS Nº CODE DESCRIPTION 21626 35666 43452 43454 Q 1 21626R0002 Anneau enjoliveur X X X X 1 2 35666R0001 Anneau enjoliveur X X 1 3 00373 Lente transparente X X X X 1 4 00346R0004 Joint lente projecteur X X X X 1 5 00371 Lampe hallogène 12 V 100 W X X X X 1 6 7012102000 Écrou DIN 934 A2 M 2 X X X X 2 7 00360R0002 Por...

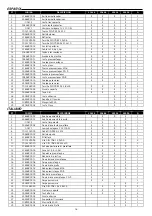
Page 16: ...porte kit fijación X X 1 28 10892R0404 Manguito M 25 X X 1 29 23042R0004 Junta Plana X X 1 ITALIANO Nº CODICE DESCRIZIONE 21626 35666 43452 43454 Q 1 21626R0002 Anello ornamentale X X X X 1 2 35666R0001 Anello ornamentale inossid X X 1 3 00373 Lente trasparente X X X X 1 4 00346R0004 Guarnizione lente proiettore X X X X 1 5 00371 Lampada alogena 12V 100W X X X X 1 6 7012102000 Dado DIN 934 A2 M 2 ...

Page 17: ...43452R0001 Befestigungsausstattungstütze X X 1 28 10892R0404 Quetschverschaubung M 25 X X 1 29 23042R0004 Flache Dichtung X X 1 PORTUGUÊS Nº CODE DESCRIPTION 21626 35666 43452 43454 Q 1 21626R0002 Anel decorativo X X X X 1 2 35666R0001 Anel decorativo inoxidable X X 1 3 00373 Lente transparente X X X X 1 4 00346R0004 Junta lente projector X X X X 1 5 00371 Lâmpada de halogéneo 12V 100W X X X X 1 6...

Page 18: ...18 PREFABRICATED POOL PISCINA PREFABRICADA 21627 24765 33110 33123 35667 35668 2 1 3 4 5 11 12 19 20 23 21 22 24 26 27 30 28 29 25 10 9 8 7 6 17 15 16 13 14 18 25 26 31 32 33 34 ...

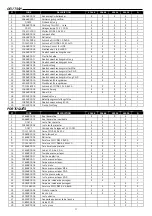
Page 19: ...le gland connector X X X X X X 1 17 21626R0203 Flat gasket X X X X X X 1 18 21626R0202 Cable gland nut M16 X X X X X X 1 19 00346R0005 Cable gland nut PG 9 X X X X X X 1 20 00346R0009 Cable gland washer PG 9 X X X X X X 1 21 00346R0006 Cable gland gasket PG 9 X X X X X X 1 22 00346R0015 Conduit connector X X 1 22 23042R0005 Conduit connector X X X 1 22 33110R0001 Conduit connector X 1 23 23042R000...

Page 20: ...ps presse étoupe X X X X X X 1 17 21626R0203 Joint plat X X X X X X 1 18 21626R0202 Écrou presse étoupe M16 X X X X X X 1 19 00346R0005 Écrou presse étoupe PG 9 X X X X X X 1 20 00346R0009 Rondelle presse étoupe PG 9 X X X X X X 1 21 00346R0006 Joint presse étoupe PG 9 X X X X X X 1 22 00346R0015 Corps passe murs X X 1 22 23042R0005 Corps passe murs X X X 1 22 33110R0001 Corps passe murs X 1 23 23...

Page 21: ...rensaestopas X X X X X X 1 17 21626R0203 Junta plana X X X X X X 1 18 21626R0202 Tuerca prensaestopas M16 X X X X X X 1 19 00346R0005 Tuerca prensaestopas PG 9 X X X X X X 1 20 00346R0009 Arandela prensaestopas PG 9 X X X X X X 1 21 00346R0006 Junta prensaestopas PG 9 X X X X X X 1 22 00346R0015 Cuerpo pasamuros X X 1 22 23042R0005 Cuerpo pasamuros X X X 1 22 33110R0001 Cuerpo pasamuros X 1 23 230...

Page 22: ...0006 Corpo premistoppa X X X X X X 1 17 21626R0203 Guarnizione piatta X X X X X X 1 18 21626R0202 Dado premistoppa M16 X X X X X X 1 19 00346R0005 Dado premistoppa PG 9 X X X X X X 1 20 00346R0009 Rondella premistoppa PG 9 X X X X X X 1 21 00346R0006 Guarnizione premistoppa PG 9 X X X X X X 1 22 00346R0015 Corpo passamuro X X 1 22 23042R0005 Corpo passamuro X X X 1 22 33110R0001 Corpo passamuro X ...

Page 23: ... X 1 17 21626R0203 Flachdichtung X X X X X X 1 18 21626R0202 Quetschverschraubungsmutter M16 X X X X X X 1 19 00346R0005 Quetschverschraubungsmutter PG 9 X X X X X X 1 20 00346R0009 Quetschverschraubungsscheibe PG 9 X X X X X X 1 21 00346R0006 Quetschverschraubungsdichtung PG 9 X X X X X X 1 22 00346R0015 Wanddurchführungskörper X X 1 22 23042R0005 Wanddurchführungskörper X X X 1 22 33110R0001 Wan...

Page 24: ... X X 1 17 21626R0203 Junta plana X X X X X X 1 18 21626R0202 Porca prensa estopas M16 X X X X X X 1 19 00346R0005 Porca prensa estopas PG 9 X X X X X X 1 20 00346R0009 Anilha prensa estopas PG 9 X X X X X X 1 21 00346R0006 Junta prensa estopas PG 9 X X X X X X 1 22 00346R0015 Corpo do isolador de passagem X X 1 22 23042R0005 Corpo do isolador de passagem X X X 1 22 33110R0001 Corpo do isolador de ...

Page 25: ...25 Fig 1 21626 35666 21626 35667 Fig 2 80 80 Ø25 Fig 3 Fig 4 ...

Page 26: ...26 Fig 5 Fig 9 Fig 10 Fig 7 Fig 8 Fig 6 ...

Page 27: ...27 9 1 2 3 8 7 5 6 3 4 7 1 3 8 6 5 4 2 Fig 12 Fig 11 ...

Page 28: ...MERSO IN ACQUA UNTERWASSER SHEINWERFER NUR UNTER WASSER GETAUCHT ANZUMACHEN NÃO ACENDER NUNCA O PROJECTOR SE NÃO ESTIVER SUBMERGIDO NA ÁGUA Made in EC Sacopa S A U Pol Ind Poliger Sud Sector I s n 17854 Sant Jaume de Llierca Spain ASTRALPOOL Avda Francesc Macià 38 planta 16 08208 Sabadell Barcelona Spain 21626E201 09 info astralpool com We reserve to change all or part of the articles or contents ...

Reviews: