background image

ENGLISH

IMPORTANT: The instruction manual you are holding includes essential information on the safety measures to 
be implemented for installation and start-up. Therefore, the installer as well as the user must read the
instructions before beginning installation and start-up.
Keep this manual for future reference.

To achieve optimum performance of the Standard Floodlamp follow the instructions provided below:

1.   VERIFY THE CONTENTS OF THE PACKING:

The following accessories are included inside the box:

Concrete pool floodlamp

Prefabricated pool floodlamp

Housing body


Housing body

Floodlamp unit

Watertight joint 
Clamp
Floodlamp unit
Bag of screws

2 DIN 7981 A2 4,8x16 screws
16 DIN 966 A2 M-6x24 screws (1)
16 DIN 7982 5,5x25 screws (2)

(1) For floodlamps with metric pitch housing
(2) For floodlamps with self-threadind housing

2. GENERAL CHARACTERISTICS:

This floodlamp has been designed to be used fully submerged underwater in fresh water swimming pools. It is a
Class III electric apparatus with very low safety voltage (12V with alternating current).
The floodlamp compiles with IPX8 degree of protection (resistance to penetration of dust, solid bodies and
humidity) at a nominal immersion depth of 2 m. 
This floodlamp compiles with international safety standards for lights, especially the EN 60598-2-18 standard.
LIGHTS PART 2: SPECIFIC REQUIREMENTS SECTION 18 LIGHTS FOR SWIMMING POOLS AND SIMILAR
APPLICATIONS.
The manufacturer is not responsible in any circumstances for assembly, installation or start-up of any electric
components which have been inserted or handied at locations other than its own premises.

3. INSTALLATION:

x

Never install in vertical position with the lamp facing downwards.

x

In order to clearly light a pool it is recommended lo install a 300W floodlamp every 25 or 35 m² of water surface.
In swimming pools which are especially deep, a 300 W floodlamp is required for every 30 or 40 m³ of water
volume.

x

In order to prevent glare, the floodlamps should be installed so that they face away from the residence or usual
view of the swimming pool.

x

In the event that lighting is used in training or competition pools, the floodlamps should be installed on the sides
to prevent glare on the swimmers.

x

To avoid the need to empty the pool to change the lamp, we recommend that the floodlamp be installed in areas
which are accessible from the upper edge of the pool.

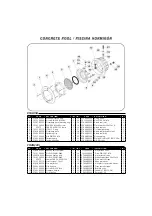
Prior to installation verify that the gland seal (no. 19) has been fully tightened.
The floodlamp should be placed on the wall of the pool at approximately 400-700 mm from the water surface
(Fig.1).
The method of fastening the housing to the pool wall varies depending on whether it is a floodlamp for concrete
pools or prefabricated pools.

Concrete swimming pool

To install a floodlamp in a concrete swimming pool the housing (no. 17) should be fixed in the wall of the
swimming pool (Fig. 2). Make sure that the cable outlet of the housing remains on the upper part.

Prefabricated swimming pool

To install a floodlamp in prefabricated swimming pool make a circular hole with a diameter of 240 mm (Fig. 2). 
Install the housing (no. 17) on the outer side of the pool

(The housing incorporates the joint that carries out the

water tightness)

. Install the adhesive joint on the inner side and use two screws DIN 7981 4,8x16 (no. 22) to

secure the two components (Fig. 3). Make sure that the cable outlet of the housing remains on the upper part.

Summary of Contents for 07833

Page 1: ...RO SUBACQUEO SERIA STANDARD UNTERWASSER SCHEINWERFER STANDARD SERIE FARO SUBACQUEO S RIE STANDARD INSTALLATION AND MAINTENANCE MANUAL MANUEL D INSTALLATION ET D ENTRETIEN MANUAL DE INSTALACI N Y MANTE...

Page 2: ...n premises 3 INSTALLATION x Never install in vertical position with the lamp facing downwards x In order to clearly light a pool it is recommended lo install a 300W floodlamp every 25 or 35 m of water...

Page 3: ...e base of the floodlamp and disconnect the two terminals loosening the two screws which secure them to the lamp Fig 10 Change the lamp and assemble the Floodlamp in the opposite order described in poi...

Page 4: ...18 LUMINAIRES POUR PISCINES ET APPLICATIONS SIMILAIRES Le fabricant n est aucunement responsable du montage de l installation ou de la mise en marche suite toute manipulation ou rajout de composants l...

Page 5: ...5 l int rieur du fond du projecteur et d connecter les 2 cosses en desserrant les deux vis qui les retiennent la lampe Fig 10 Changer la lampe et proceder au montage du projecteur effectuer l op ratio...

Page 6: ...OS PARTICULARES SECCI N 18 LUMINARIAS PARA PISCINAS Y APLICACIONES SIMILARES El fabricante en ning n caso se responsabiliza del montaje instalaci n o puesta en funcionamiento de cualquier manipulaci n...

Page 7: ...ondo proyector n 7 Fig 9 Extraer la l mpara n 5 del interior del fondo proyector y desconectar los 2 terminales aflojando los dos tornillos que los fijan a la l mpara Fig 10 Cambiar la l mpara y proce...

Page 8: ...18 ILLUMINAZIONE PER PISCINE E APPLICAZIONI SIMILARI II fabbricante rifiuta qualsiasi responsabilit per il montaggio I installazione o la messa in funzione di componenti elettrici che sono stati manip...

Page 9: ...7 Fig 9 Estrarre la lampada n 5 dall interno del fondo proiettore e scollegare i 2 terminali allentando le due viti che li fissano alla lampada Fig 10 Cambiare la lampada e procedere al montaggio del...

Page 10: ...dhabung oder Einbau von Elektrokomponenten nicht in seinem Betrieb durchgef hrt worden sind 3 INSTALLATION x Der Strahler darf nie in vertikaler Lage mit der Lampe nach unten weisend Installiert werde...

Page 11: ...ausgewechseit und die Montage des Strahiers erfolgt nun in umgekehrter Weise wie oben im Punkt 4 beschrieben wobei auf folgendes besonders geacntet werden mu x Die Kabelschuhe werden an der Lampe ang...

Page 12: ...AIS SEC O 18 APARELHOS DE ILUMINA O PARA PISCINAS E APLICA ES SIMILARES O fabricante n o se responsabiliza em nenhum caso pela montagem instala o ou coloca o em funcionamento por qualquer manipula o o...

Page 13: ...do interior do fundo do projector e desligue os 2 termin is afrouxando os dois parafusos que os fixam l mpada Fig 10 Substituir a l mpada e proceder montagem do Projector da forma inversa descrita no...

Page 14: ...1 Electrical cable H07 RN F 2 5m 1 11 07831R0002 Fastening wedge 2 22 10892R0404 M 25 Socket 1 FRAN AIS ID CODE DESCRIPTION Q ID CODE DESCRIPTION Q 1 07838R0001 Anneau enjoliver blanc 1 12 7710240020...

Page 15: ...520R0001 Cavo H07 RN F 2 5m 1 11 07831R0002 Cuneo fissaggio 2 22 10892R0404 Manicotto M 25 1 DEUTSCH ID ARTIKEL NR BESCHREIBUNG ME ID ARTIKEL NR BESCHREIBUNG M 1 07838R0001 Verzierungsring wieB 1 12 7...

Page 16: ...c pitch housing 2 Only for models with self threading housing FRAN AIS ID CODE DESCRIPTION Q ID CODE DESCRIPTION Q 1 07838R0001 Anneau enjoliver blanc 1 15 00352R0013 Rondelle plastique 20x15x1 5 2 2...

Page 17: ...i con nicchia a filetto metrico 2 Solo per modelli con nicchia autofilettante DEUTSCH ID ARTIKEL NR BESCHREIBUNG M ID ARTIKEL NR BESCHREIBUNG ME 1 07838R0001 Verzierungsring wieB 1 15 00352R0013 Unter...

Page 18: ......

Page 19: ......

Page 20: ......

Page 21: ......

Page 22: ......

Page 23: ......

Page 24: ...TTORE SE NON IMMERSO IN ACQUA UNTERWASSER SHEINWERFER NUR UNTER WASSER GETAUCHT ANZUMACHEN NAO ACENDER NUNCA O PROECTOR SE NAO ESTIVER SUBMERGIDO NA AGUA Made in EC Sacopa S A U Pol Ind Poliger Sud Se...

Reviews: