background image

ENGLISH

IMPORTANT: The instruction manual you are holding includes essential information on the safety measures to be
implemented for installation and start-up. Therefore, the installer as well as the user must read the instructions before
beginning installation and start-up. Therefore, the installer as well as the user must read the instructions before 
beginning installation and start-up.

To achieve optimum performance of the Flat Plastic Floodlamp, models 21626, 35666, 21627 and 35667, follow the
instructions indicated below:

1.

VERIFY THE CONTENTS OF THE PACKING:

The following accessories are included inside the box:

Concrete pool floodlamp, model 21626-35666

2

Floodlamp unit
Crosshead mount
Bag of screws 

Prefabricated pool floodlamp, model 21627-35667

Crosshead mount 
Floodlamp unit
Bag of screws 

2. GENERAL CHARACTERISTICS:

This floodlamp has been designed to be used fully submerged underwater in fresh water swimming pools. It is a Class III
electric apparatus with very low safety voltage (12V with alternating current).
The floodlamp compiles with IPX8 degree of protection (resistance to penetration of dust, solid bodies and humidity) at a
nominal immersion depth of 2 m. 
This floodlamp complies with international safety standards for lights, especially the EN 60598-2-18 standard: LIGHTS
PART 2: SPECIFIC REQUIREMENTS SECTION 18 LIGHTS FOR SWIMMING POOLS AND SIMILAR APPLICATIONS.
The mains supply to the light should have 30 mA overload protection. The electricity supply to these lights should be via an 
independent isolating safety transformer with separated windings. 
The manufacturer is not responsible in any circumstances for assembly, installation or start-up of any electric components
which have been inserted or handled at locations other than its own premises.

3. INSTALLATION: 

x

In order to clearly light a pool it is recommended lo install a 100W floodlamp every 25m² or 35 m² of water surface. In
swimming pools which are especially deep, a 100 W floodlamp is required for every 30 or 40 m³ of water volume.

x

In order to prevent glare, the floodlamps should be installed so that they face away from the residence or usual view of
the swimming pool.

x

In the event that lighting is used in training or competition pools, the floodlamps should be installed on the sides to
prevent glare on the swimmers.

x

To avoid the need to empty the pool to change the lamp, we recommend that the floodlamp be installed in areas which
are accessible from the upper edge of the pool.

Prior to installation verify that the gland seal has been fully tightened.
The floodlamp should be placed on the wall of the pool at approximately 700 mm from the water surface (Fig. 1).
The method of fastening the crosshead mount to the pool wall varies depending on whether it is a floodlamp for concrete
pools (model 21626 - 35666) or prefabricated pools (model 21627 - 35667).

Concrete pool (MODEL 21626 - 35666)

Place the crosshead mount of the flat floodlamp (No. 10) in the designated place. Mark the holes. Drill with a 6 

‡

 bit and

insert the 4 fastening blocks (No. 9).
Position the crosshead mount so that the word “TOP” is located on the upper part.
Use four 4.8 x 25 screws (No. 11) to secure the crosshead mount to the wall (Fig. 2).
Place the conduit body (No. 15) in the upper left quadrant of the crosshead mount, in accordance with the measurements
shown in Fig. 3.

Prefabricated pool (MODEL 21627 - 35667) 

Place the crosshead mount of the flat floodlamp (No. 10) in the designated place. Mark the holes. Drill with a 6 

‡

 bit. 

Position the crosshead mount so that the word “TOP” is located on the upper part.
Use four M-6 x 35 screws (No. 16) with four O-rings (No. 17) to secure the crosshead mount to the inner wall of the
swimming pool. Place 4 butt joints (No. 18) between the mount and the liner. On the outer side of the swimming pool,
insert 4 washers (No. 19) and 4 nuts (No. 20) (Fig. 2).
Place the conduit body (No. 15) in the upper left quadrant of the crosshead mount, in accordance with the measurements
shown in Fig. 3. Use the butt point (No. 21) and the conduit nut (No. 22) to secure on the outer side of the swimming pool. 

Summary of Contents for 21626

Page 1: ...ERWASSER SCHEINWERFER FARO SUBACQUEO Model 21626 21627 35666 35667 INSTALLATION AND MAINTENANCE MANUAL MANUEL D INSTALLATION ET D ENTRETIEN MANUAL DE INSTALACI N Y MANTENIMIENTO MANUALE DI INSTALAZION...

Page 2: ...which are especially deep a 100 W floodlamp is required for every 30 or 40 m of water volume x In order to prevent glare the floodlamps should be installed so that they face away from the residence or...

Page 3: ...r and never touch the new lamp with your bare hands Then assemble the floodlamp in the opposite order of that described Make sure that the butt joint and the transparent lens are inserted properly in...

Page 4: ...d eau Dans les piscines particuli rement profondes il faudra employer un projecteur de 100 W tous les 30 ou 40 m de volume d eau x Pour viter d tre aveugl par la lumi re il faut que 1 orientation des...

Page 5: ...nues Proc der au montage du projecteur de la fa on inverse l op ration d crite pr c demment en prenant bien soin de placer correctement le joint plat et la lentille transparente sur l assiette de l cr...

Page 6: ...de 100 W cada 30 o 40 m de volumen de agua x A fin de evitar deslumbramientos los proyectores deben instalarse orientados en sentido contrario de la vivienda o vista habitual de la piscina x En caso d...

Page 7: ...lente transparente en el asiento de la pantalla Hacer coincidir la palabra TOP del embellecedor con la palabra TOP del anclaje de la pantalla Girar el embellecedor ligeramente a la derecha hasta que...

Page 8: ...o 35 m di superficie d acqua Nelle piscine particolarmente profonde sar necessario un proiettore da 100W ogni 30 o 40 m di volume d acqua x Per evitare abbagliamenti i proiettori dovranno essere insta...

Page 9: ...erso delle operazioni descritte per lo smontaggio facendo particolare attenzione a situare correctamente la guarnizione piana e la lente trasparente nella sede dello scherzo Fare coincidere la parola...

Page 10: ...ng oder Einbau von Elektrokomponenten nicht in seinem Betrieb durchgef hrt worden sind 3 INSTALLATION x Um einen Swimmingpool hell zu erleuchten empfiehlt sich die Installation von einem 100 W Strahle...

Page 11: ...Abb 9 Man zieht an der Lampe E um sie aus der Fassung zu entfernen Nr 2 und setzt die neue ein Abb 10 SEHR WICHTIG Zum Auswechseln der Lampe muss man immer einen Kartonschutz benutzen und darf die neu...

Page 12: ...o de um projector de 100W a cada 25 ou 35 m de superf cie de gua Em piscinas especialmente profundas ser necess rio um projector de 100 W a cada 30 ou 40 m de volume de gua x A fim de evitar deslumbr...

Page 13: ...as Proceda montagem do Projector do modo contr rio ao descrito tendo especial cuidado em situar correctamente a junta plana e a lente transparente no assento do quebra luz Fa a coincidir a palavra TOP...

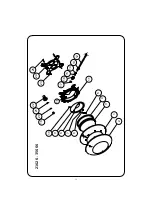
Page 14: ...21626 35666 2 1 3 4 5 11 12 19 20 21 22 24 25 23 10 9 8 7 6 17 15 16 13 14 18 14...

Page 15: ...2x1 5 X X 1 25 00346R0008 Screw anchor S 6 X X 4 13 21626R0007 Cable gland plug X X 1 FRAN AIS N CODE DESCRIPTION 21626 35666 Q N CODE DESCRIPTION 21626 35666 Q 1 21626R0002 Anneau enjoliveur X 1 14...

Page 16: ...ble 2x1 5 de 2 5m X X 1 25 00346R0008 Taco S 6 X X 4 13 21626R0007 Tap n prensaestopas X X 1 ITALIANO N CODICE DESCRIZIONE 21626 35666 Q N CODICE DESCRIZIONE 21626 35666 Q 1 21626R0002 Anello ornament...

Page 17: ...21626R0005 Elektrokabel 2x1 5x2500 X X 1 25 00346R0008 D bel S 6 X X 4 13 21626R0007 Quetschverschraubungsdeckel X X 1 PORTUGU S N CODE DESCRIPTION 21626 35666 Q N CODE DESCRIPTION 21626 35666 Q 1 216...

Page 18: ...21627 35667 2 1 3 4 5 11 12 19 20 23 21 22 24 26 27 30 28 29 25 10 9 8 7 6 17 15 16 13 14 18 18...

Page 19: ...4 15 00346R0011 Cable gland gasket X X 1 30 7012106000 Nut DIN 934 A2 M 6 X X 4 FRAN AIS N CODE DESCRIPTION 21627 35667 Q N CODE DESCRIPTION 21627 35667 Q 1 21626R0002 Anneau enjoliveur X X 1 16 21626...

Page 20: ...4 15 00346R0011 Junta prensaestopas X X 1 30 7012106000 Tuerca DIN 934 A2 M 6 X X 4 ITALIANO N CODICE DESCRIZIONE 21627 35667 Q N CODICE DESCRIZIONE 21627 35667 Q 1 21626R0002 Anello ornamentale X X 1...

Page 21: ...DIN 125 A2 M 6 X X 4 15 00346R0011 Quetschverschraubungsdichtun X X 1 30 7012106000 Mutter DIN 934 A2 M 6 X X 4 PORTUGU S N CODE DESCRIPTION 21627 35667 Q N CODE DESCRIPTION 21627 35667 Q 1 21626R000...

Page 22: ...Fig 1 21626 35666 21626 35667 Fig 2 80 80 25 Fig 3 Fig 4 22...

Page 23: ...Fig 5 Fig 6 Fig 7 Fig 8 Fig 9 Fig 10 23...

Page 24: ...E SE NON IMMERSO IN ACQUA UNTERWASSER SHEINWERFER NUR UNTER WASSER GETAUCHT ANZUMACHEN N O ACENDER NUNCA O PROJECTOR SE N O ESTIVER SUBMERGIDO NA GUA Made in EC Sacopa S A U Pol Ind Poliger Sud Sector...

Reviews: