background image

ENGLISH 


IMPORTANT: The instruction manual you are holding includes essential information on the safety measures to be implemented 
for installation and start-up. Therefore, the installer as well as the user must read the instructions before beginning installation 
and start-up. 
Keep this manual for future reference. 

To achieve optimum performance of the Standard Floodlamp follow the instructions provided below: 


1.   VERIFY THE CONTENTS OF THE PACKING: 

 
The following accessories are included inside the box: 
 

Housing body 
2 watertight joints 
Clamp 
Floodlamp unit 
Bag of screws:    2 DIN 7981 A2 4,8x16 screws 

16 DIN 7982 A2 5,5x25 screws 
16 DIN 966 A2 M-6x24 screws (1) 
8 DIN 7982 A2 M-4,8x25 screws 

(1) For floodlamps with metric pitch housing 

2. GENERAL CHARACTERISTICS: 

 
This floodlamp has been designed to be used fully submerged underwater in fresh water swimming pools. It is a Class 
III electric apparatus with very low safety voltage (12V with alternating current). 
The floodlamp compiles with IPX8 degree of protection (resistance to penetration of dust, solid bodies and humidity) 
at a nominal immersion depth of 2 m. 
This floodlamp compiles with international safety standards for lights, especially the EN 60598-2-18 standard. 
LIGHTS PART 2: SPECIFIC REQUIREMENTS SECTION 18 LIGHTS FOR SWIMMING POOLS AND SIMILAR 
APPLICATIONS. 
The manufacturer is not responsible in any circumstances for assembly, installation or start-up of any electric 
components which have been inserted or handied at locations other than its own premises. 
 

3. INSTALLATION: 


• 

Never install the lamp facing downwards, 

• 

In order to clearly light a pool it is recommended lo install a 300W floodlamp every 25 or 35 m² of water surface. 
In swimming pools which are especially deep, a 300 W floodlamp is required for every 30 or 40 m³ of water 
volume. 

• 

In order to prevent glare, the floodlamps should be installed so that they face away from the residence or usual 
view of the swimming pool. 

• 

In the event that lighting is used in training or competition pools, the floodlamps should be installed on the sides 
to prevent glare on the swimmers. 

• 

To avoid the need to empty the pool to change the lamp, we recommend that the floodlamp be installed in areas 
which are accessible from the upper edge of the pool. 

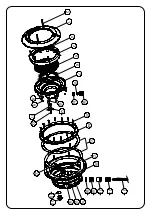
Prior to installation verify that the gland seal (no. 16) has been fully tightened. 
The floodlamp should be placed on the wall of the pool at approximately 400-700 mm from the water surface (Fig. 
1). 
 
To place a projector in a prefabricated swimming pool, which can be either metal plate or plastic, make a circular 
hole measuring 276 mm. in diameter and 8 holes measuring 4.5 mm. (Fig. 2) 
 
Place the recess (no. 17) through the inside part of the swimming pool and bolt the 8 DIN 7982 4.8x25 screws (no. 
28) (Fig. 3).  Make sure that the cable comes out of the recess through the upper part. 
Stick one of the adhesive seals (no. 23) on the inside of the pool and then place the liner. 
Place the other adhesive seal and then the flange (no. 24) inside the pool.  Fasten the flange (no. 24) in the recess 
(no. 17) with 16 DIN 7982 5.5x25 screws (no. 25), 16 DIN 966 M-6x24 screws (no. 25). 
 
Cut the Liner remaining inside the flange so that the recess is clear and then assemble the projector. 

Summary of Contents for 23672

Page 1: ...O SUBACQUEO UNTERWASSER SCHEINWERFER FARO SUBACQUEO INSTALLATION AND MAINTENANCE MANUAL MANUEL D INSTALLATION ET D ENTRETIEN MANUAL DE INSTALACI N Y MANTENIMIENTO MANUALE DI INSTALAZIONE E MANUTENZION...

Page 2: ...n its own premises 3 INSTALLATION Never install the lamp facing downwards In order to clearly light a pool it is recommended lo install a 300W floodlamp every 25 or 35 m of water surface In swimming p...

Page 3: ...assembly taking special care to Connect the cable terminals to the lamp using the 2 screws supplied with the lamp Fig 10 Fully centre the 110x11 O ring no 6 in its seat Firmly tighten the nuts Attenti...

Page 4: ...rajout de composants lectriques qui ne se seraient pas produits chez lui 3 INSTALLATION Ne jam is installer la lampe orient e vers le bas Pour assurer un bon clairage une piscine il est recommand d i...

Page 5: ...s 2 vis fourmes avec la lampe Fig 10 Placer le joint torique 110x11 num 6 bien centr dans son logement Bien serrer tous les crous Attention Avant toute manipulation s assurer que le projecteur N EST P...

Page 6: ...raci n de componentes el ctricos que no se hayan llevado a cabo en sus instalaciones 3 INSTALACI N No instalar nunca con la l mpara hacia abajo Para iluminar claramente una piscina se recomienda insta...

Page 7: ...trados con la l mpara Fig 10 Poner la Junta t rica 110x11 n 6 bien centrada en su alojamiento Apretar bien todas las tuercas Atenci n Antes de cualquier manipulaci n asegurarse que el proyector NO rec...

Page 8: ...ati o introdotti al di fuori dei suoi stabilimenti 3 INSTALLAZIONE Non installare mal con la lampada verso il basso Per ben iIluminare una piscina si raccomanda d installare un proiettore da 300W per...

Page 9: ...mpada usando le due viti fornite con la lampada Fig 10 Metiere a guarnizione tonca 110x11 n 6 ben centrata nel suo allogglamento Stnngere bene tutti i dadi Attenzione Prima di qualsiasi manipolazione...

Page 10: ...gendeine Art Handhabung oder Einbau von Elektrokomponenten nicht in seinem Betrieb durchgef hrt worden sind 3 INSTALLATION Der Strahler darf nie in vertikaler Lage mit der Lampe nach unten weisend Ins...

Page 11: ...angeschlossen wof r die beiden mit der Lampe mitgelieferten Schrauben zu verwenden sind Abb 10 Die Rundringdichtung 110x11 Nr 6 mu gut zentriert in ihre Aufnahme gelegt werden Die Schrauben m ssen gut...

Page 12: ...or qualquer manipula o ou incorpora o de componentes el ctricos que n o tenham sido realizadas as suas instala oes 3 INSTALA O N o instalar nunca com a l mpada para baixo Para iluminar claramente uma...

Page 13: ...10 Colocar a Junta t rica 110x11 n 6 bem centralizada no seu alojamento Apertar bem todas as porcas Aten o Antes de qualquer manipula o assegure se de que o projector N O recebe tens o A l mpada nova...

Page 14: ...21 27 26 19 18 16 14 15 1 2 4 3 5 6 7 25 24 23 17 28 20 18 9 8 12 10 13 11 22 16 15 14...

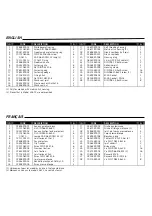
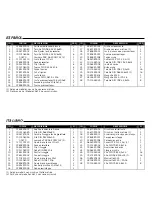
Page 15: ...models with metric pitch housing 2 Pieces that in Model 23672 are not provided FRAN AIS ID CODE DESCRIPTION Q ID CODE DESCRIPTION Q 1 07838R0001 Anneau enjoliver blanc 1 17 23670R0002 Niche autovissa...

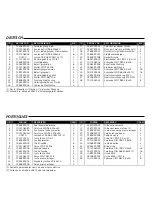
Page 16: ...opas 2 1 Solo para modelos con nicho con rosca m trica 2 Piezas que en el Modelo 23672 no se suministran ITALIANO ID CODICE DESCRIZIONE Q ID CODICE DESCRIZIONE Q 1 07838R0001 Anello ornamentale bianco...

Page 17: ...astik 2 16 07838R0005 Schraube Stopfbuchse 2 1 Nur f r Modelle mit Nische mit metrischer Windung 2 St cke die in Modell 23672 nicht vorausgesetzt werden PORTUGUES ID CODIGO DESCRI O CAN ID CODIGO DESC...

Page 18: ......

Page 19: ......
Page 20: ...R NUNCA EL PROYECTOR SI NO ESTA SUMERGIDO EN AGUA NON ACCENDERE MAI IL PROIETTORE SE NON IMMERSO IN ACQUA UNTERWASSER SHEINWERFER NUR UNTER WASSER GETAUCHT ANZUMACHEN NAO ACENDER NUNCA O PROECTOR SE N...

Reviews: