background image

5

QB800 robotic cleaner   

Owner’s Manual

4

QB800 robotic cleaner   

Owner’s Manual

Section 1.  Important Safety Instructions

READ AND FOLLOW ALL INSTRUCTIONS


Congratulations on purchasing the AstralPool Robotic Cleaner. Please read through the entire manual before 

installing your new robotic pool cleaner. Your cleaner must be installed and operated as specified.


WARNING

Failure to comply with the following warnings can increase risk of fire or electrocution which can result 

in property damage and serious injury, including loss of life.
PREVENT ELECTRICAL SHOCK
To reduce risk of electrical shock:

•  The cleaner is to be installed in accordance with the relevant requirements of the Australian wiring rules AS/

NZS 3000. Also refer to the installation instructions relating to the swimming pool equipment for which the 

cleaner will be an integral part. The cleaner is to be supplied through a Residual Current Device (RCD) with a 

rated residual operating current of 30mA.

•  Do not enter pool while the robotic cleaner is in water.

•  Do not bury cord. Locate cord so as to prevent it from being damaged by lawn mowers, hedge trimmers and 

other equipment.

•  To reduce the risk of electrical shock, do not use the robotic cleaner or control unit if the cord is worn or dam-

aged. Contact AstraPool Consumer Care 1300 186 875  immediately for proper servicing and replacement of 

the damaged cord.

•  Double insulation—For continued protection against possible electric shock, use only identical replacement 

parts when servicing. Do not attempt repair of the robotic cleaner, control unit, power cord, or floating cable.

•  Use only the power supply provided with the product.

•  NEVER OPEN CONTROL UNIT.

•  DO NOT USE AN EXTENSION CORD TO CONNECT THE UNIT TO ELECTRIC SUPPLY; PROVIDE A PROPERLY 

LOCATED APPROVED ELECTRICAL OUTLET. THE CONTROL UNIT SHOULD BE PLACED NEAR THE APPROVED 

RECEPTACLE BOX.

PREVENT CHILD INJURY AND DROWNING

•  To reduce the risk of injury, do not permit children or persons with reduced physical, sensory or mental 

capabilities, or lack of experience and knowledge to operate this product.

•  Do not let anyone, especially small children, sit, step, lean, or climb on any equipment installed as part of your 

pool’s operational system. 

Summary of Contents for QB800

Page 1: ...qualified in pool equipment by the jurisdiction in which the product will be installed where such state or local requirements exist In the event no such state or local requirement exists the maintaine...

Page 2: ...2 QB800 robotic cleaner Owner s Manual...

Page 3: ...to a Power Source 8 Section 4 General Cleaner Operation 9 4 1 Install and Submerge the Cleaner 9 4 2 Cleaner Control Unit 10 4 3 Start Stop Cleaning 11 4 4 Elevate System 11 Section 5 Storage Mainten...

Page 4: ...o not bury cord Locate cord so as to prevent it from being damaged by lawn mowers hedge trimmers and other equipment To reduce the risk of electrical shock do not use the robotic cleaner or control un...

Page 5: ...face with a pool brush Ink from the pattern can also rub off during the installation process or when it comes into contact with objects in the pool AstralPool Group Australia Pty Ltd is not responsibl...

Page 6: ...omponents When unpacking the cleaner and its components Check to make sure each component is in the box Check cleaner and components for damage during transport If there are any missing parts or damag...

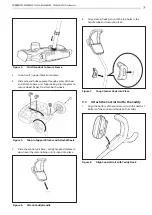
Page 7: ...in Support Blocks and Attach Wheels 7 Slide the control unit base caddy handle attachment down over the metal tubing until it snaps into place Figure 6 Attach Caddy Handle 8 Align cleaner hook pins w...

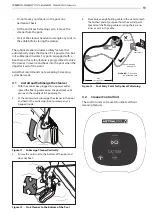
Page 8: ...t not water proof In order to prevent electrocution never submerge the control unit or leave exposed to inclement weather 1 Unscrew the protective cap for the floating cable from the side of the contr...

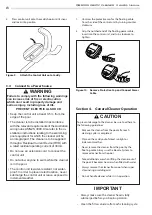
Page 9: ...plugged into a power outlet spread the floating cable across the pool deck until you reach the middle of the pool length 2 At the center point submerge the cleaner in the pool and hold in the vertical...

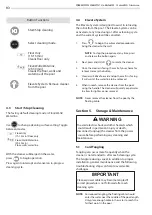
Page 10: ...release the button again 2 Next press and HOLD MODE SMART to rotate the cleaner 3 Once the cleaner is facing the wall of your choice for retrieval release the button 4 Cleaner will drive forward and u...

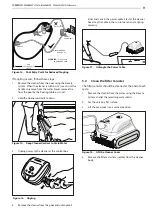
Page 11: ...ally to drain Figure 15 Keep Cleaner Vertical to Drain Water 3 Unplug power to the cleaner at the control box Figure 16 Unplug 4 Remove the cleaner from the pool and untangle all kinks and coils in th...

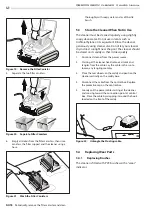
Page 12: ...er Do not let your cleaner dry in direct sunlight near the pool The cleaner should be stored on its caddy so that it dries quickly 1 Disconnect cleaner from the power source 2 Starting at the cleaner...

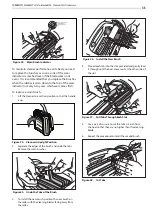
Page 13: ...vertical position so that the handle is up Figure 24 Cleaner in Upright Position 2 Separate the edges of the brush and undo the tabs Remove the worn brushes 2 Figure 25 Undo the Tabs of the Brush 3 T...

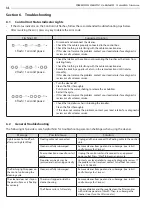
Page 14: ...t no debris or hair is blocking the impeller Clean the filter thoroughly If this does not resolve the problem contact your local retailer for a diagnostic review or call customer service 6 2 General T...

Page 15: ...0 186 875 The floating cable has excessive tangling Too much cable in the water Place only the required amount of cable into the water to allow it to reach the farthest end of your pool with remaining...

Page 16: ...warranty and complete your details Or scan the QR code to go directly to the registration page Record your equipment details here for quick reference Model No ____________________________________ Seri...

Reviews: